

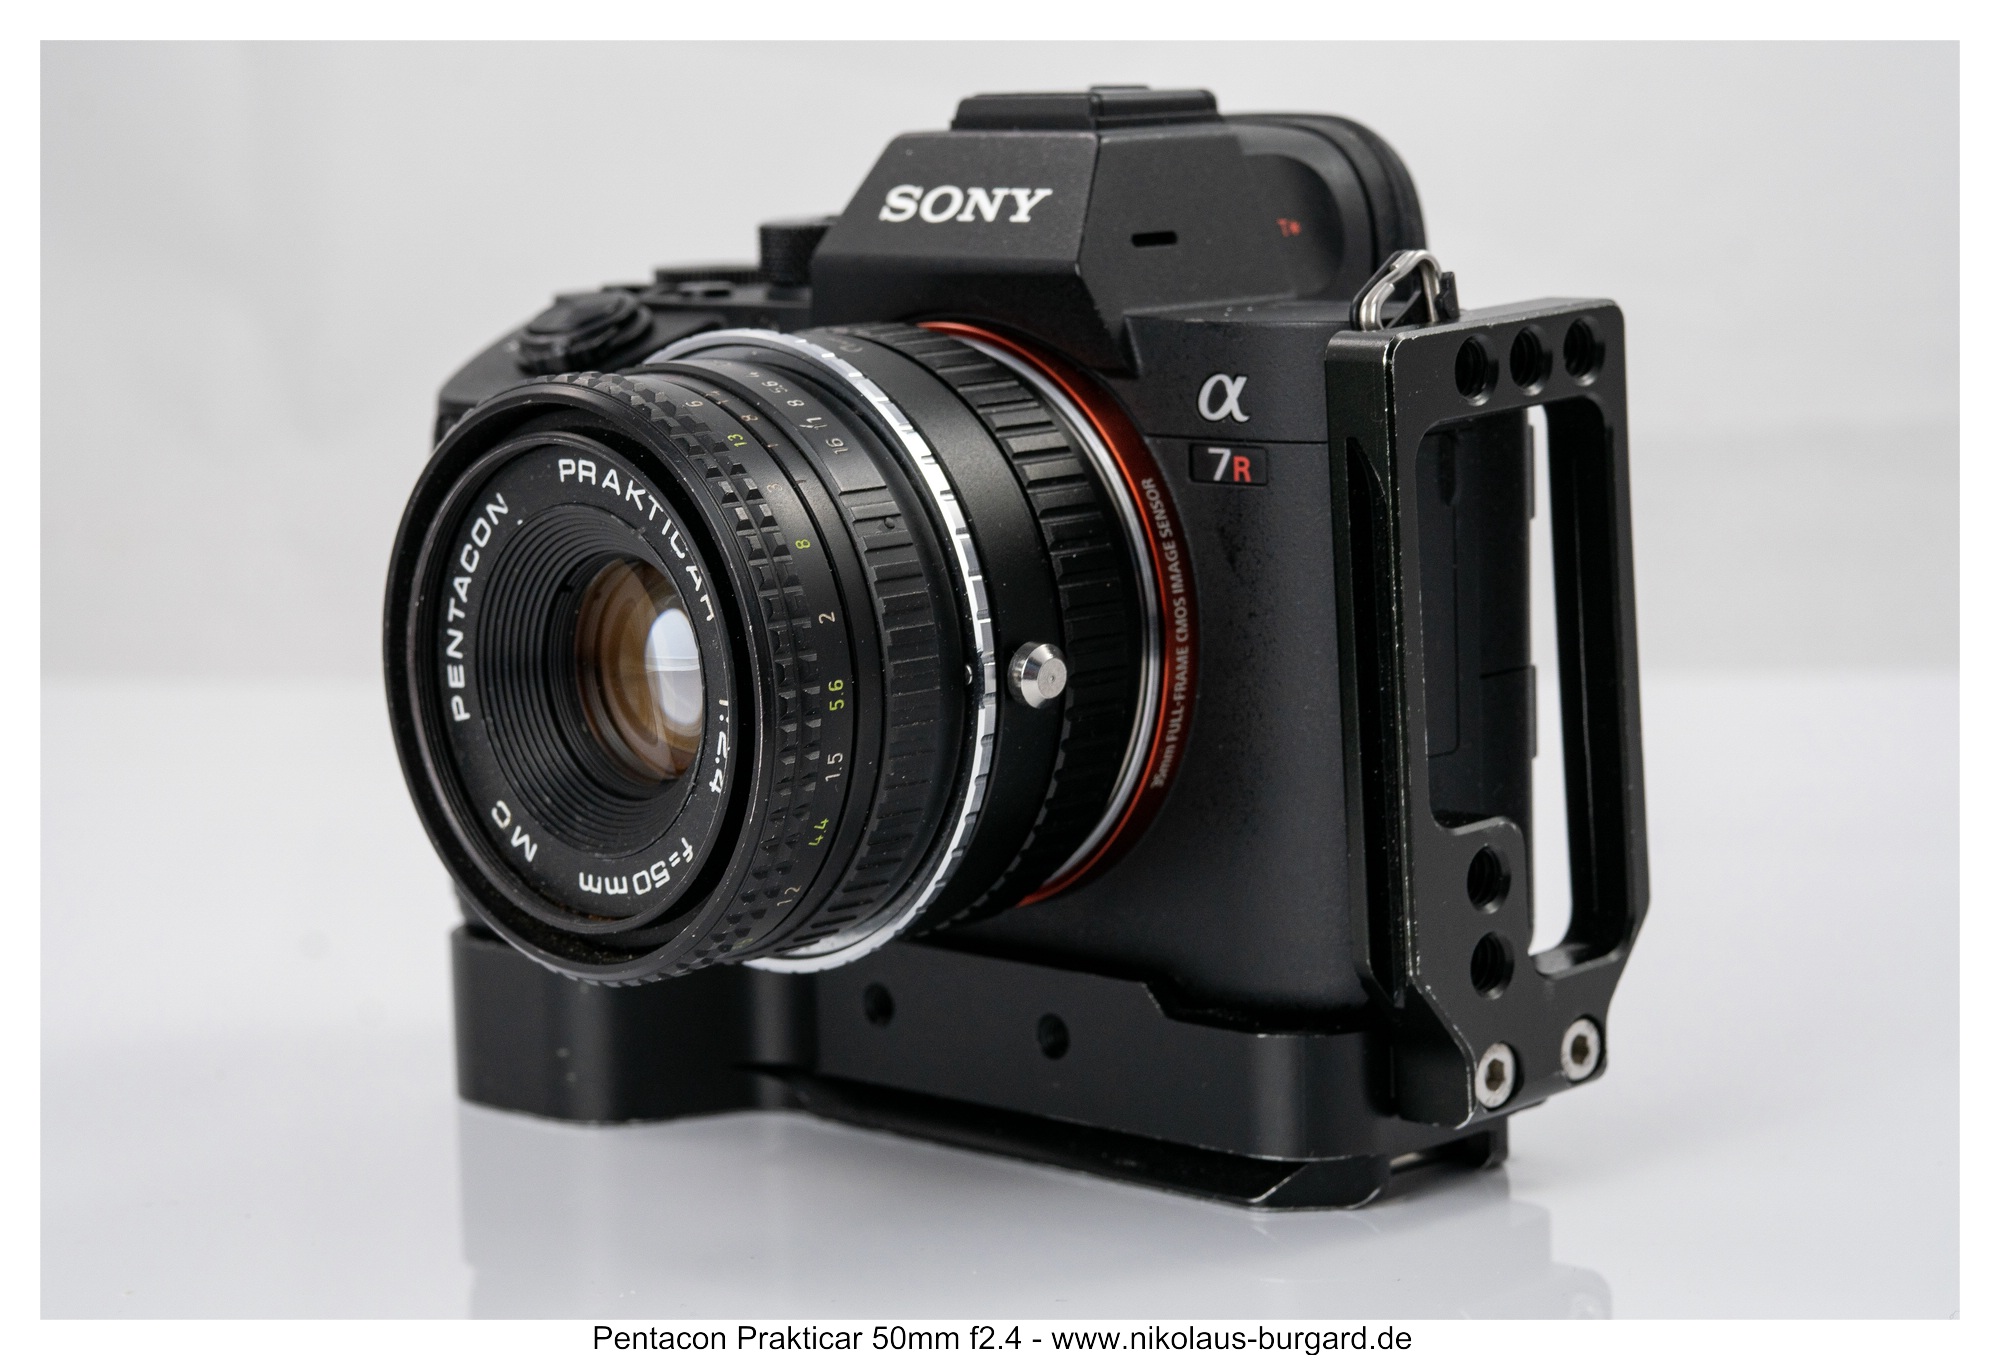
Pentacon Prakticar 50mm f2.4
Deutsche Version / English Version

Liebe Freunde der manuellen Objektive,
ich möchte euch ein Normalobjektiv für die Praktica B-Baureihe vorstellen.
Es handelt sich um die "Budget"-Variante, also das preisgünstige Einstiegsobjektiv.
Und trotzdem ist dies ein sehr interessantes Stück.
Jahrzehntelang waren die Tessar-Konstruktionen die lichtschwächeren Normalobjektive zu den deutschen Kleinbild-Kameras, und bei Lichtstärke f2.8 war die Konstruktion dieses Types ausgereizt.
Die Konstrukteure bei Meyer Optik in Görlitz (in dieser Zeit zum Kombinat Pentacon gehörend) wollten unter Beibehaltung der nur 4 Linsen nun eine Steigerung der Lichtstärke auf f2.4 bewerkstelligen, ohne bei der Bildqualität Abstriche machen zu müssen.
Dies gelang ihnen mit dem
Pentacon Prakticar 50mm f2.4 MC,
welches ich euch nun im Detail vorstellen möchte.
Wie ihr merkt, ist die Entstehungsgeschichte dieses Objektives sehr interessant. Wenn ihr dazu mehr erfahren wollt, kann ich euch die hervorragende Website www.zeissikonveb.de nur ans Herz legen -
und dort insbesondere die Seite zu diesem Objektiv:
Prakticar 50mm f2.4 auf www.zeissikonveb.de
Hier nun einige technische Daten zu diesem Objektiv:
Länge: 33mm (den Spitznamen "Pancake" trägt es zurecht!')
Gewicht: 160g
Optisches System: 4 Linsen in 4 Gruppen (Ernostar-Typ)
Blende: von f2.4 bis f16, mit Klicks, 6 Blendenlamellen
Filterdurchmesser: 49mm
Naheinstellgrenze: 60cm
Und so sieht das gute Stück in der letzten Bauform ("Ratio") aus (gefertigt wurde es übrigens ausschließlich in Rumänien bei IOR):
Dear friends of manual lenses,
I would like to introduce you to a standard lens for the Praktica B series.
It is the "budget" variant, i.e. the inexpensive entry-level lens.
And yet this is a very interesting piece.
For decades, the Tessar constructions were the weaker standard lenses for the German 35mm cameras, and the construction of this type was exhausted at a light intensity of f2.8.
The designers at Meyer Optik in Görlitz (at this time part of the Pentacon combine) wanted to increase the light intensity to f2.4 while retaining only 4 lenses, without having to make any compromises in image quality.
They succeeded with that
Pentacon Prakticar 50mm f2.4 MC,
which I would now like to present to you in detail.
As you can see, the history of this lens is very interesting. If you want to find out more about this, I can only recommend the excellent website www.zeissikonveb.de -
and there in particular the page for this lens:
Prakticar 50mm f2.4 at www.zeissikonveb.de
Here are some technical data for this lens:
Length: 33mm (it well deserves the nickname "Pancake"!')
Weight: 160g
Optical system: 4 lenses in 4 groups (Ernostar type)
Aperture: from f2.4 to f16, with clicks, 6 aperture blades
Front Filter: 49mm
Shortest focusing distance: 60cm
And this is what the good piece looks like in the last design ("Ratio") (by the way, it was manufactured exclusively in Romania at IOR):


Montiert an eine der Testkameras (hier die Sony Alpha 7RIII) ergibt sich eine sehr handliche Kombination. Durch den Adapter entfällt zwar der Pancake-Charakter wieder, trotzdem ist das Ensemble deutlich kompakter als mit vergleichbaren anderen Normalobjektiven.
Adaptieren kann man das Objektiv auf mehreren Wegen. Der Einfachste wäre ein direkter Adapter Praktica B (PB) auf Sony E-Mount (hier nicht im Bild).
Da mich die 60cm (!) Nahgrenze des Objektives massiv stören und einschränken, habe ich die Adaptionsvariante über: Dünner PB auf EOS-Ring (im Bild silbern), dann EOS auf Sony E-Mount HELICOID-(macro focusing-) Adapter gewählt. Dieser Adapter funktioniert wie ein variabler Zwischenring und ermöglicht sowohl Aufnahmen auf unendlich als auch eine deutliche Verringerung der Nahgrenze bis fast in den Makrobereich.
Mounted on one of the test cameras (here the Sony Alpha 7RIII), the result is a very handy combination. Although the adapter eliminates the pancake character, the ensemble is still significantly more compact than with other comparable normal lenses.
The lens can be adapted in several ways. The simplest would be a direct adapter Praktica B (PB) to Sony E-Mount (not shown here).
Since the 60cm (!) close-up limit of the lens massively bothers and limits me, I chose this adaptation variant: Thin PB on EOS-ring (silver in the picture), then EOS to Sony E-Mount HELICOID-(macro focusing-) adapter. This adapter works like a variable extension ring and enables both infinity recordings and a significant reduction in the close-up limit almost to the macro range.


Das Prakticar ist von der Verarbeitung her schon auf der einfachen Seite.
Günstige Kunststoffassung,
und auch der Fokusring läuft bei meinem Exemplar nicht mehr ganz "rund".
The Praktikar is already on the simple side in terms of manufacturing:
cheap plastic frame,
and the focus ring on my copy is really "wobbly".
Bildschärfe / Sharpness
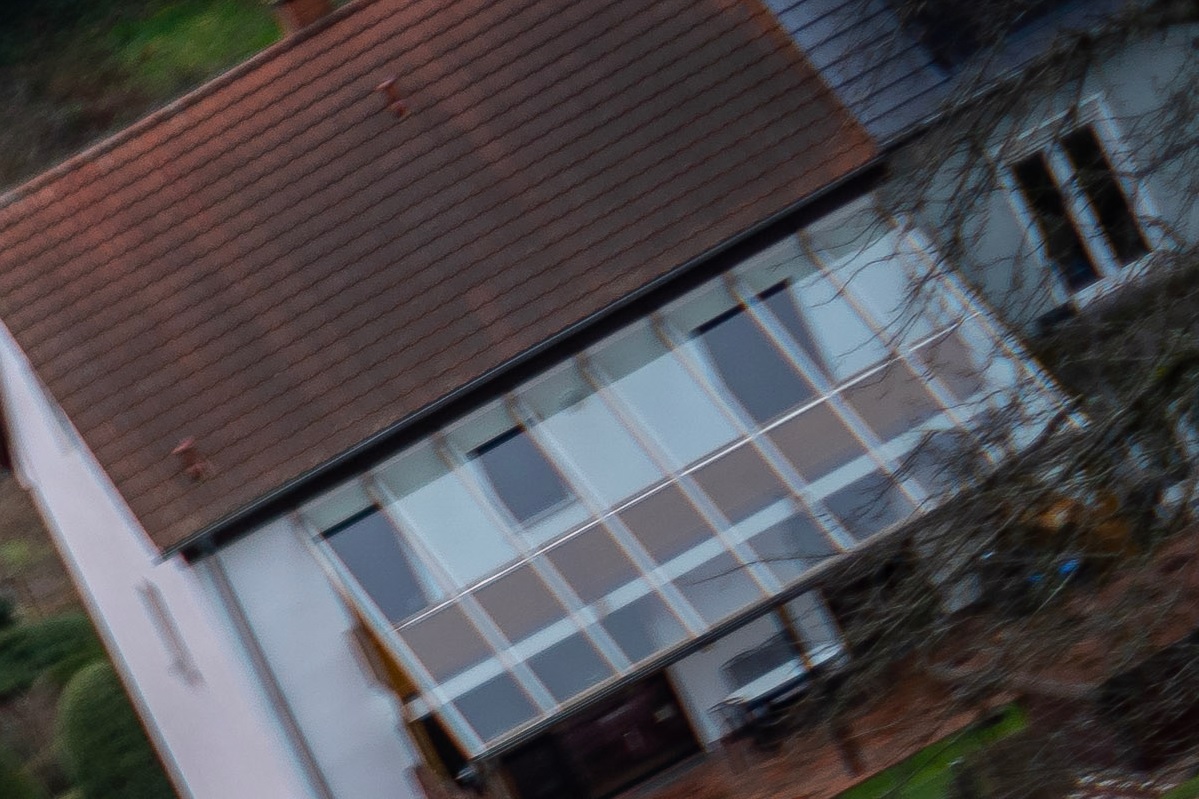
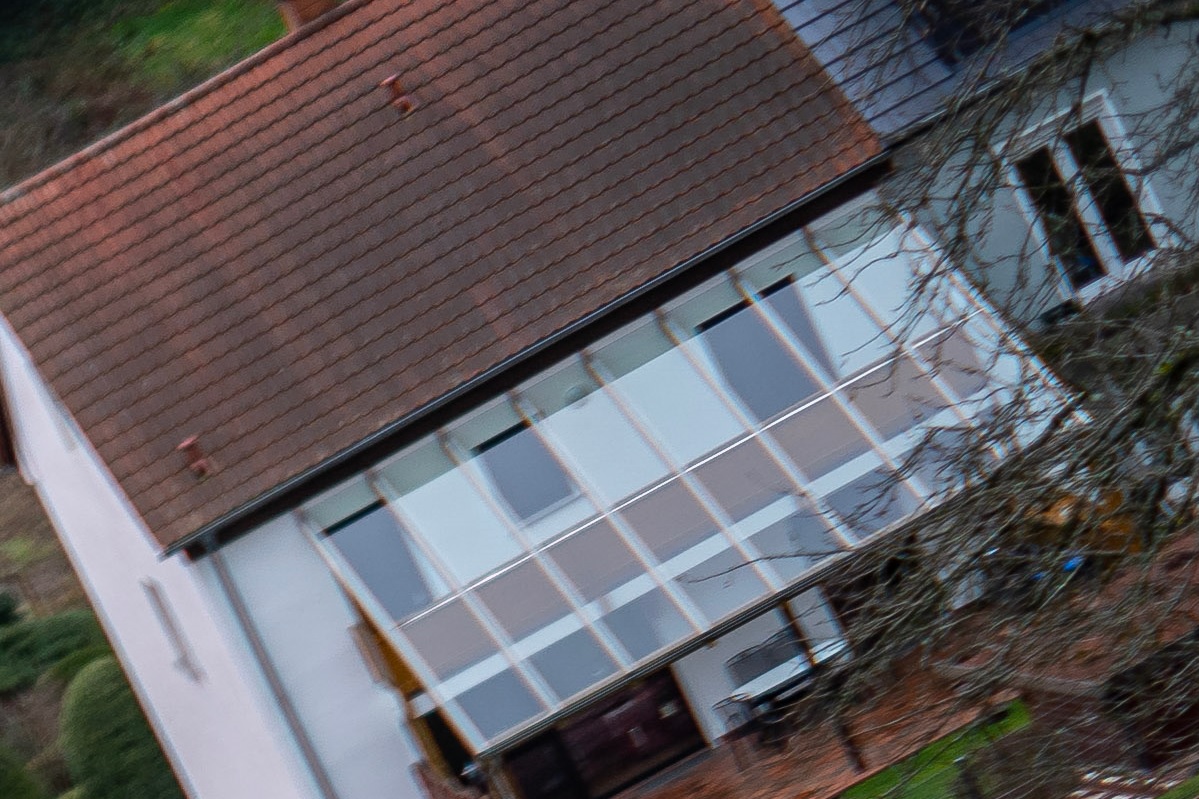
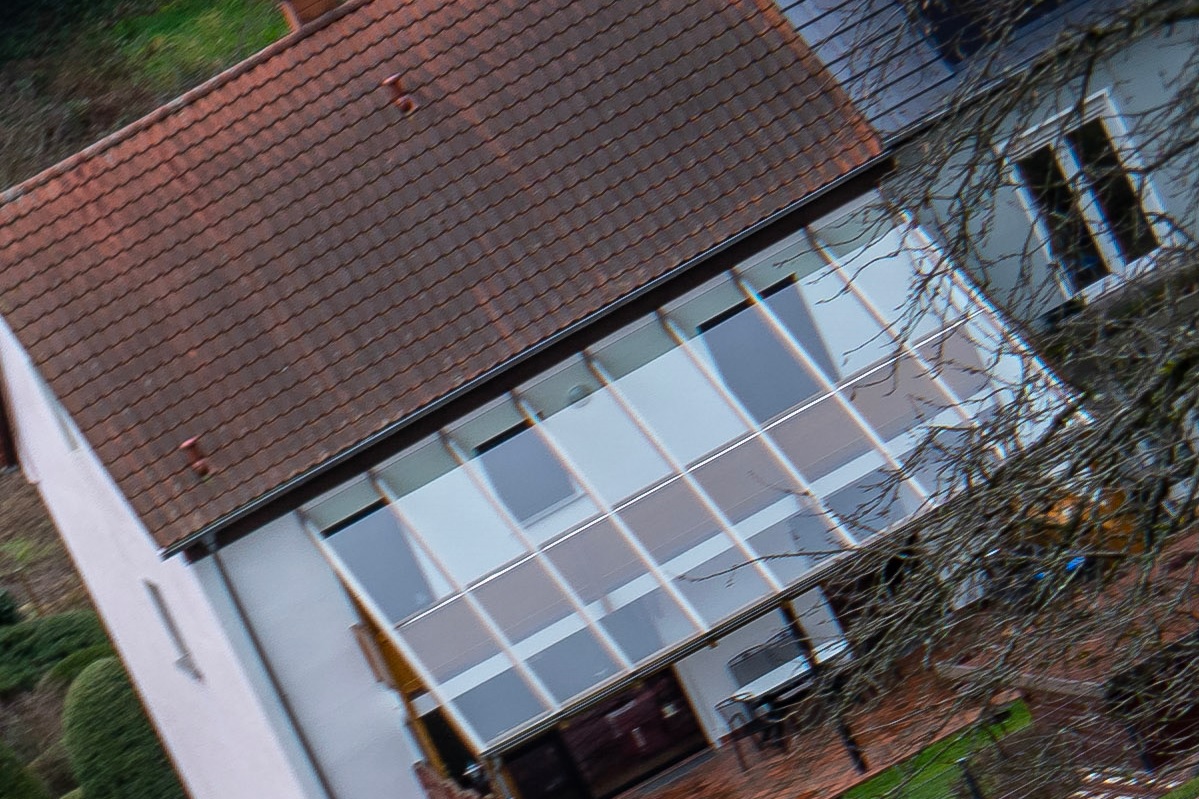
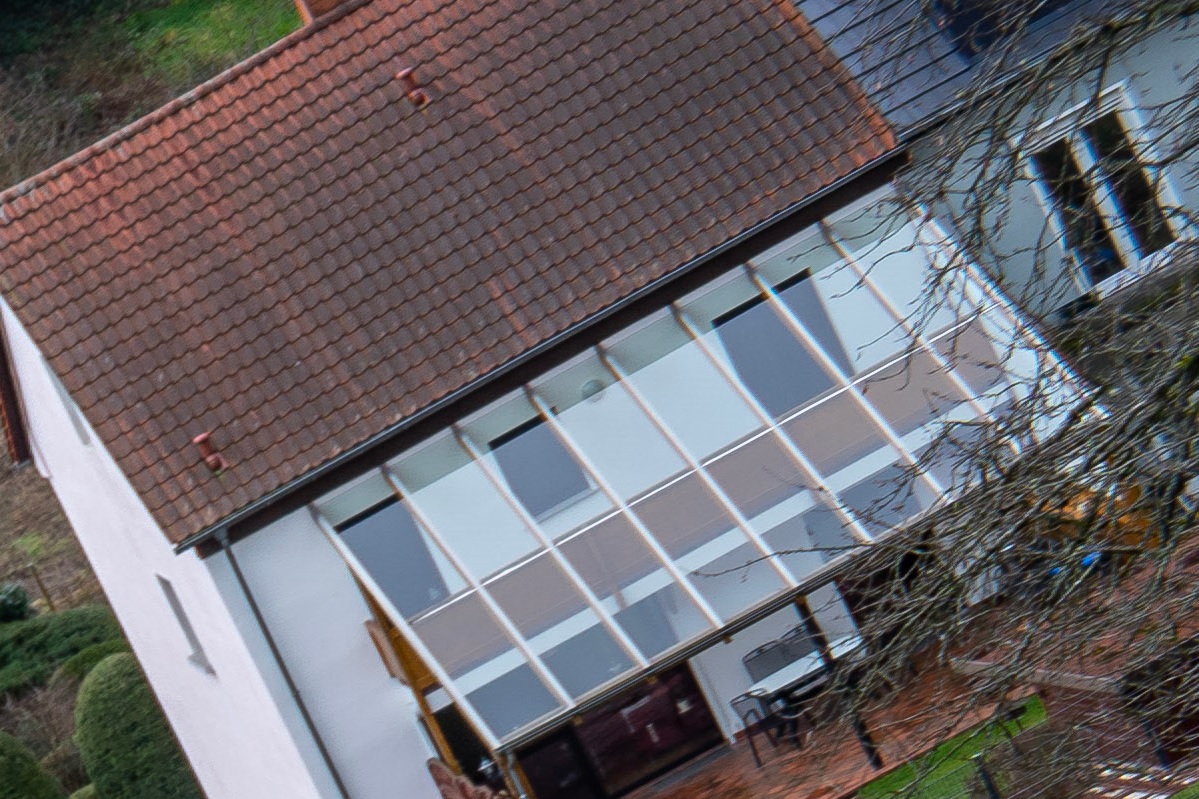
Ich habe mit der Sony Alpha 7RIII (42MP) eine Bildreihe zur Bewertung der Schärfe für euch angefertigt, bei der sowohl das Bildzentrum als auch die Bildecke in einer Schärfeebene liegen.
Fokuspunkt war die Markise des Hauses links der nach oben führenden Straße. Das Haus in der rechten oberen Bildecke liegt in der gleichen Fokusebene.
I used the Sony Alpha 7RIII (42MP) to create a series of images for you to evaluate the sharpness, in which both the center of the image and the corner of the image are in one sharpness plane.
The focal point was the awning of the house to the left of the street leading up. The house in the upper right corner of the picture is in the same focal plane.


In den Gesamtbildern sieht man schön die deutliche Vignettierung bei f2.4.
Bei f4 ist diese schon sichtbar gemildert und ab f5.6 komplett vernachlässigbar.
Zur genauen Schärfebeurteilung habe ich 100%-Vergrößerungen vom Fokuspunkt in der Bildmitte (der Markise des Hauses) angefertigt:
In the overall images you can see the strong vignetting at f2.4.
At f4 this is already visibly reduced and from f5.6 it is completely negligible.
For a precise sharpness assessment, I made 100% enlargements of the focal point in the center of the picture (the awning of the house):


Wir starten in der Bildmitte bereits bei Offenblende f2.4 schärfetechnisch auf einem sehr guten Niveau, allerdings gibt es einen sanften Glow aufgrund der sphärischen Aberration und die Kontraste sind noch nicht voll da.
Von f4 an ist die Schärfe ausgezeichnet, auch der Glow ist verschwunden - die Kontraste brauchen ebenfalls f4 um ihr Maximum zu erreichen
Bei f11 ist der Schärfeeindruck beugungsbedingt wieder leicht schwächer.
Auch aus den Bildecken habe ich 100%-Vergrößerungen angefertigt:
We start in the center of the image with an open aperture of f2.4, in terms of sharpness at a very good level, but there is a gentle glow due to the spherical aberration and the contrasts are not yet fully there.
From f4 onwards, the sharpness is excellent, and the glow has also disappeared - the contrasts also need f4 to reach their maximum
At f11, the impression of sharpness is slightly weaker again due to diffraction.
I also made 100% enlargements from the corners of the picture:


Wir starten in der Bildecke bei f2.4 auf schwachem Schärfeniveau, die sphärische Aberration ist in der Ecke als sehr deutlicher Schleier wahrnehmbar - und die Ecke ist durch die Vignettierung deutlich abgedunkelt.
f4 wird im Vergleich dazu eigentlich nur minimal besser und vor allem heller, die Vignette wird deutlich schwächer.
Bei f5.6 steigert sich die Schärfe schon auf "man kann etwas erkennen" und die sphärische Aberration verschwindet komplett,
bei f8 und f11 haben wir ein knapp gutes Schärfeniveau erreicht.
Deutlich sichtbar sind bei allen Blendenstufen die lateralen chromatischen Aberrationen.
Das Prakticar 50mm f2.4 zeigt auf weite Distanz eine durchwachsene Schärfeleistung.
Während die Bildmitte schon ab Offenblende sehr gutes Niveau erreicht,
werden die Ecken nur weit abgeblendet gut.
We start in the corner of the image at f2.4 on a weak level of sharpness, the spherical aberration is perceptible as a very clear veil in the corner - and the corner is clearly darkened by the vignetting.
In comparison, f4 is actually only slightly better and, above all, brighter, the vignette is significantly weaker.
At f5.6 the sharpness already increases to "you can see something" and the spherical aberration disappears completely,
at f8 and f11 we achieved a just about good level of sharpness.
The lateral chromatic aberrations are clearly visible at all f-stops.
The Prakticar 50mm f2.4 shows mixed sharpness at long distances.
While the center of the image achieves a very good level from an open aperture,
the corners are only good when stopped down far.
Alle folgenden Bilder des Tests sind mit der Sony Alpha 7III (24MP) entstanden! / All of the following pictures of the test were taken with the Sony Alpha 7III (24MP)!
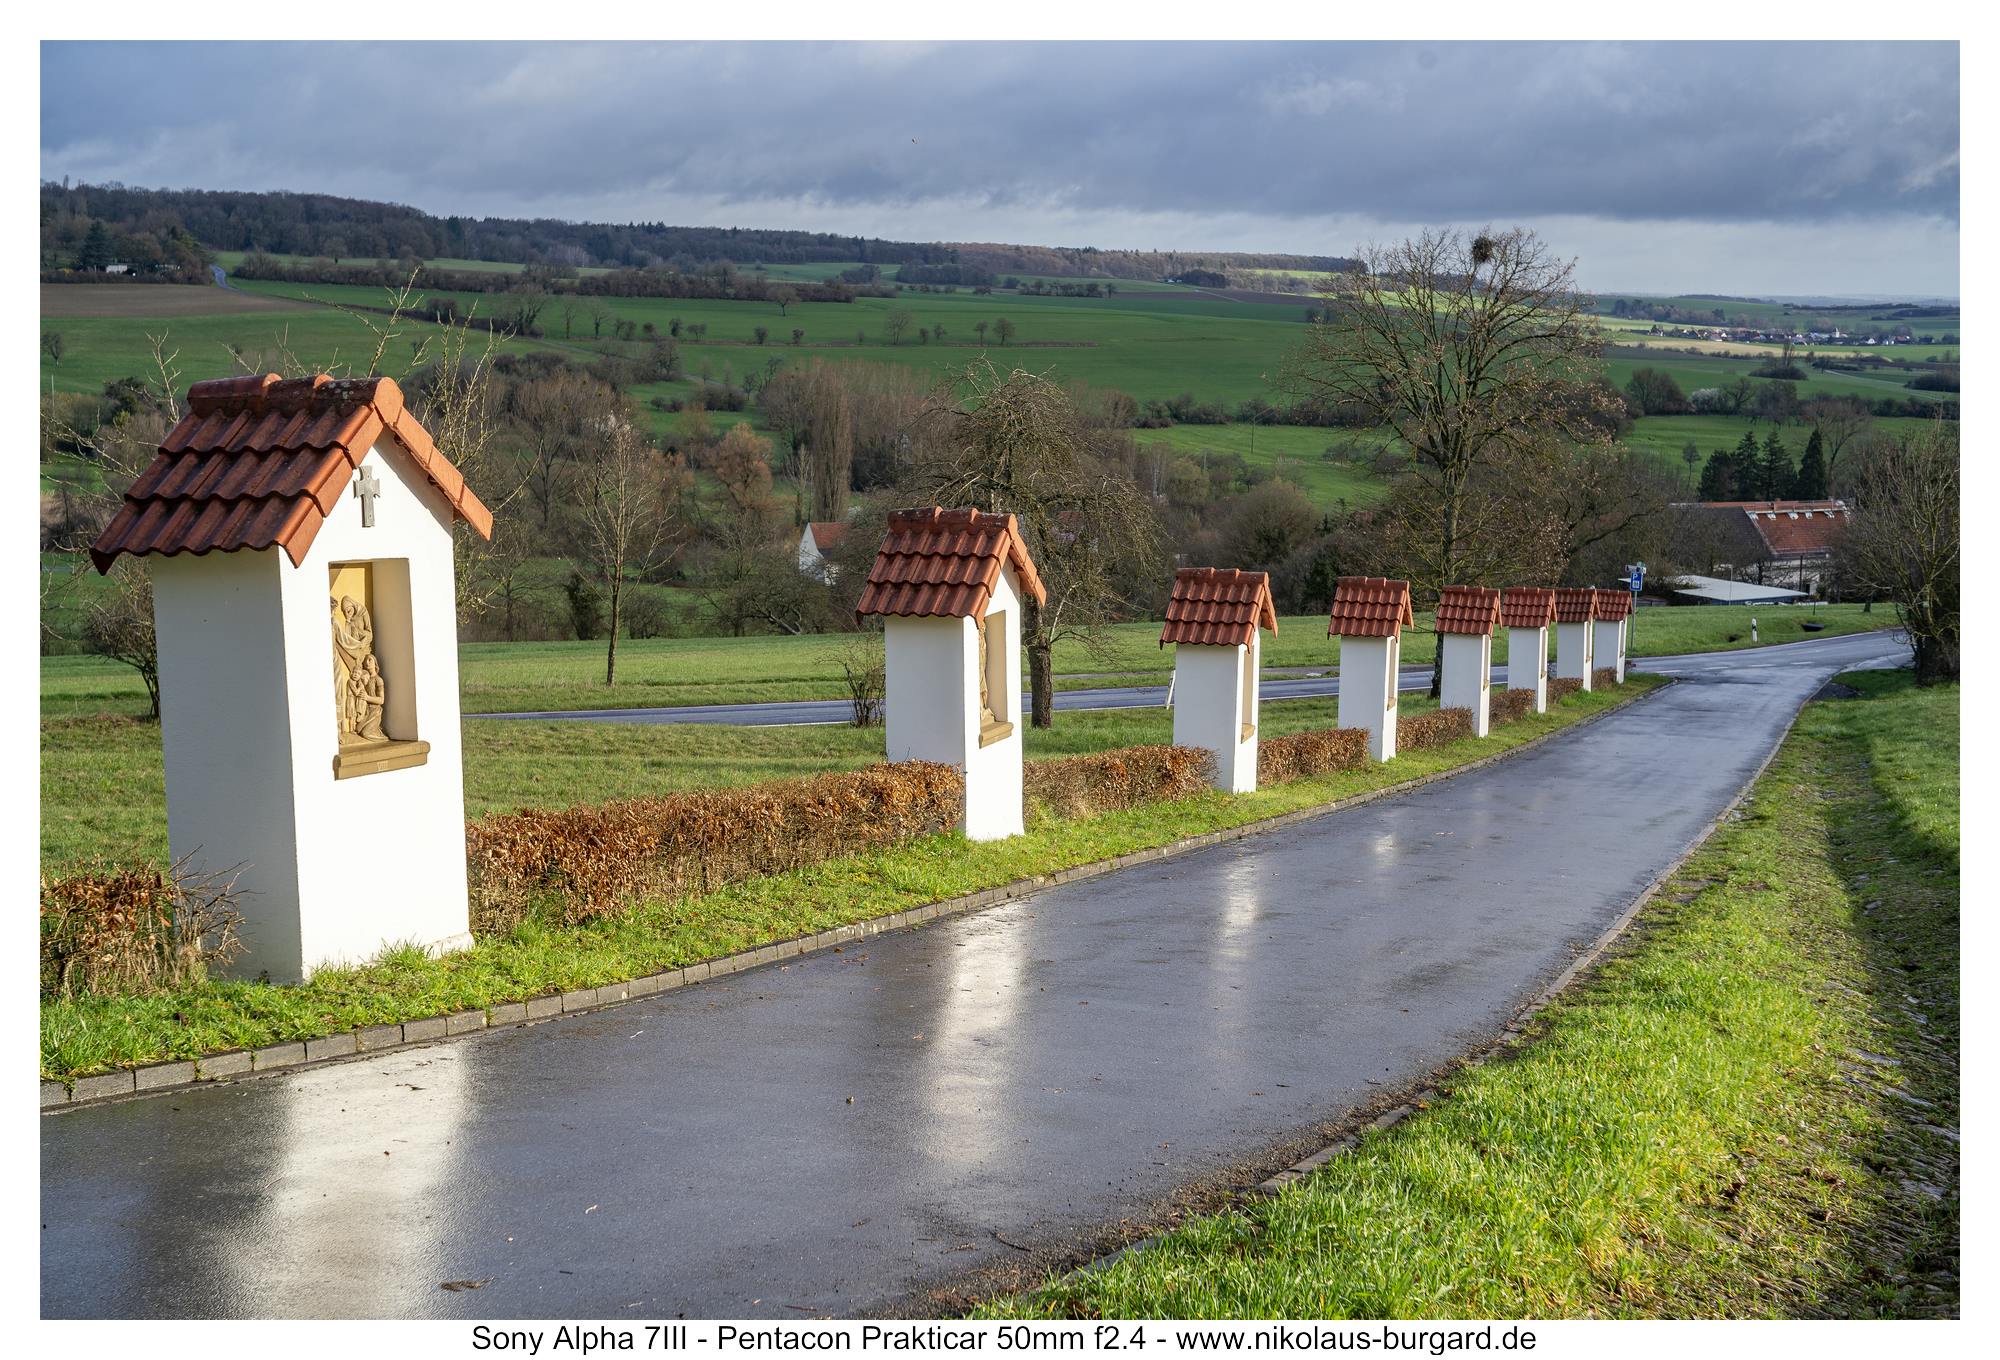
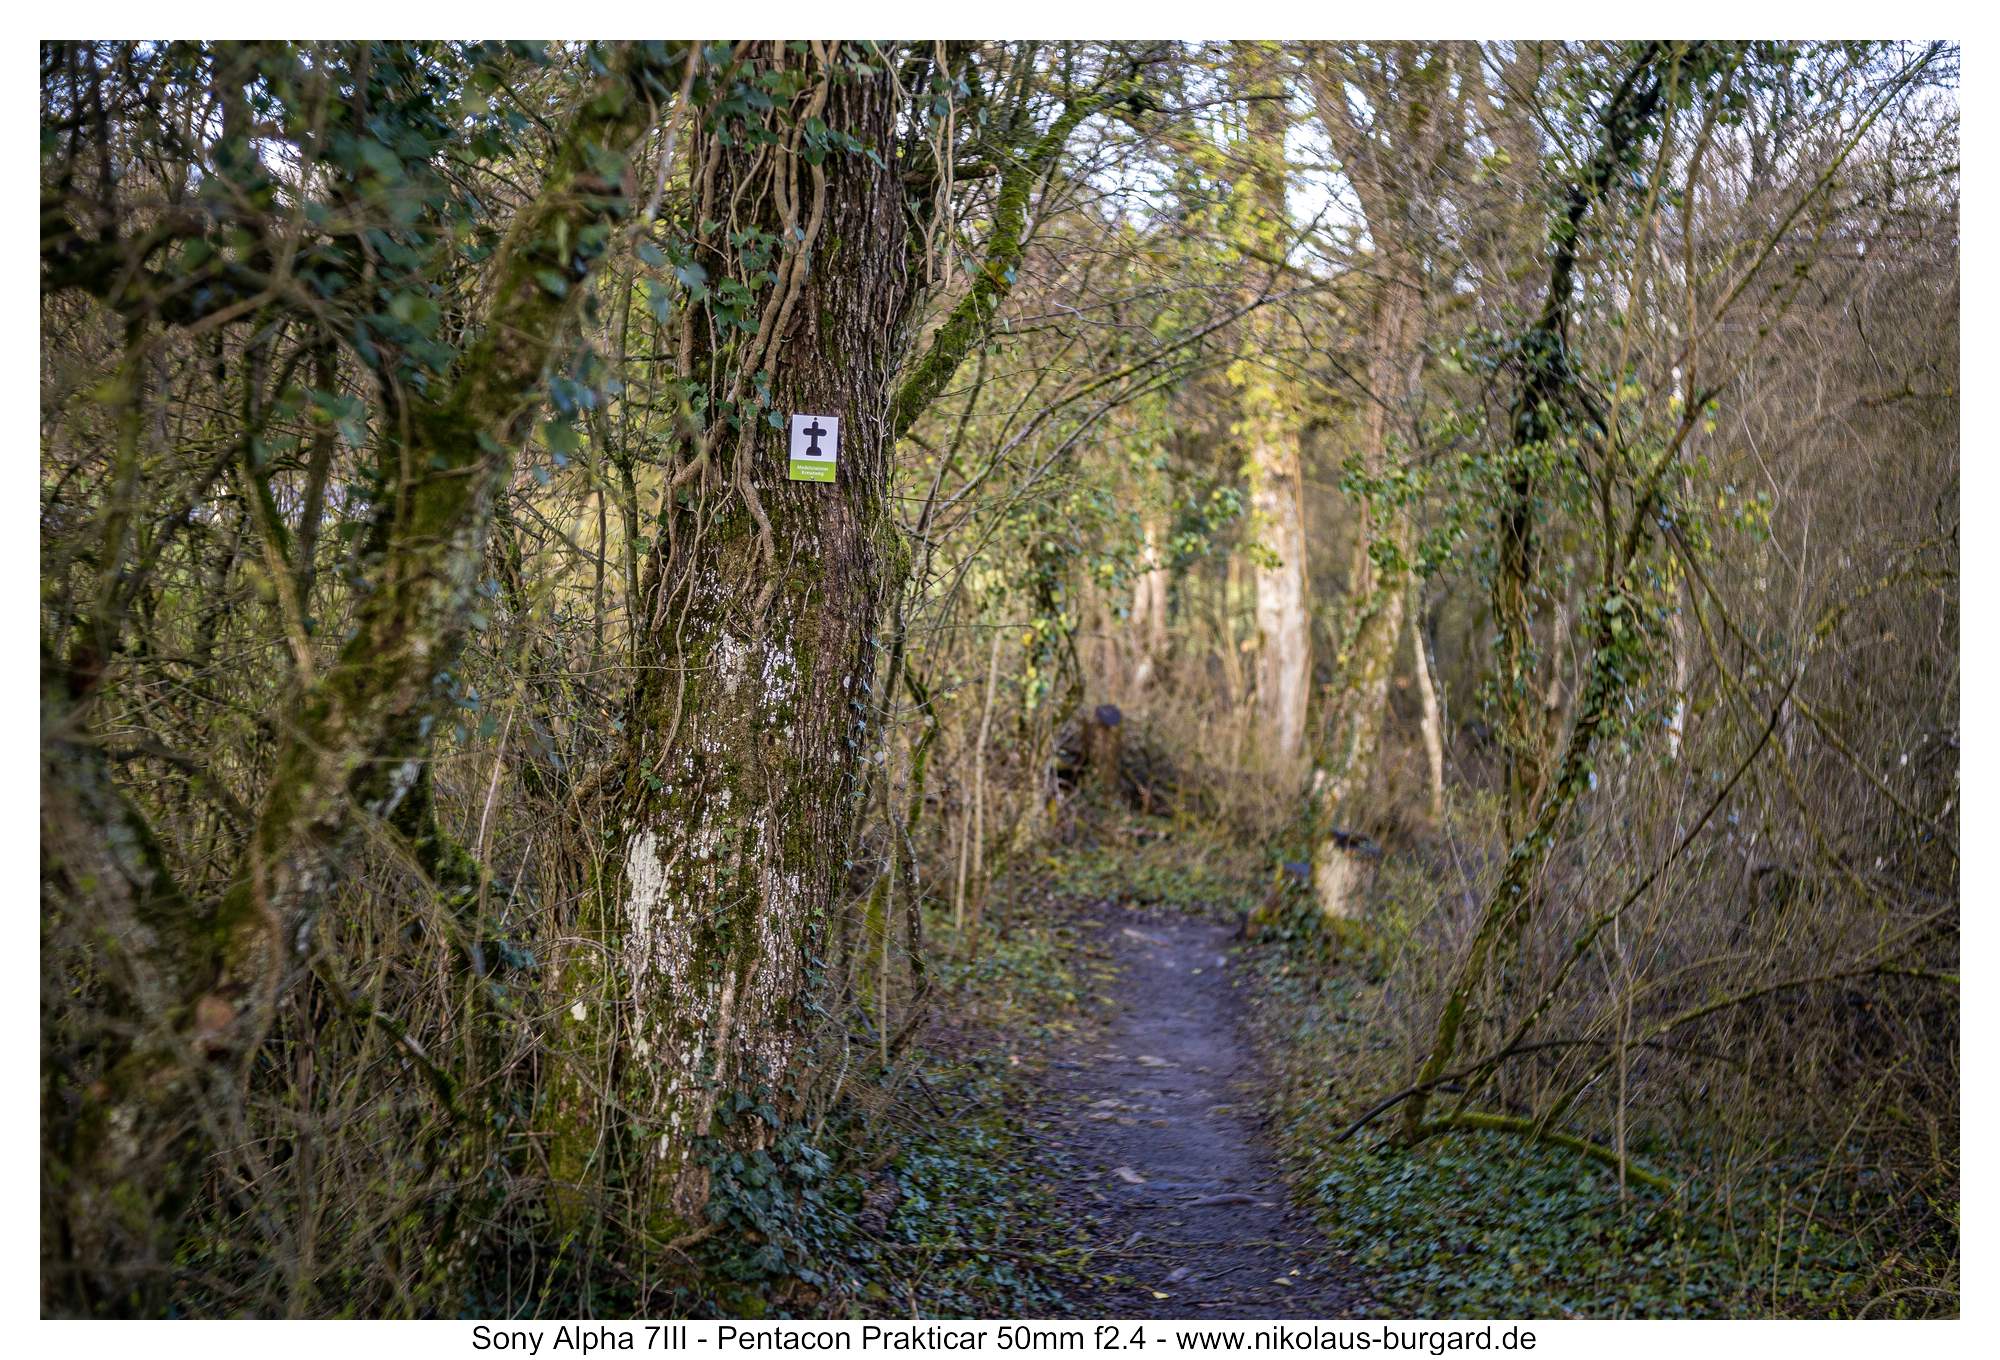
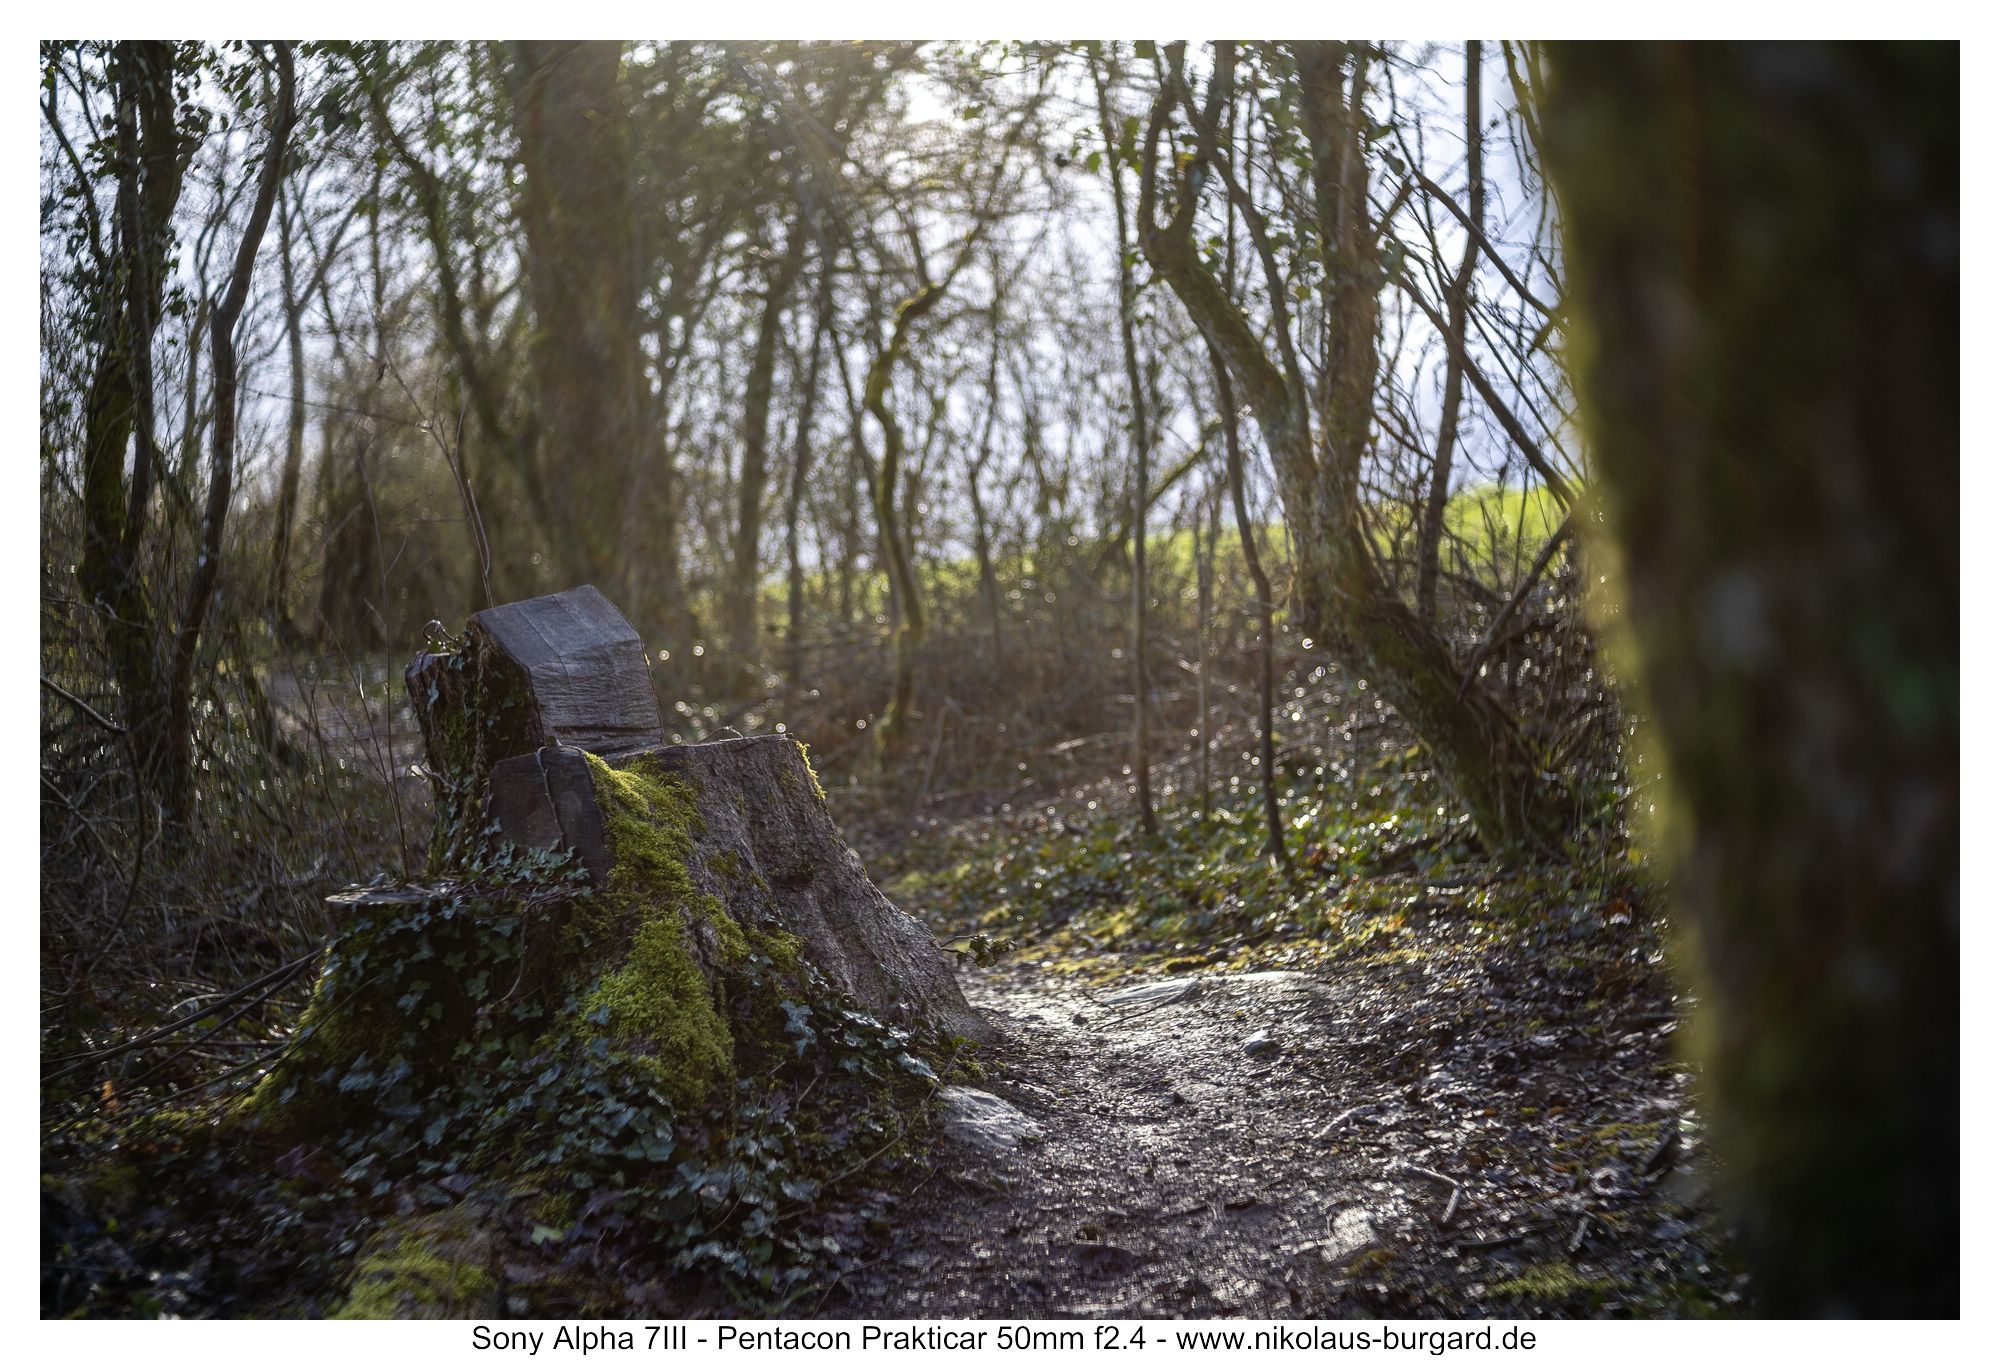
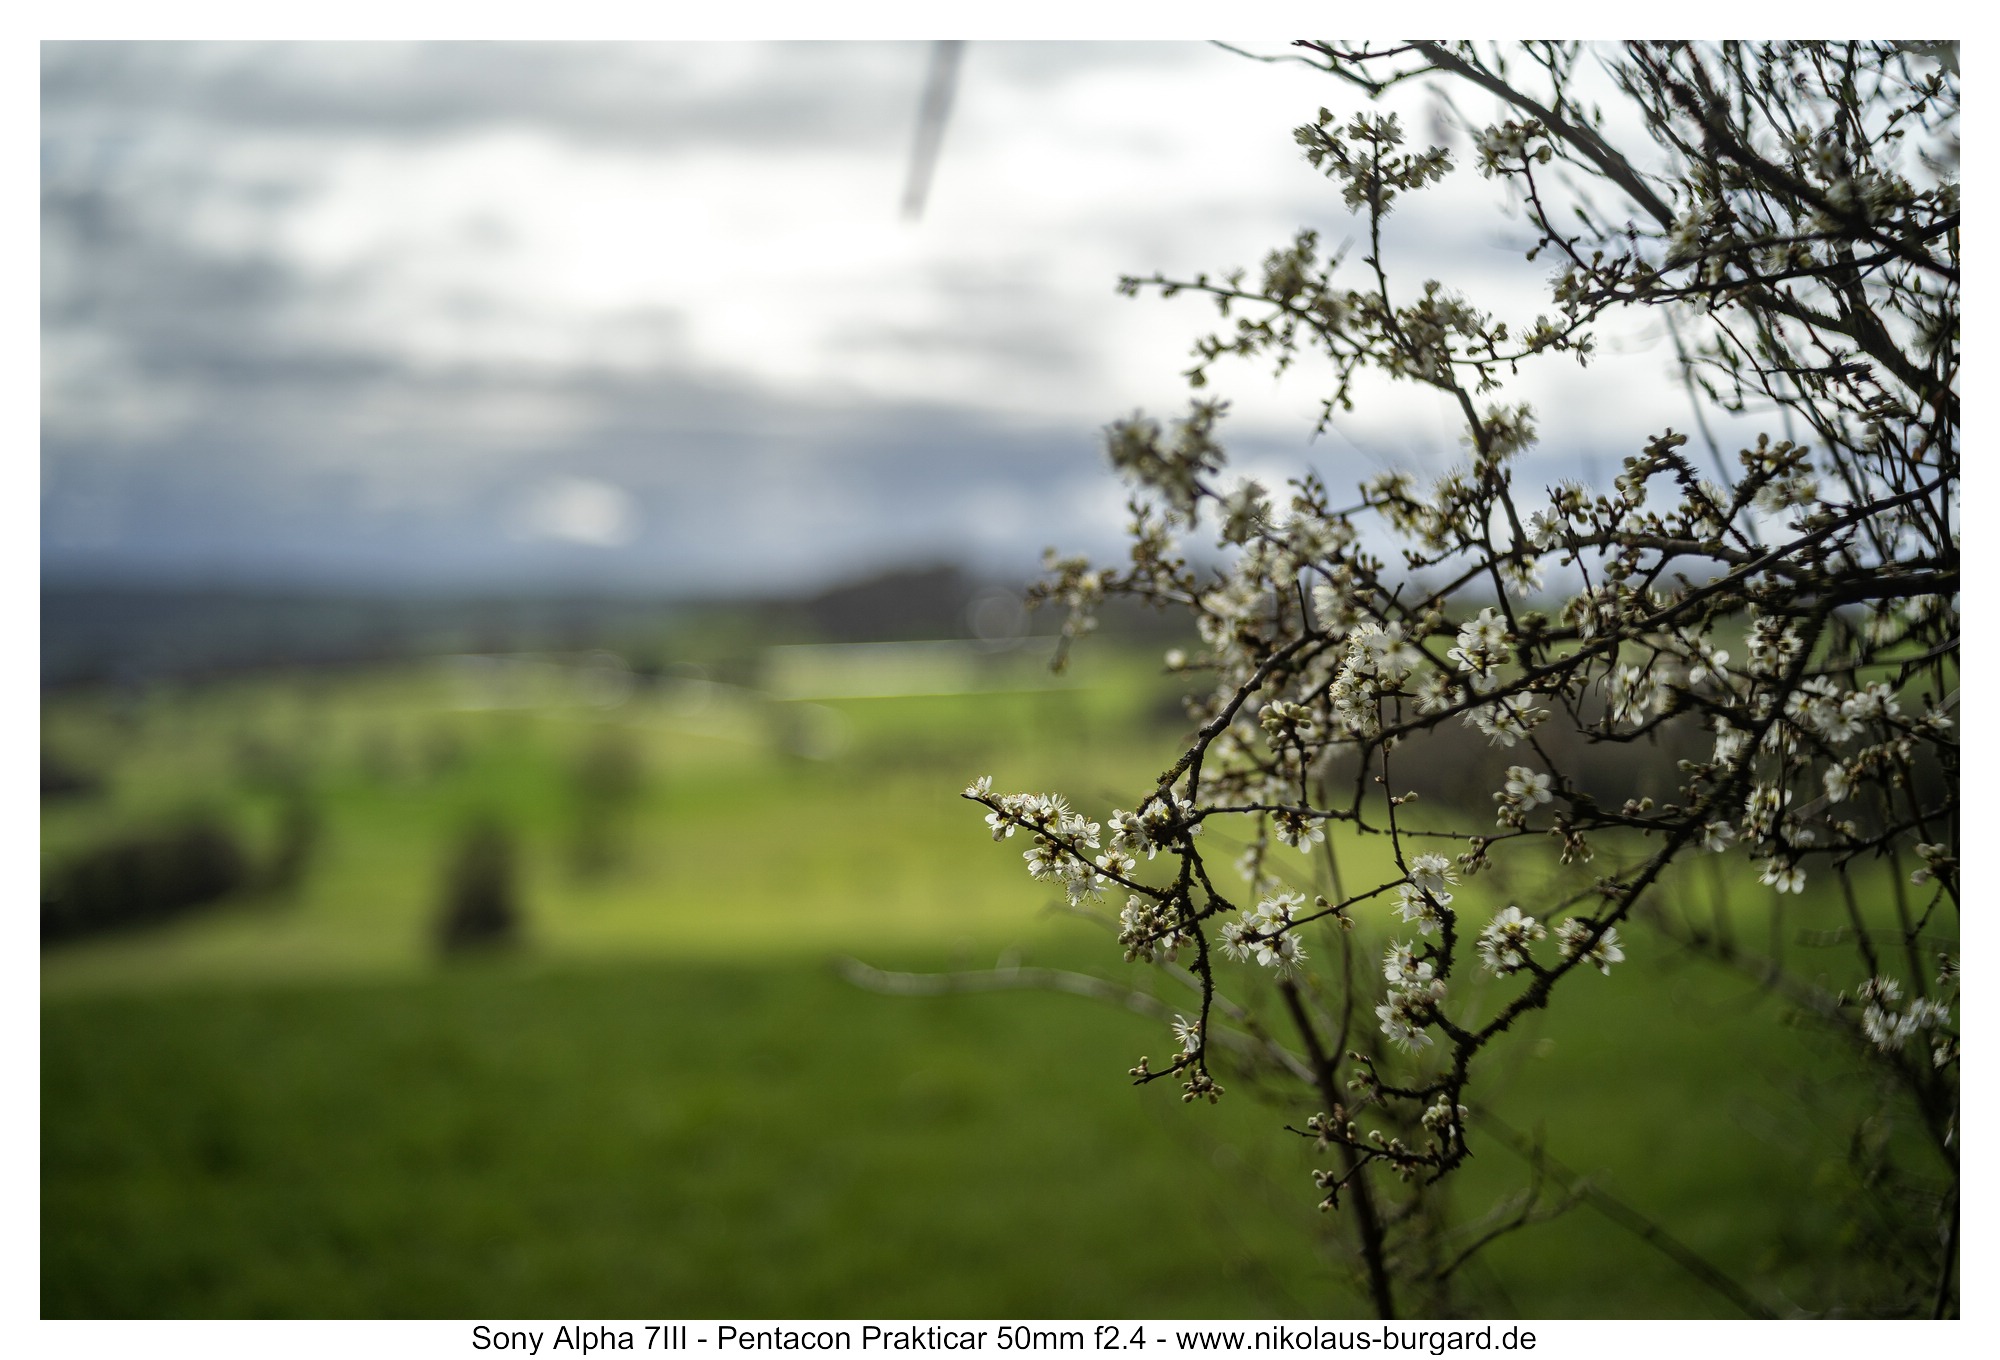
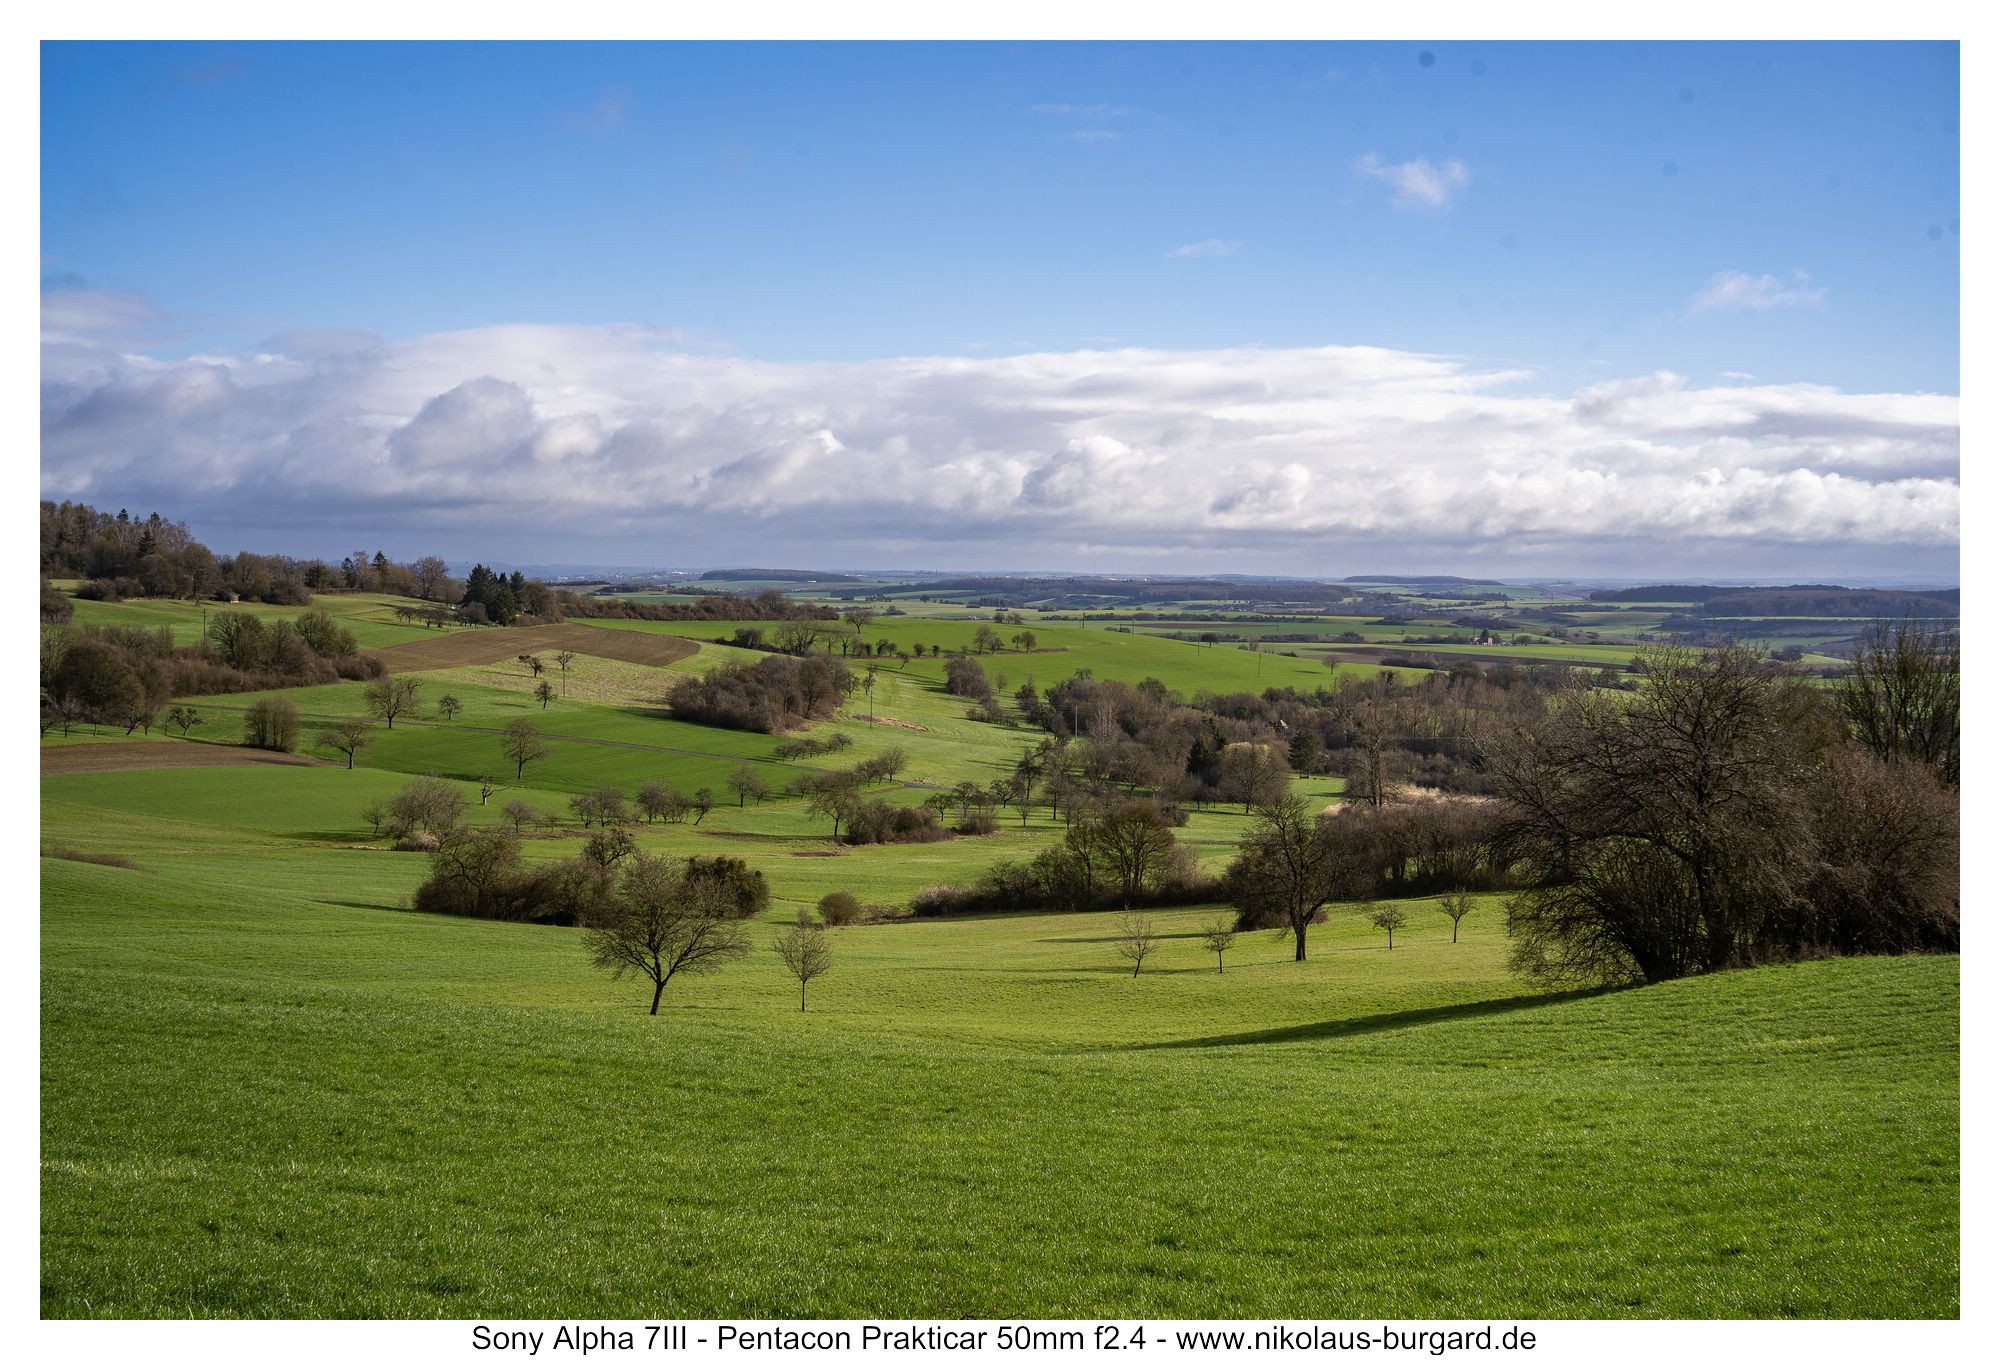
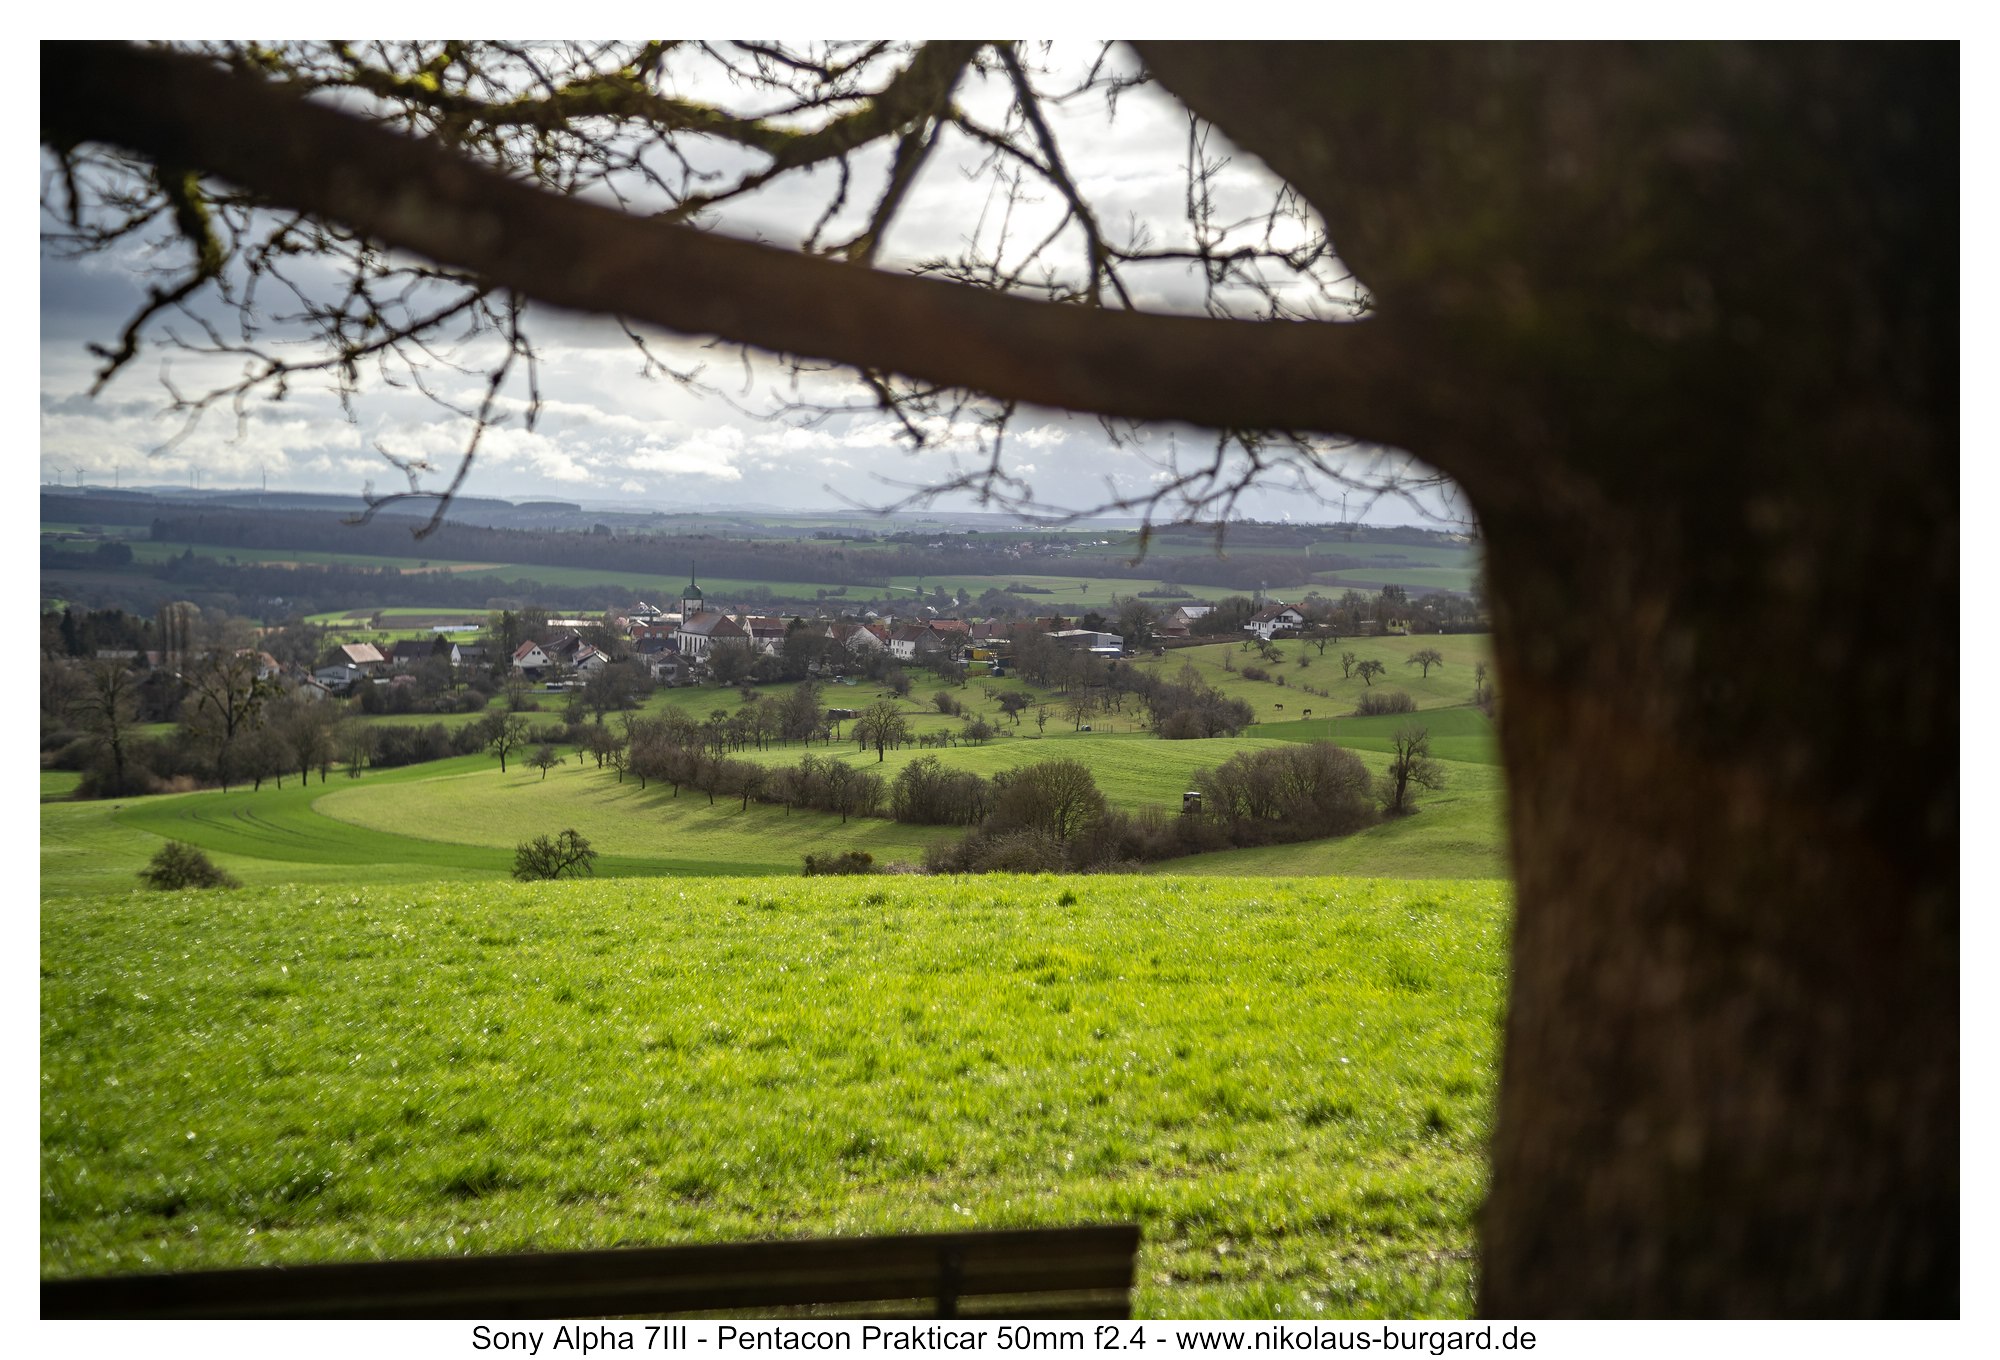
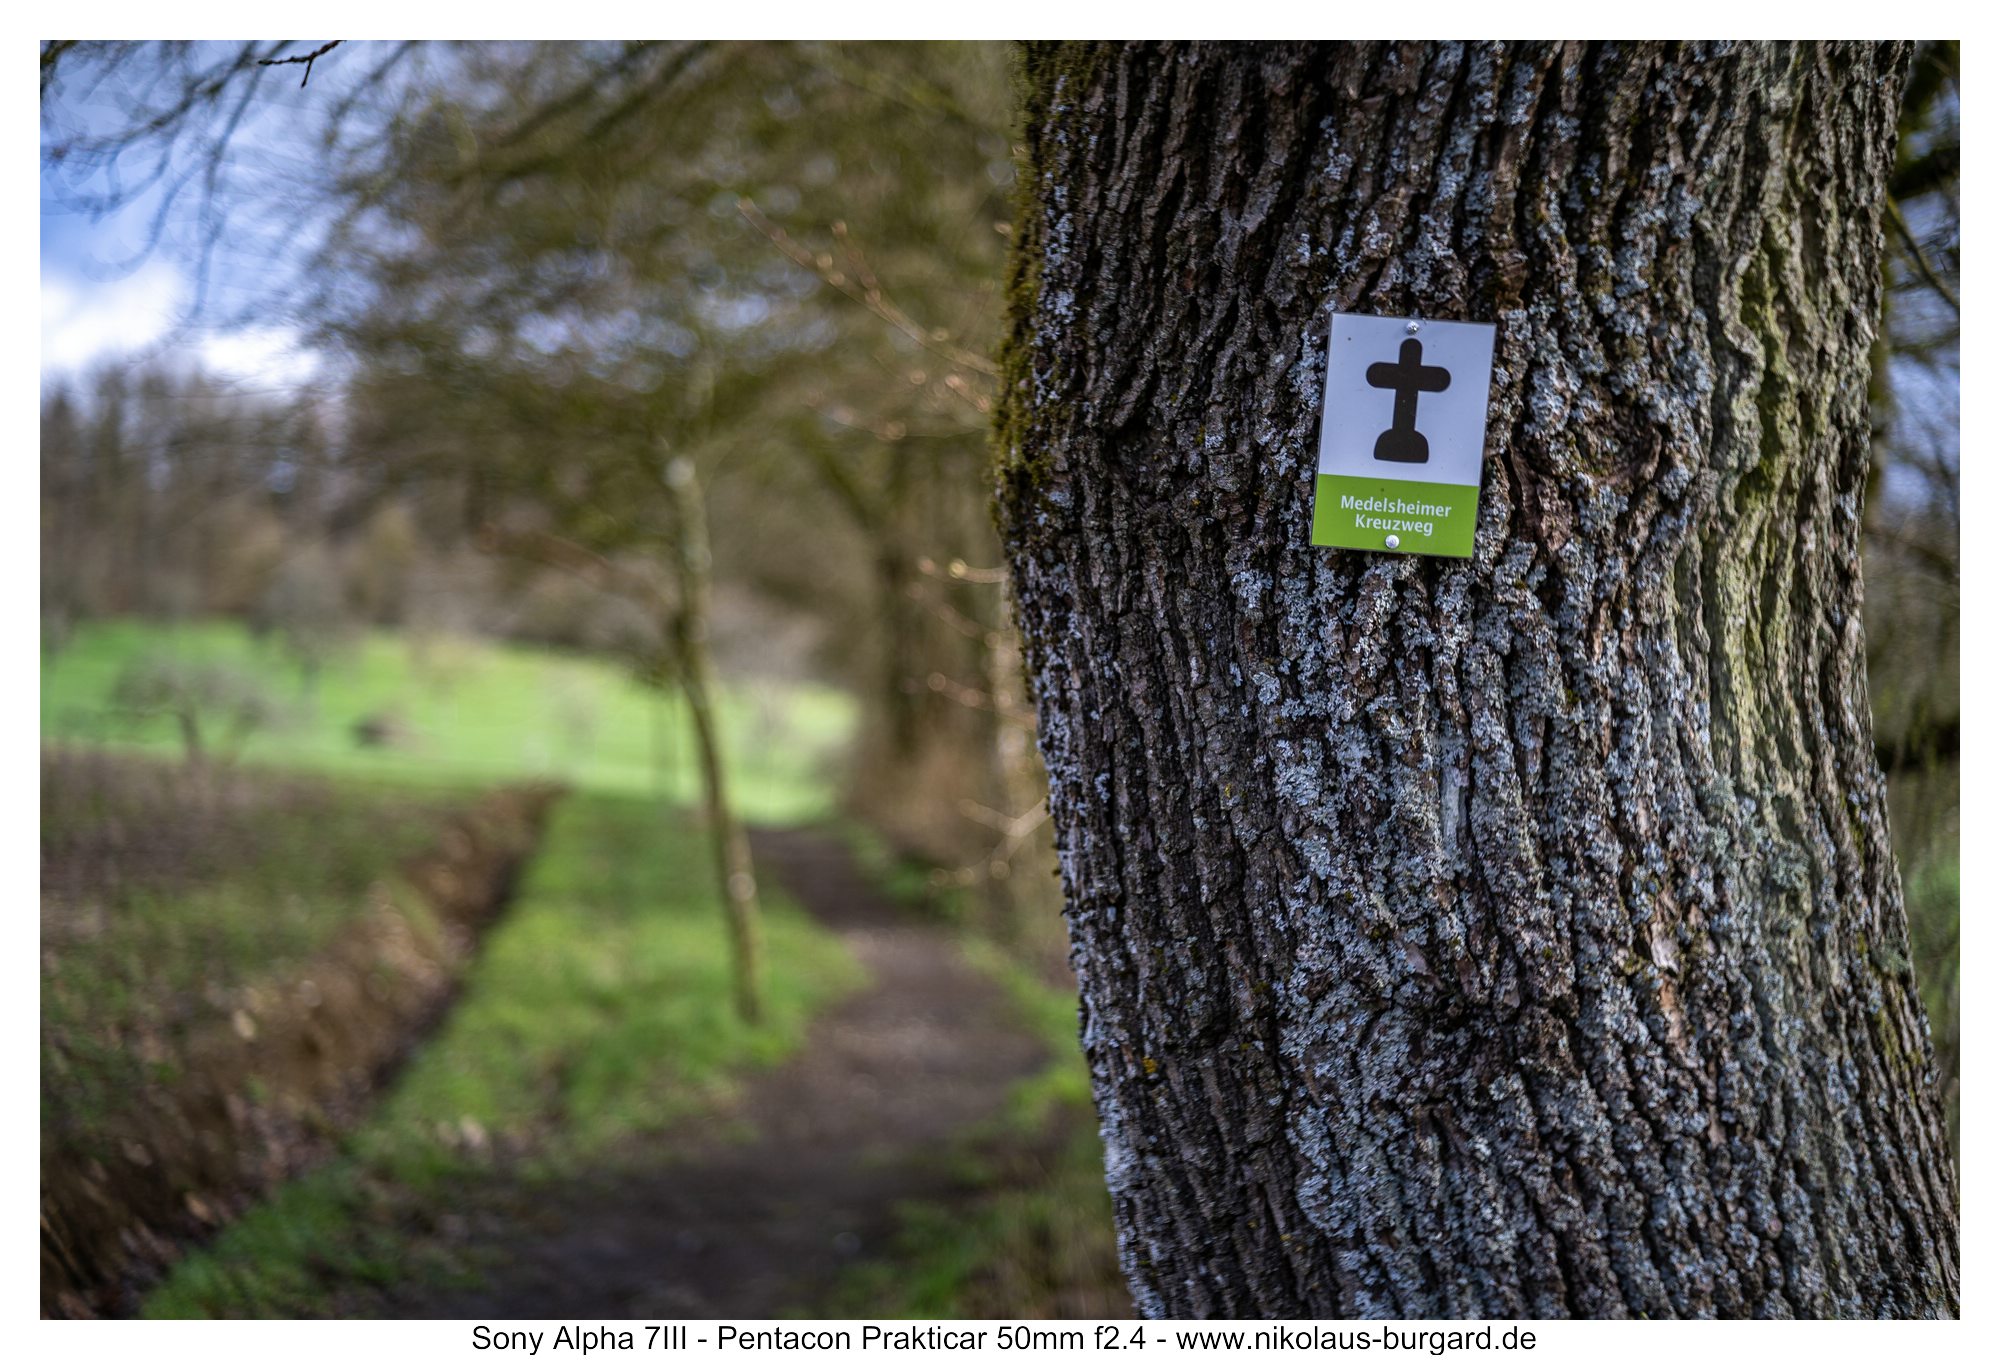
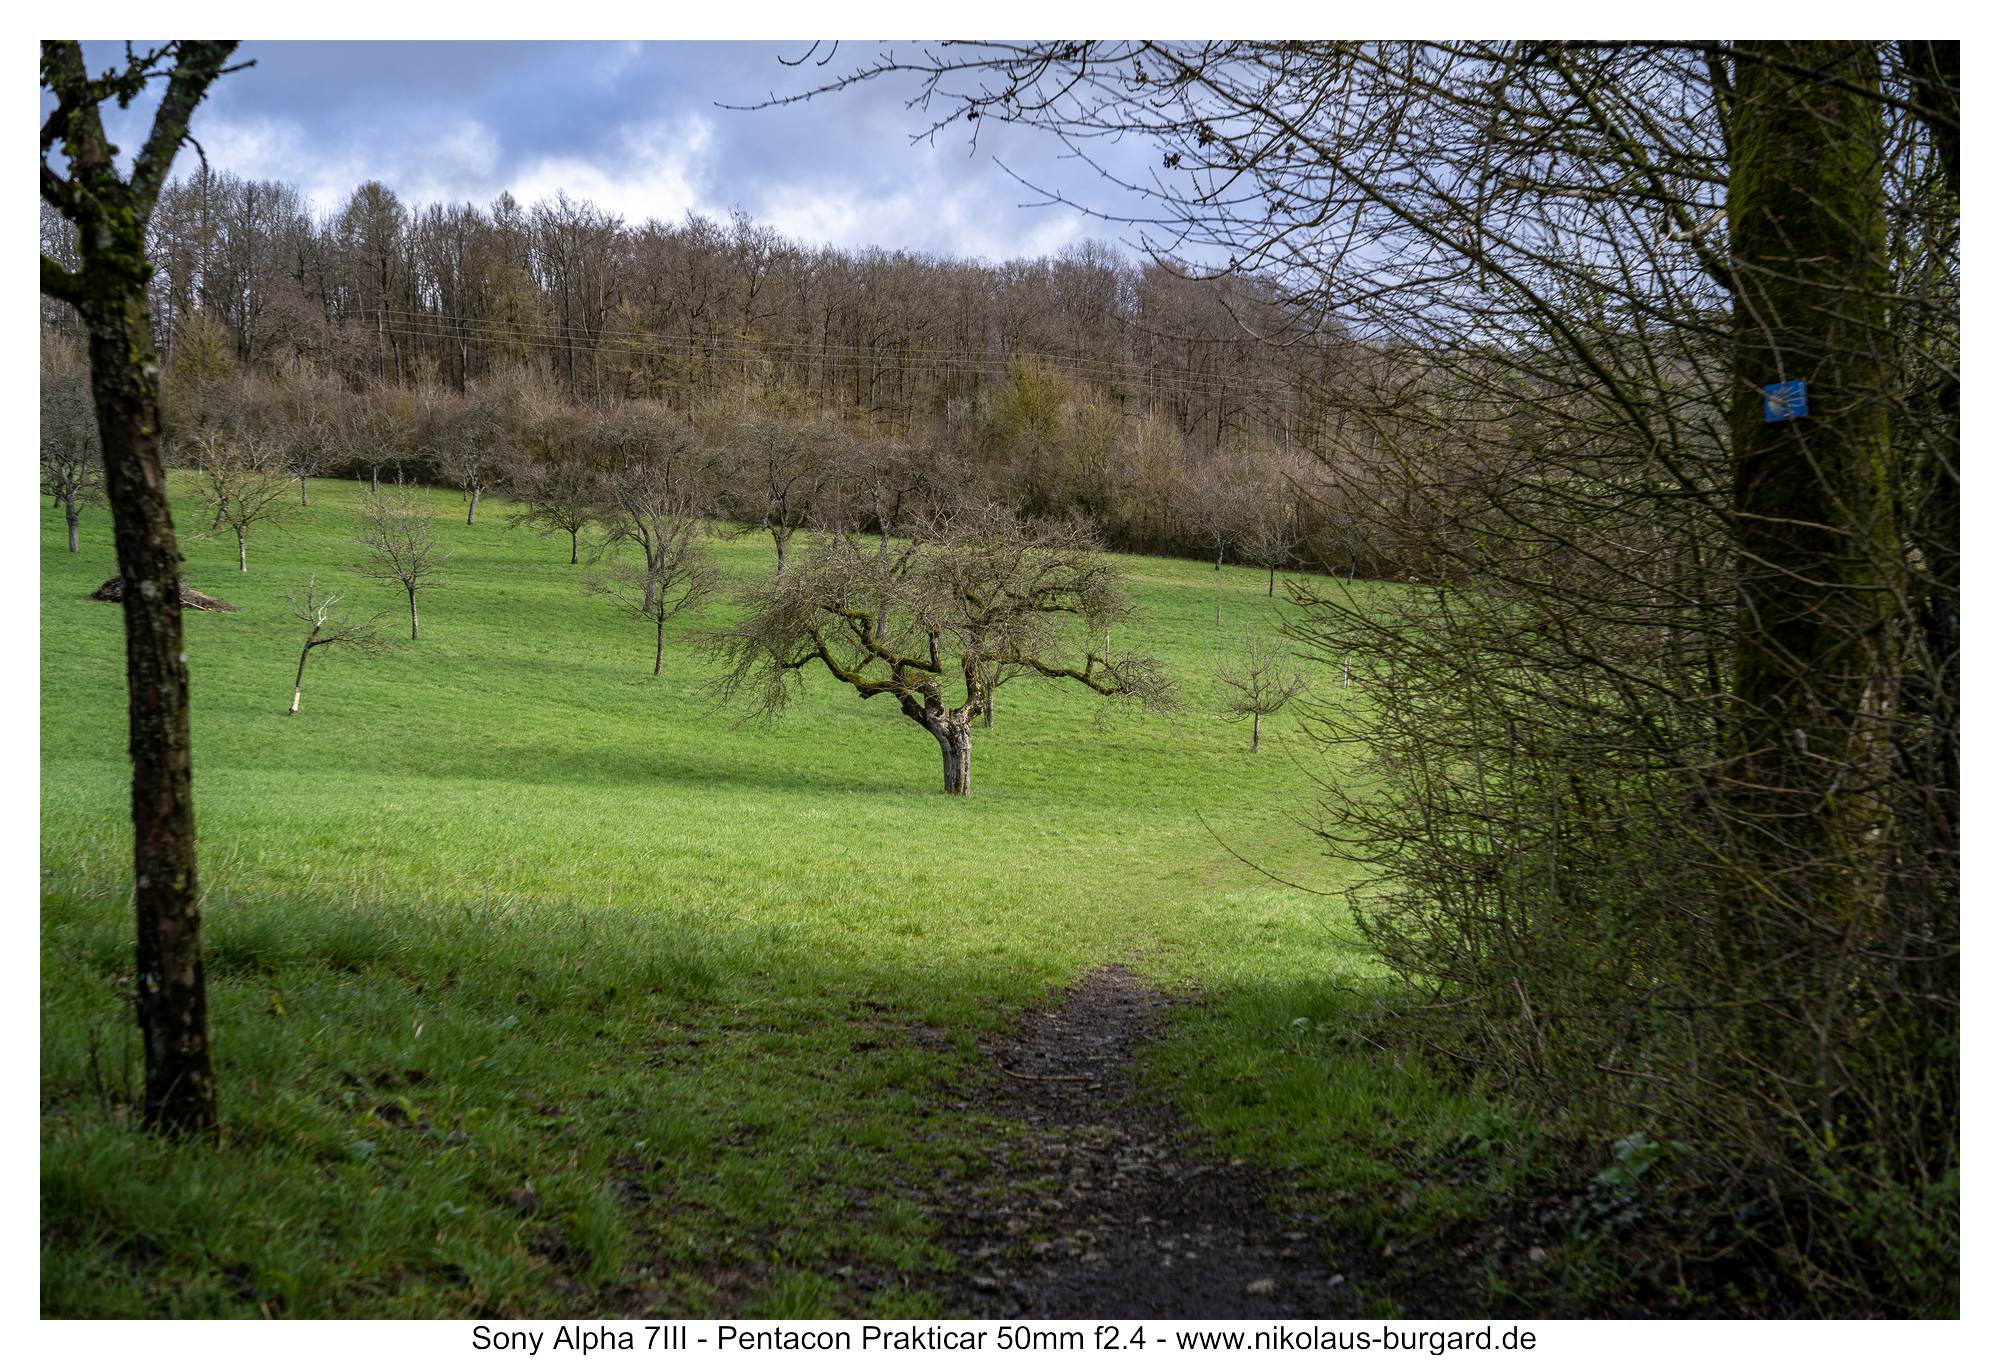
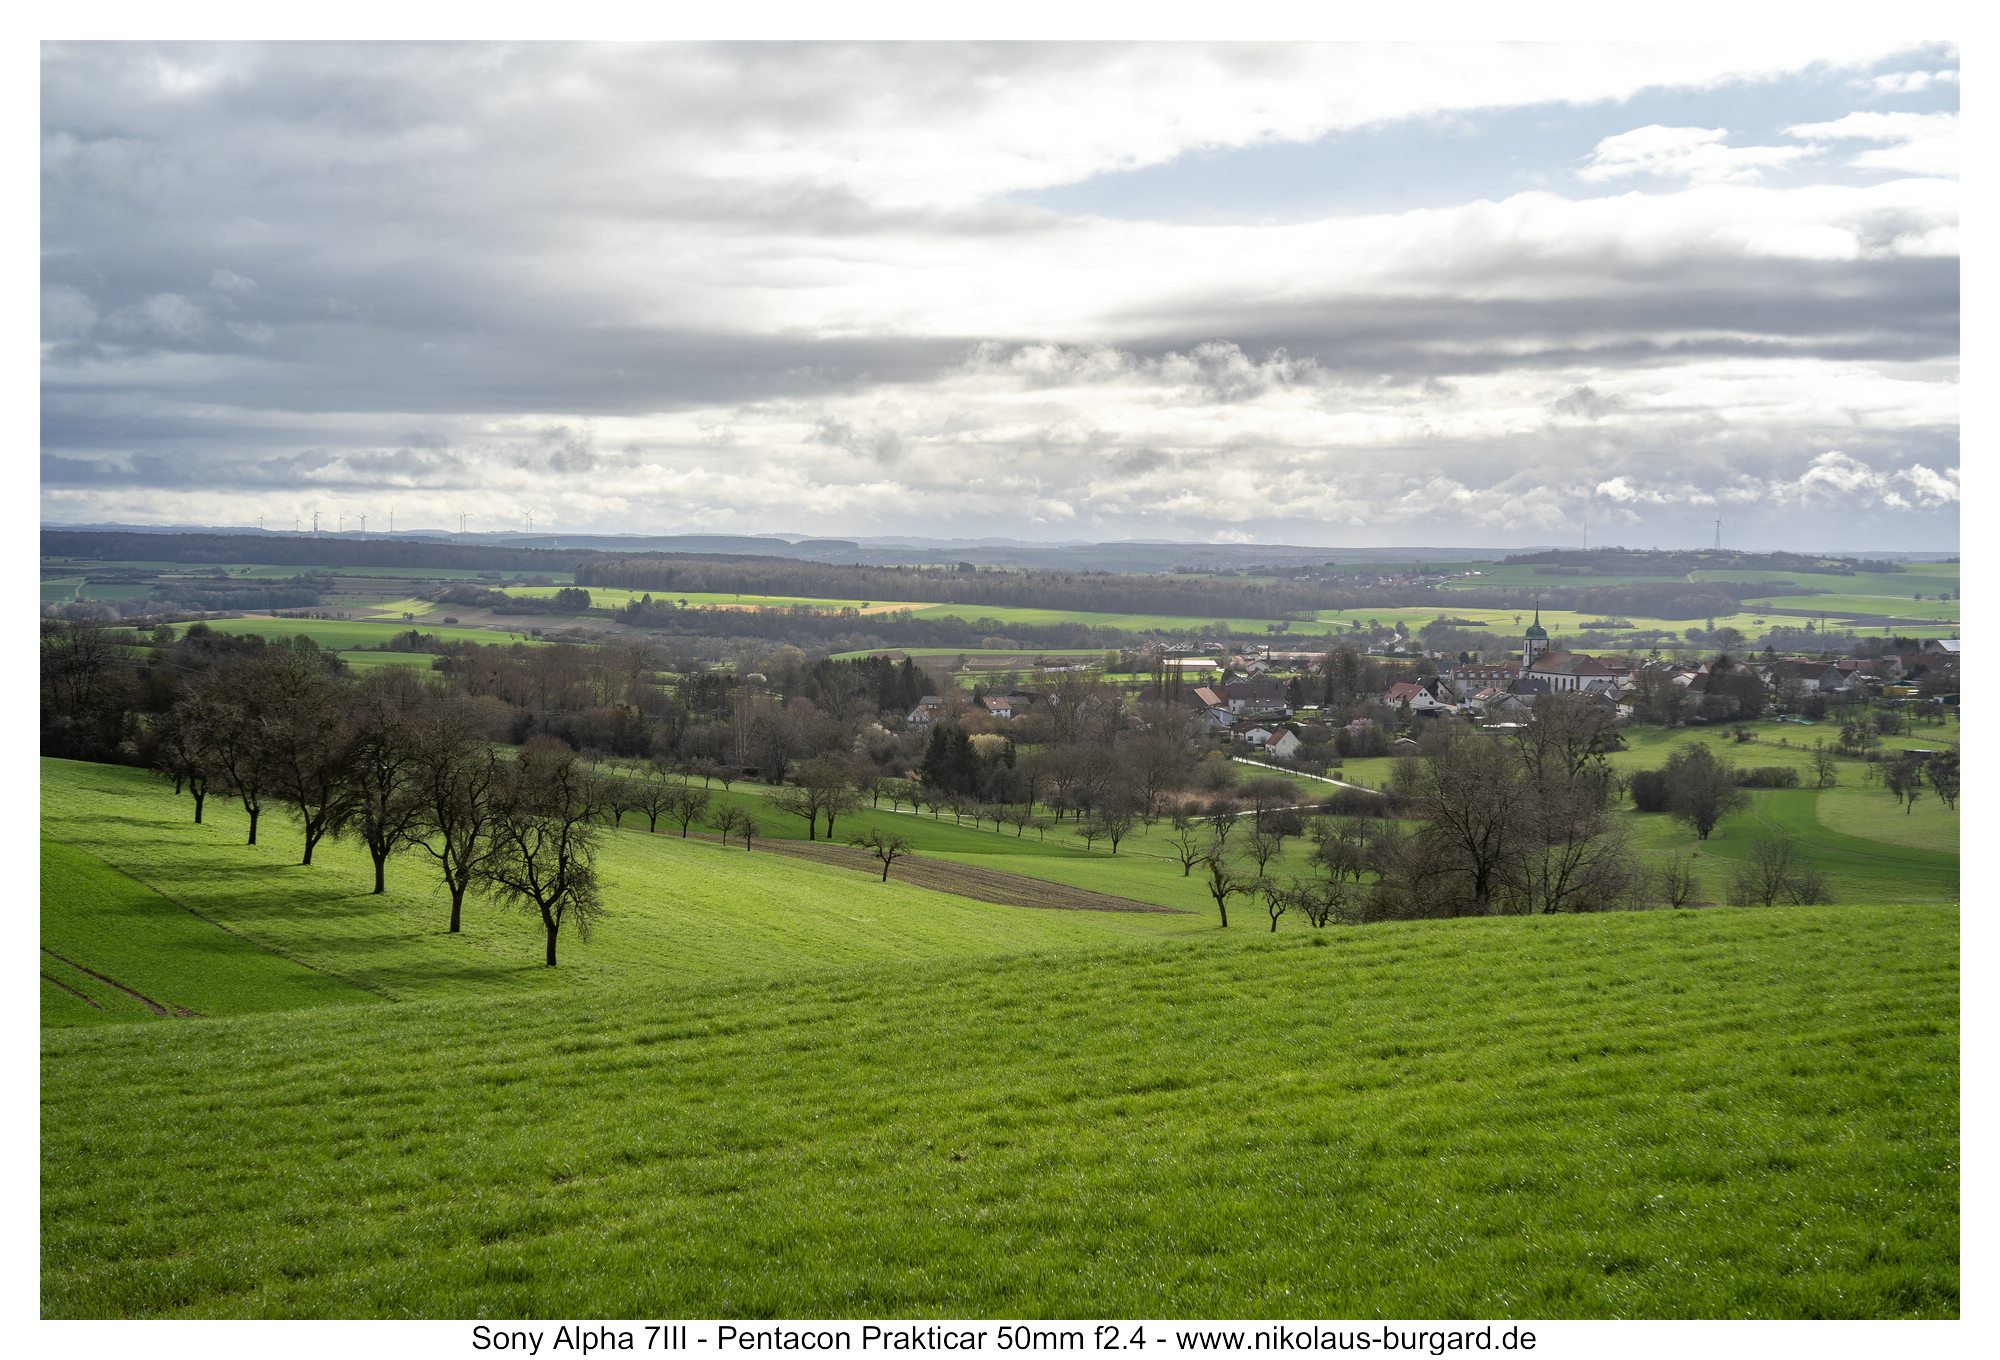
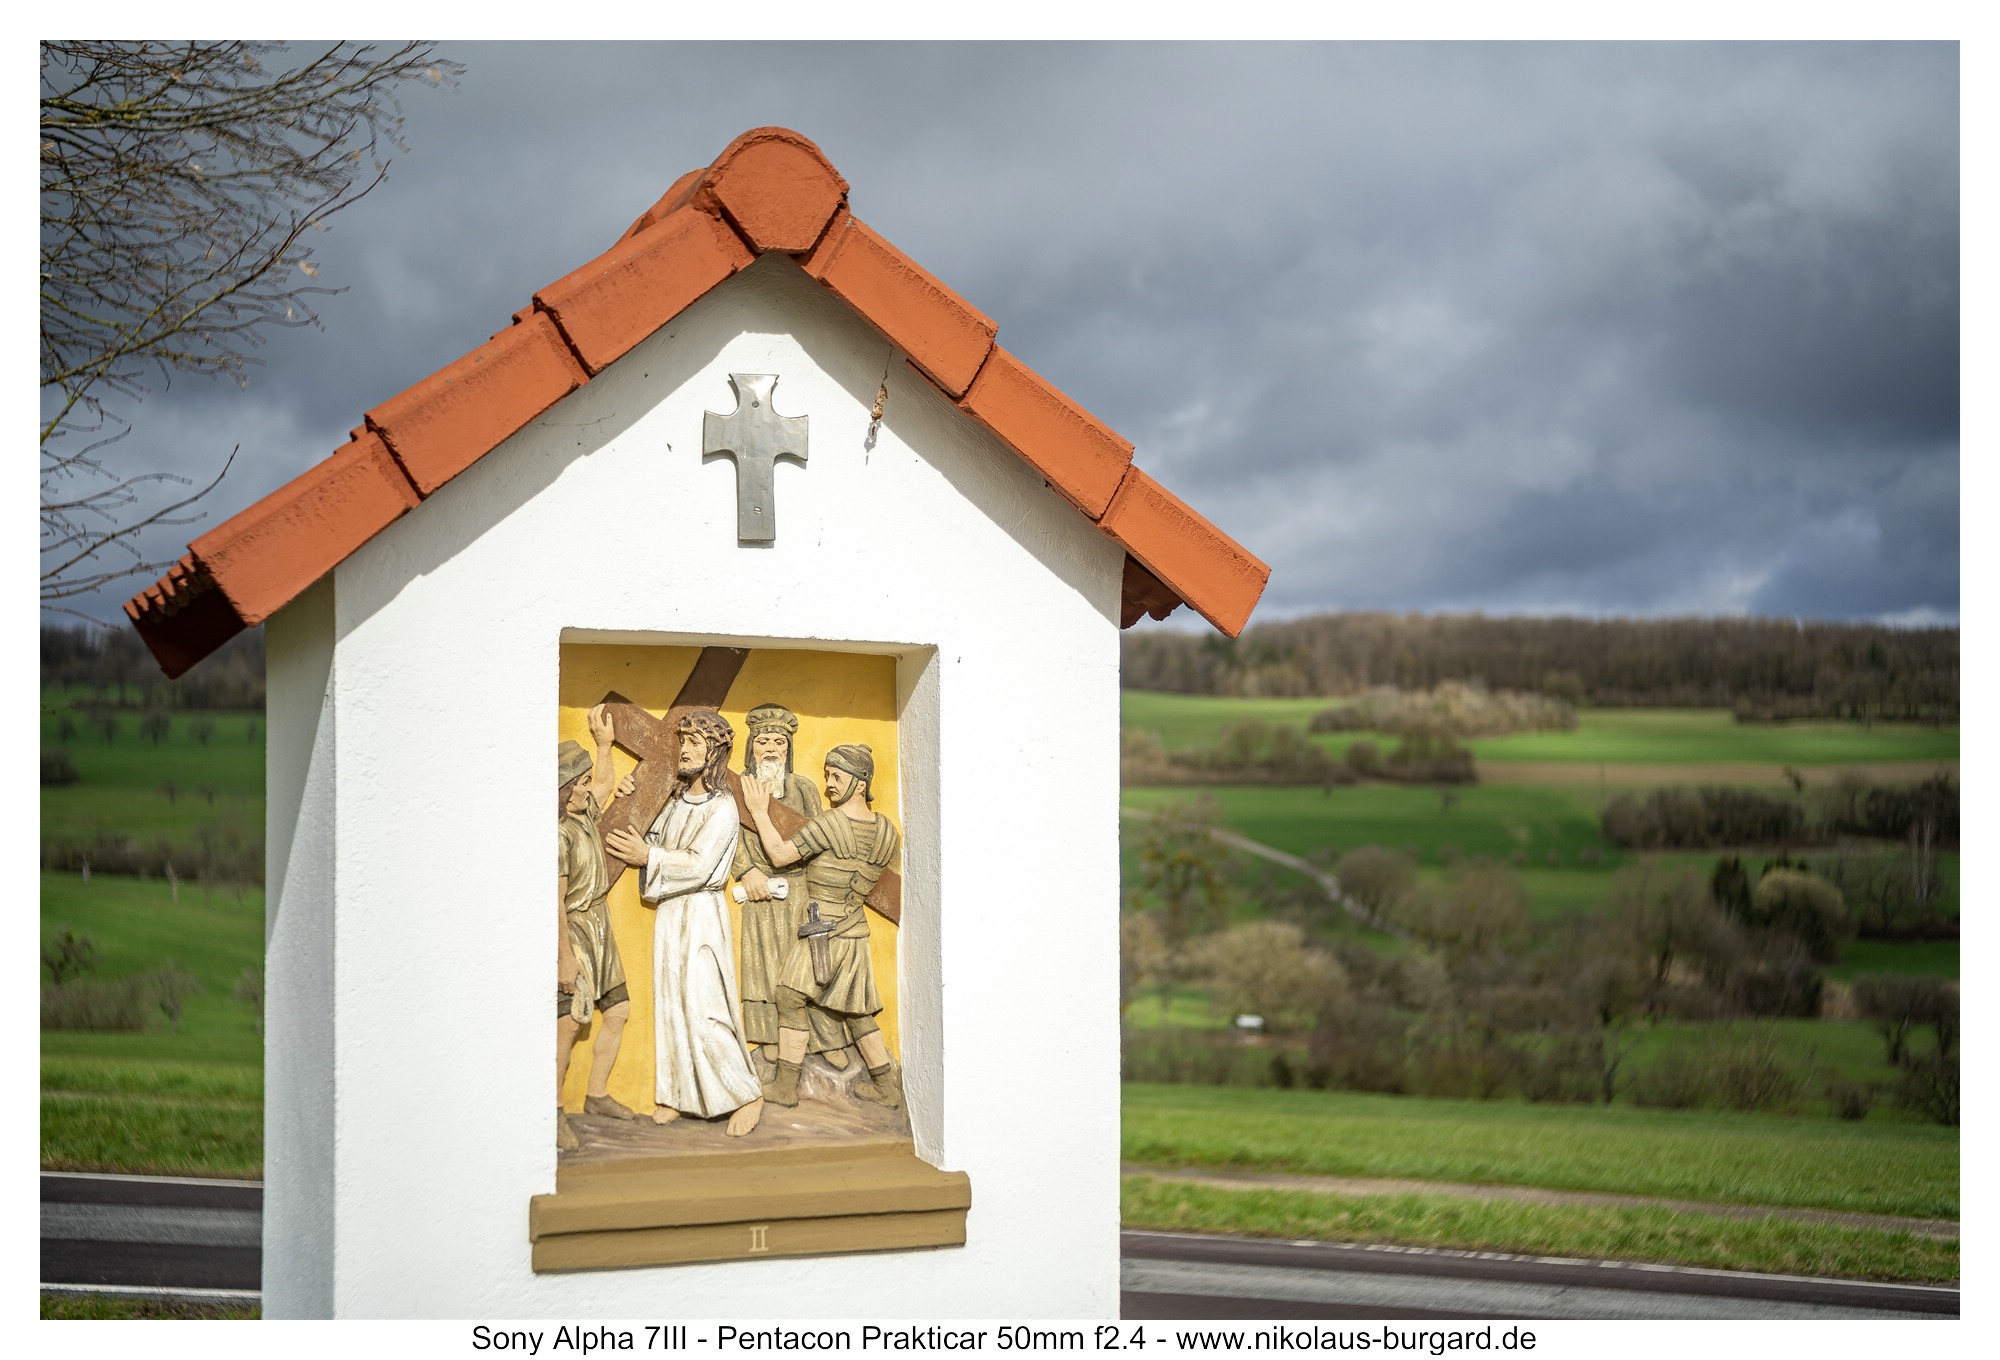
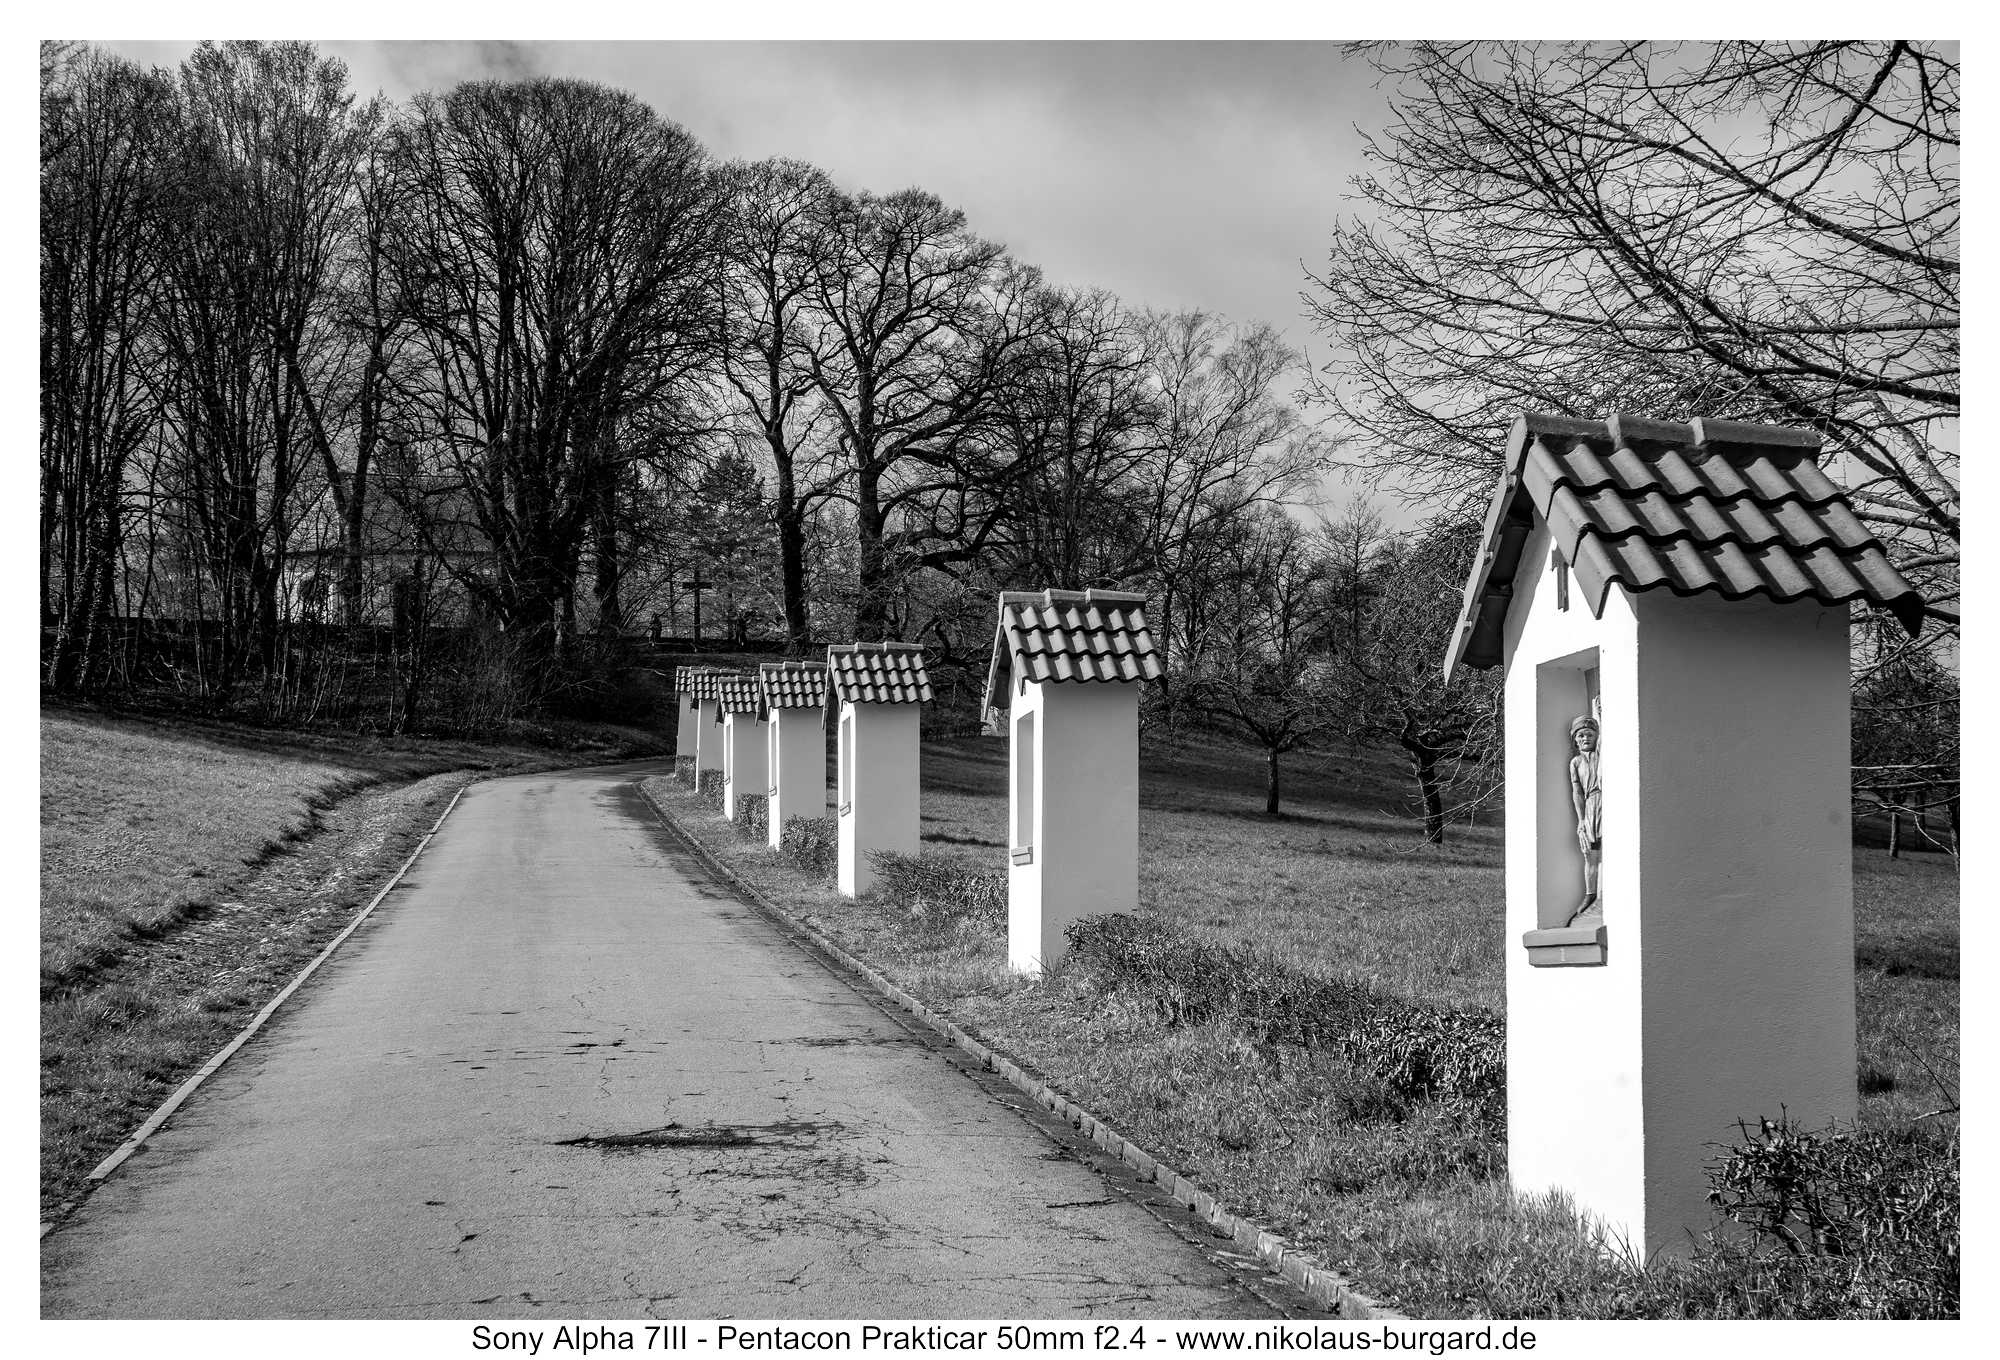
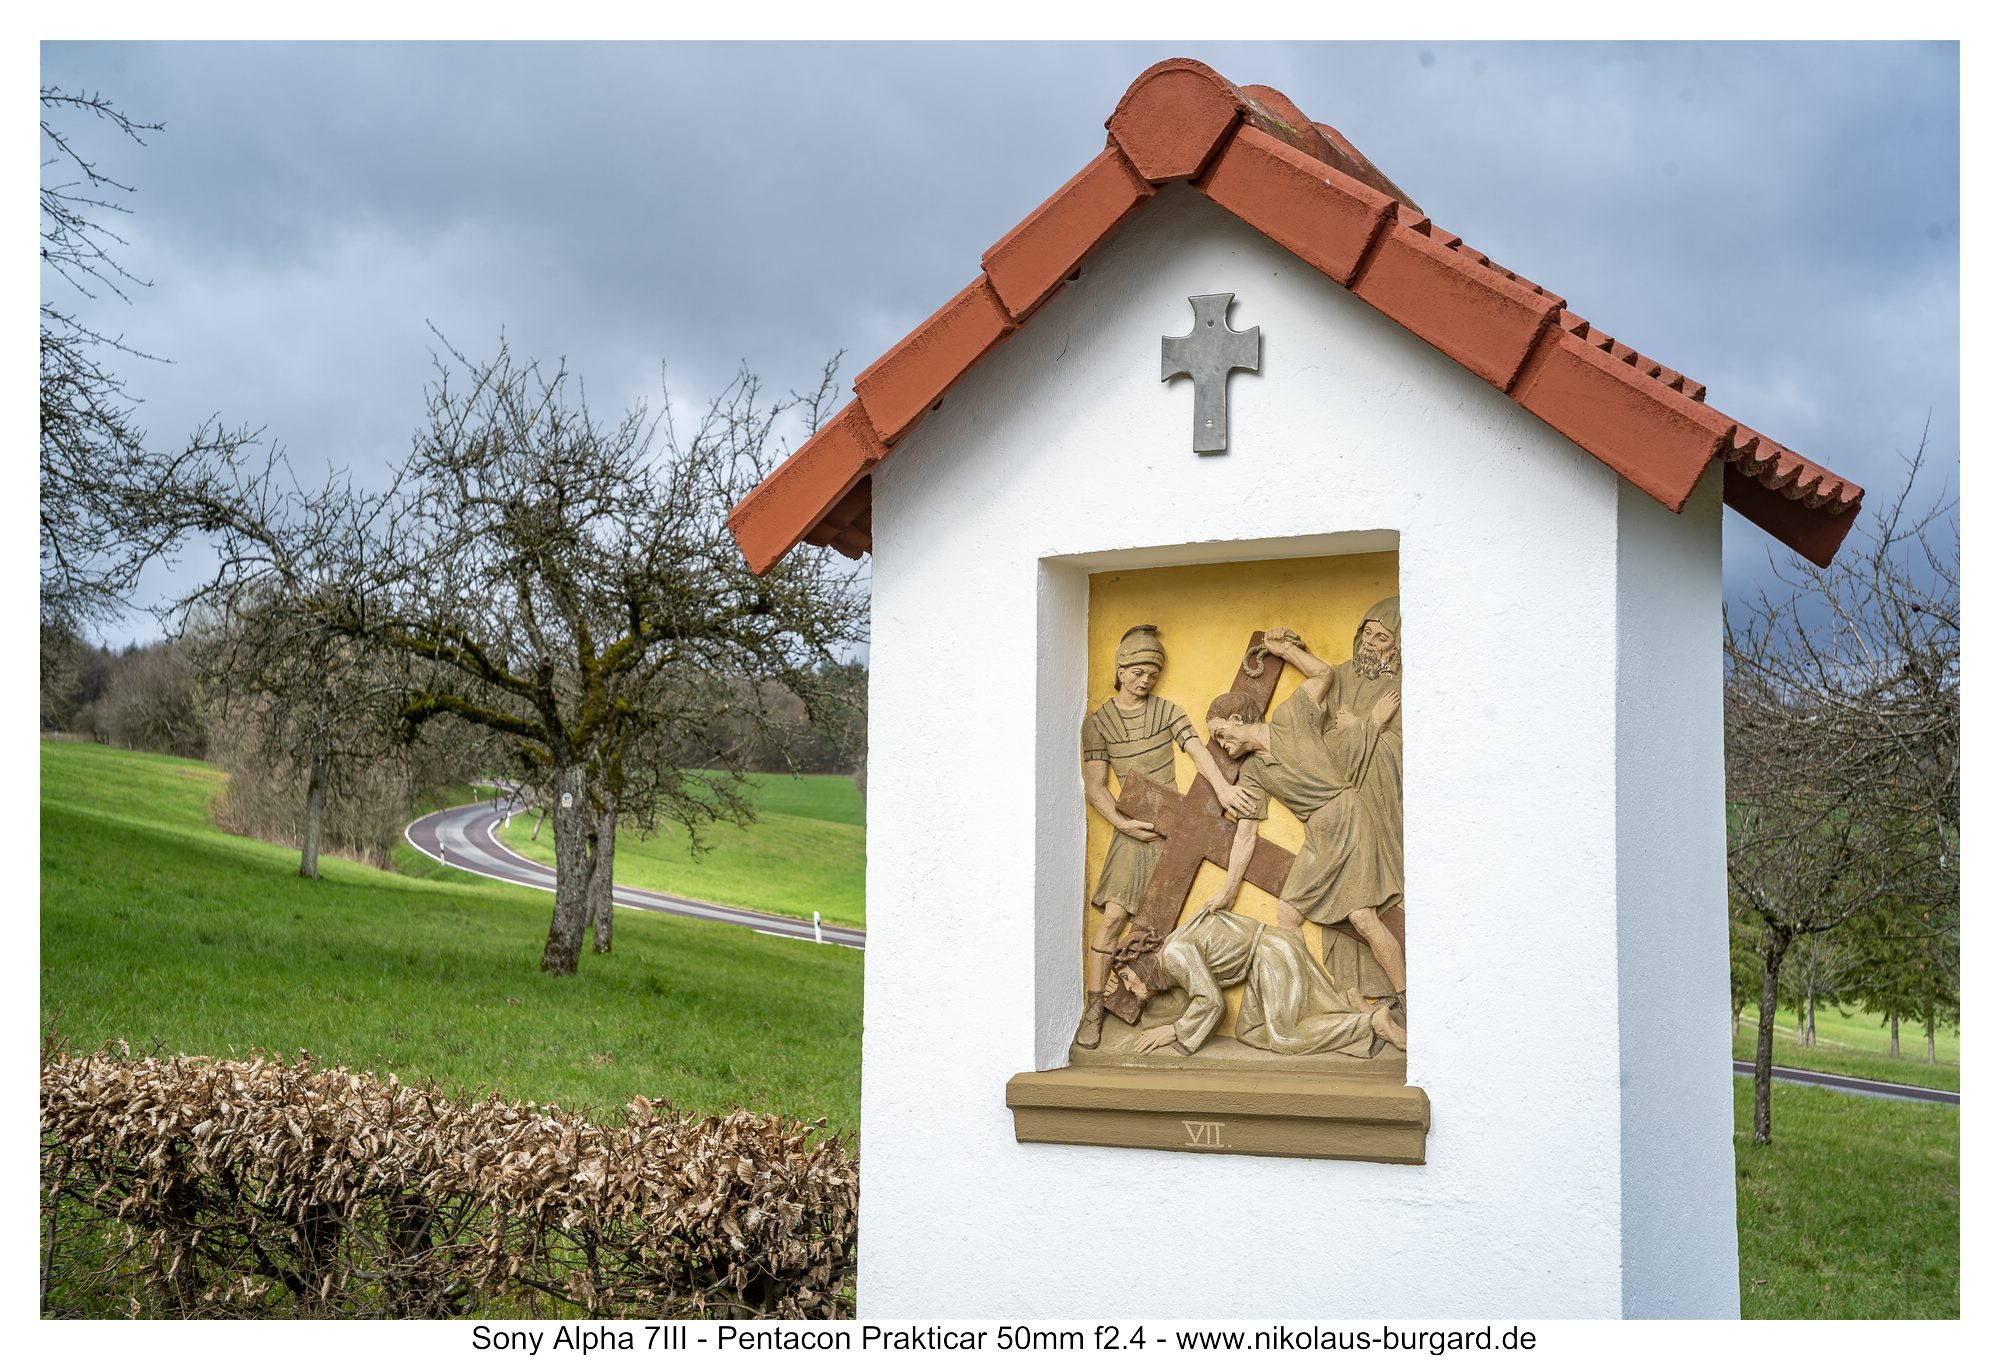
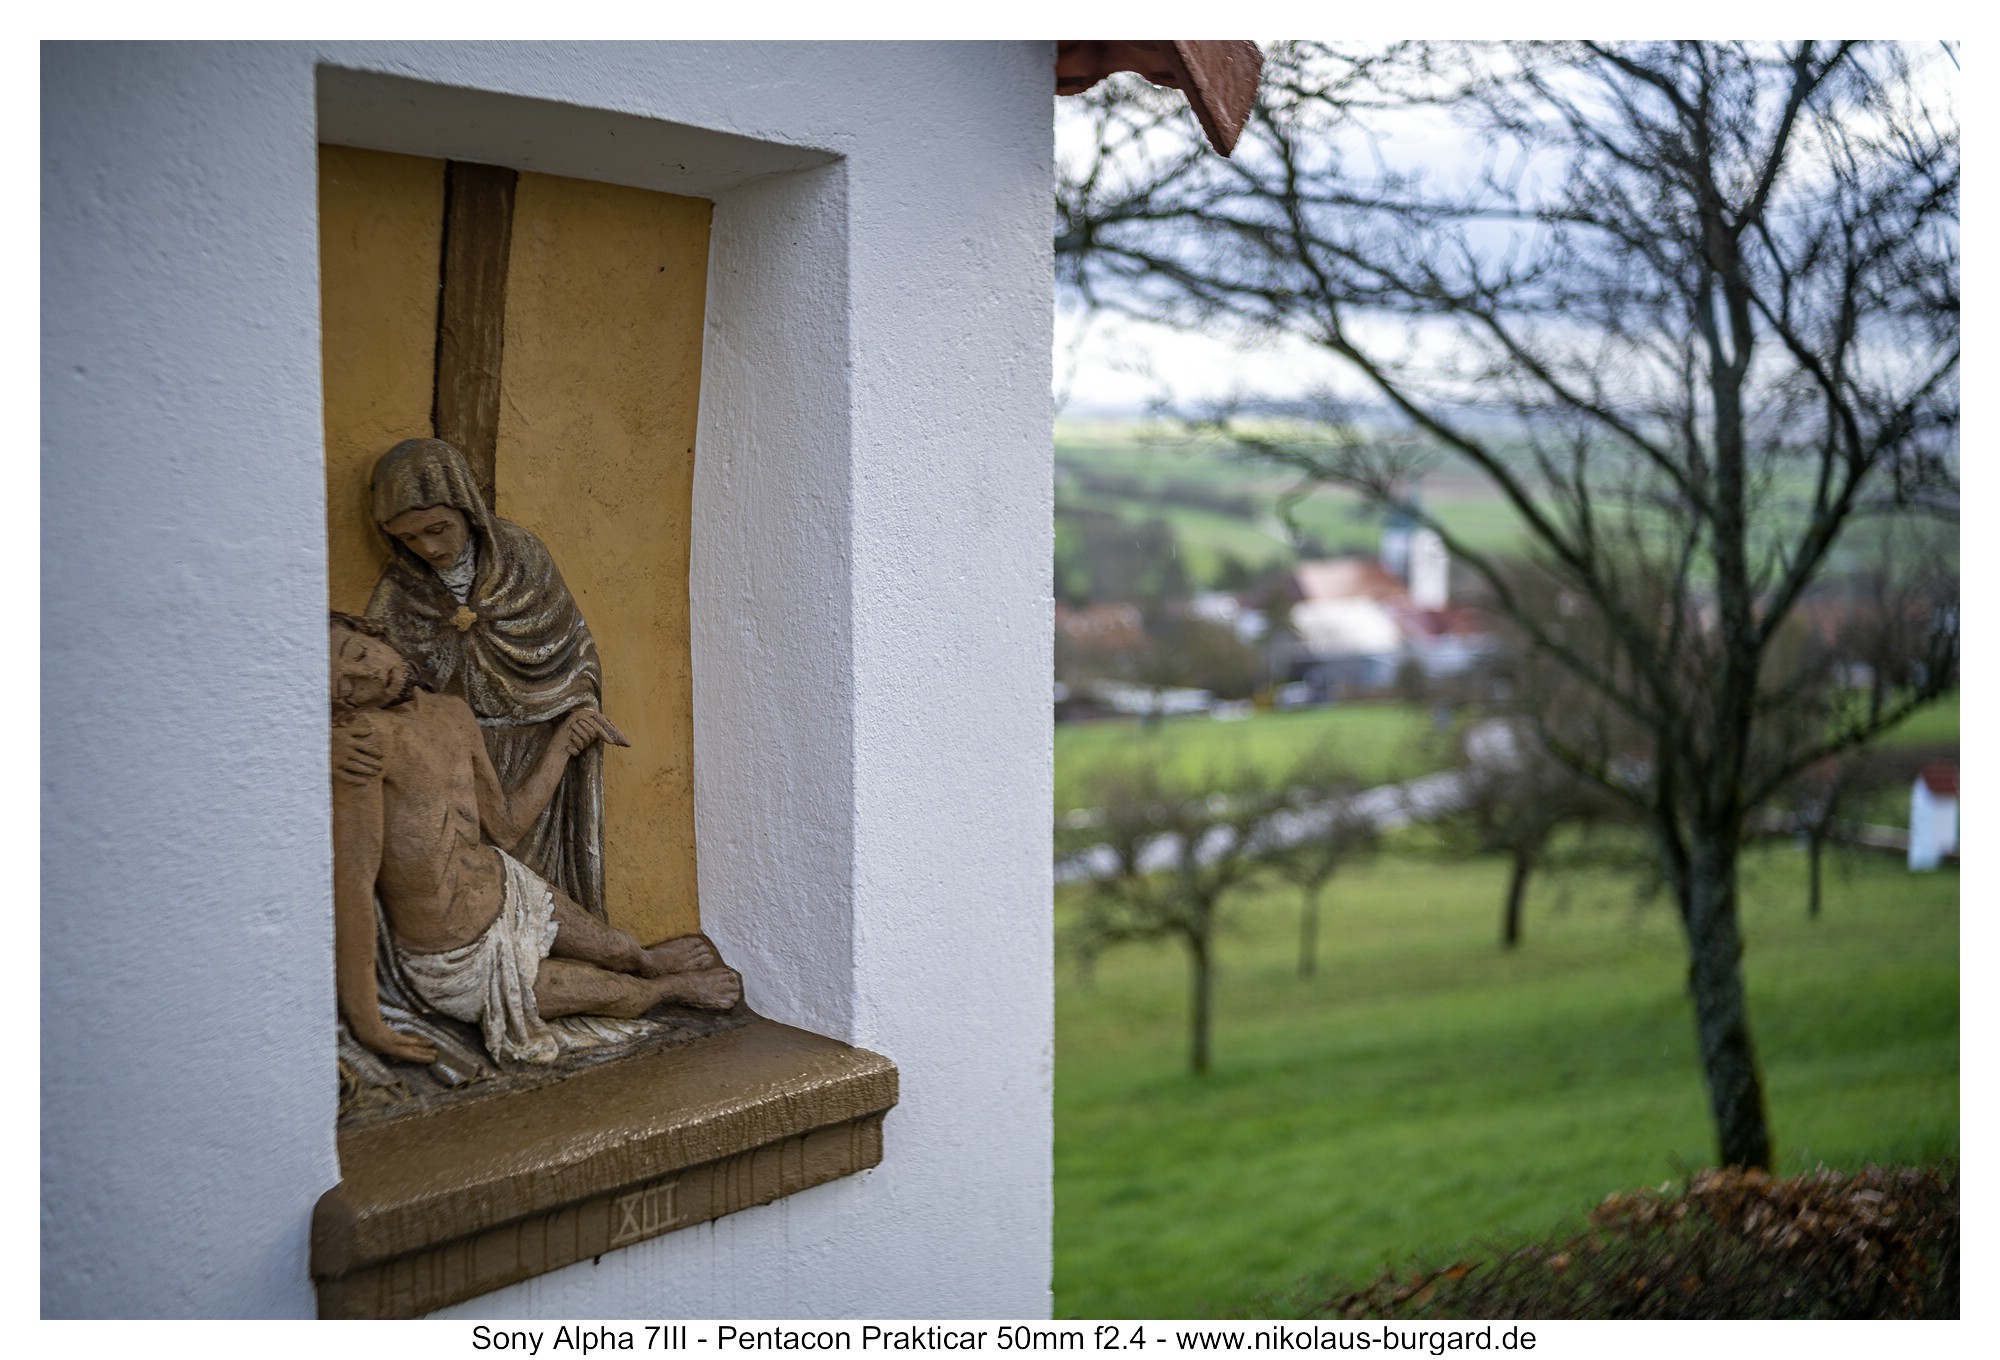
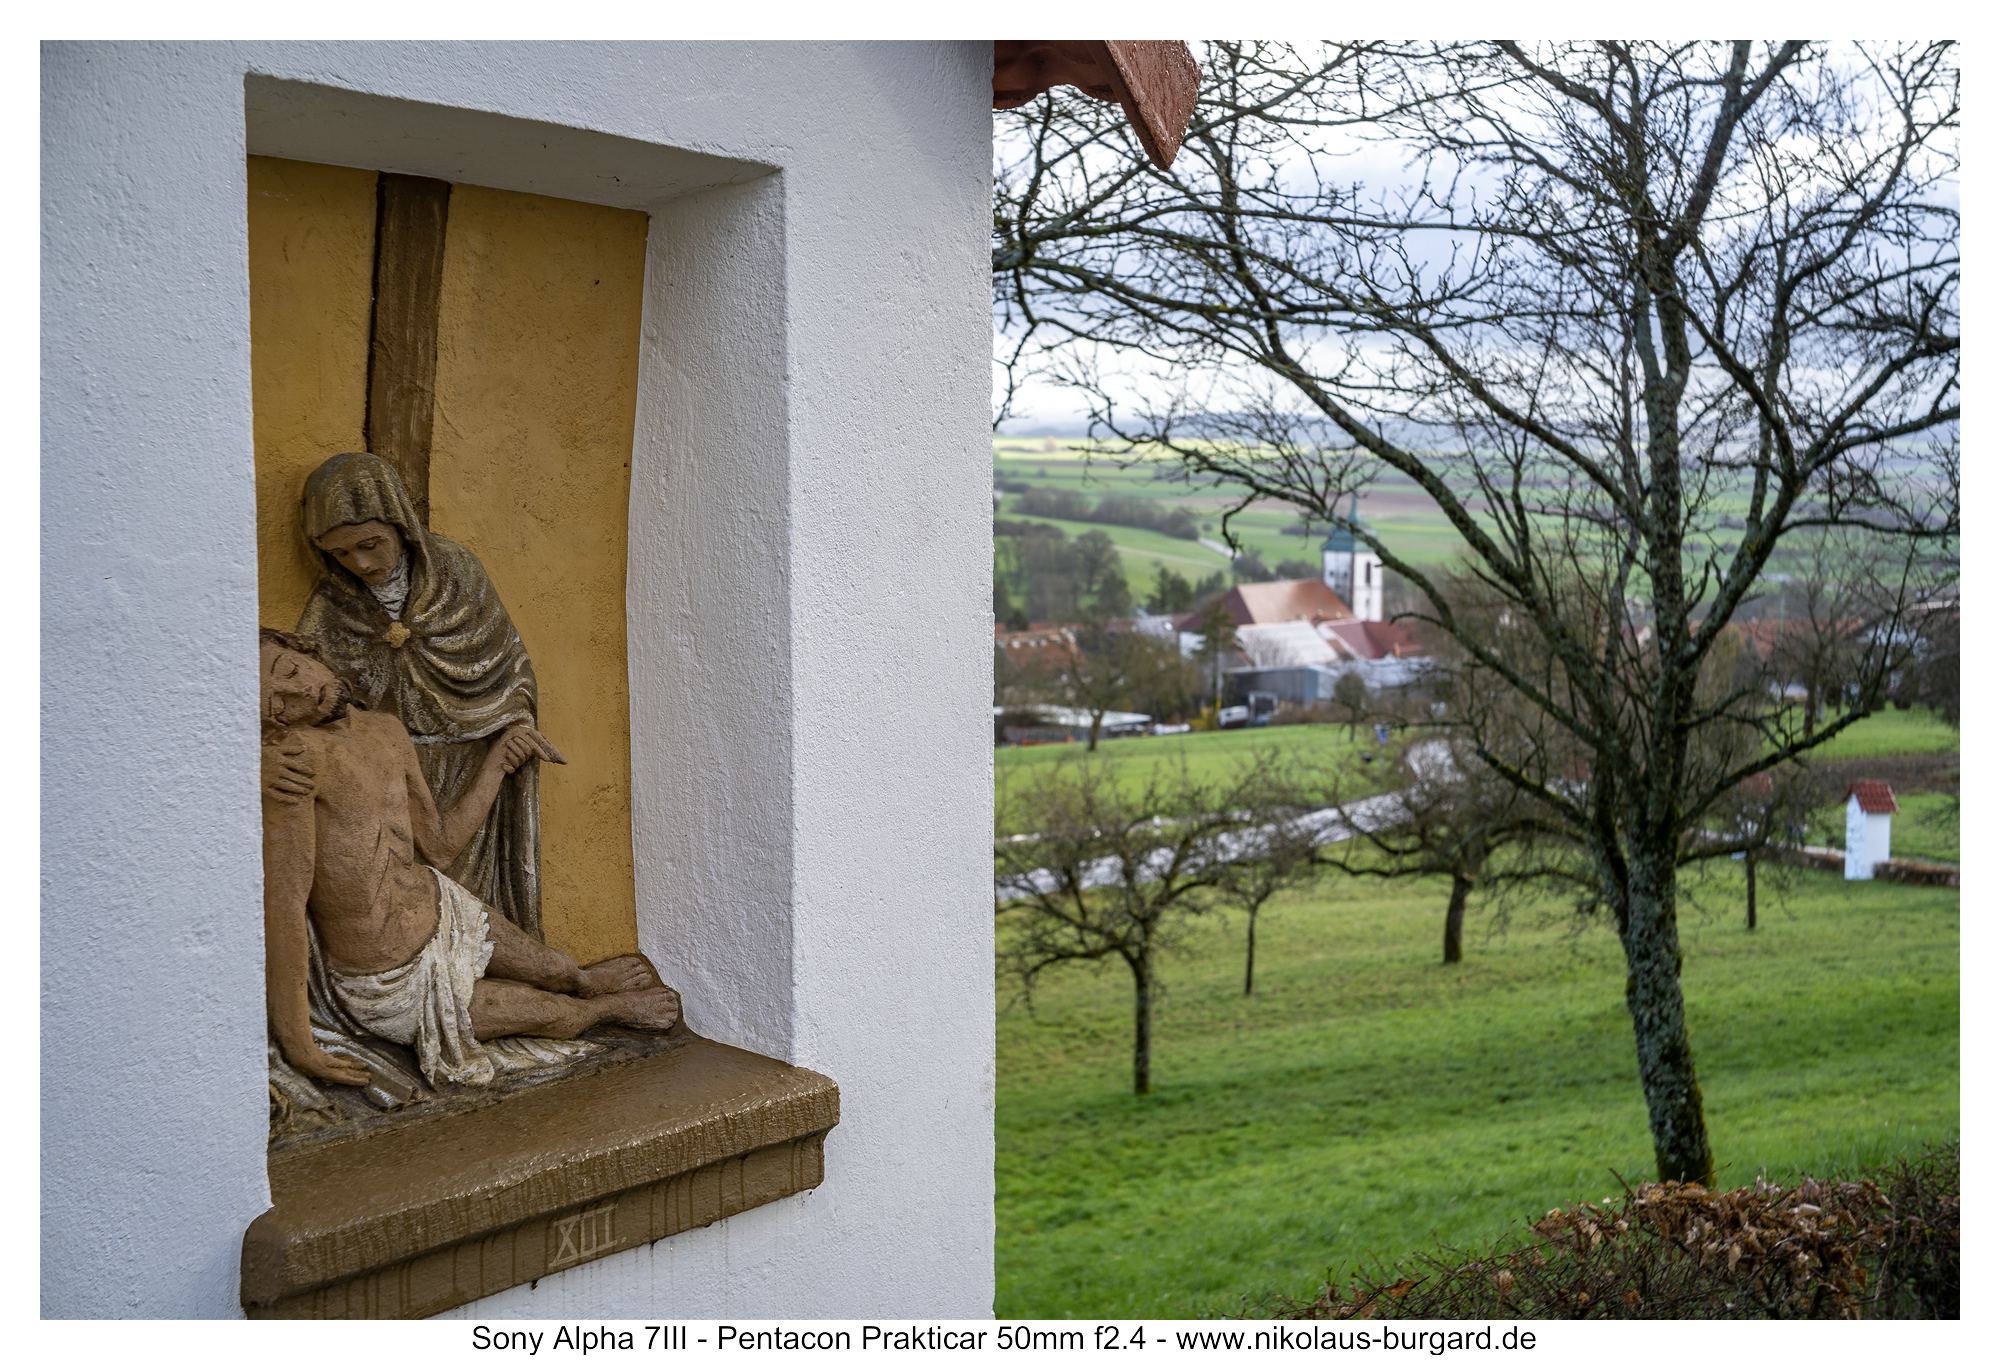
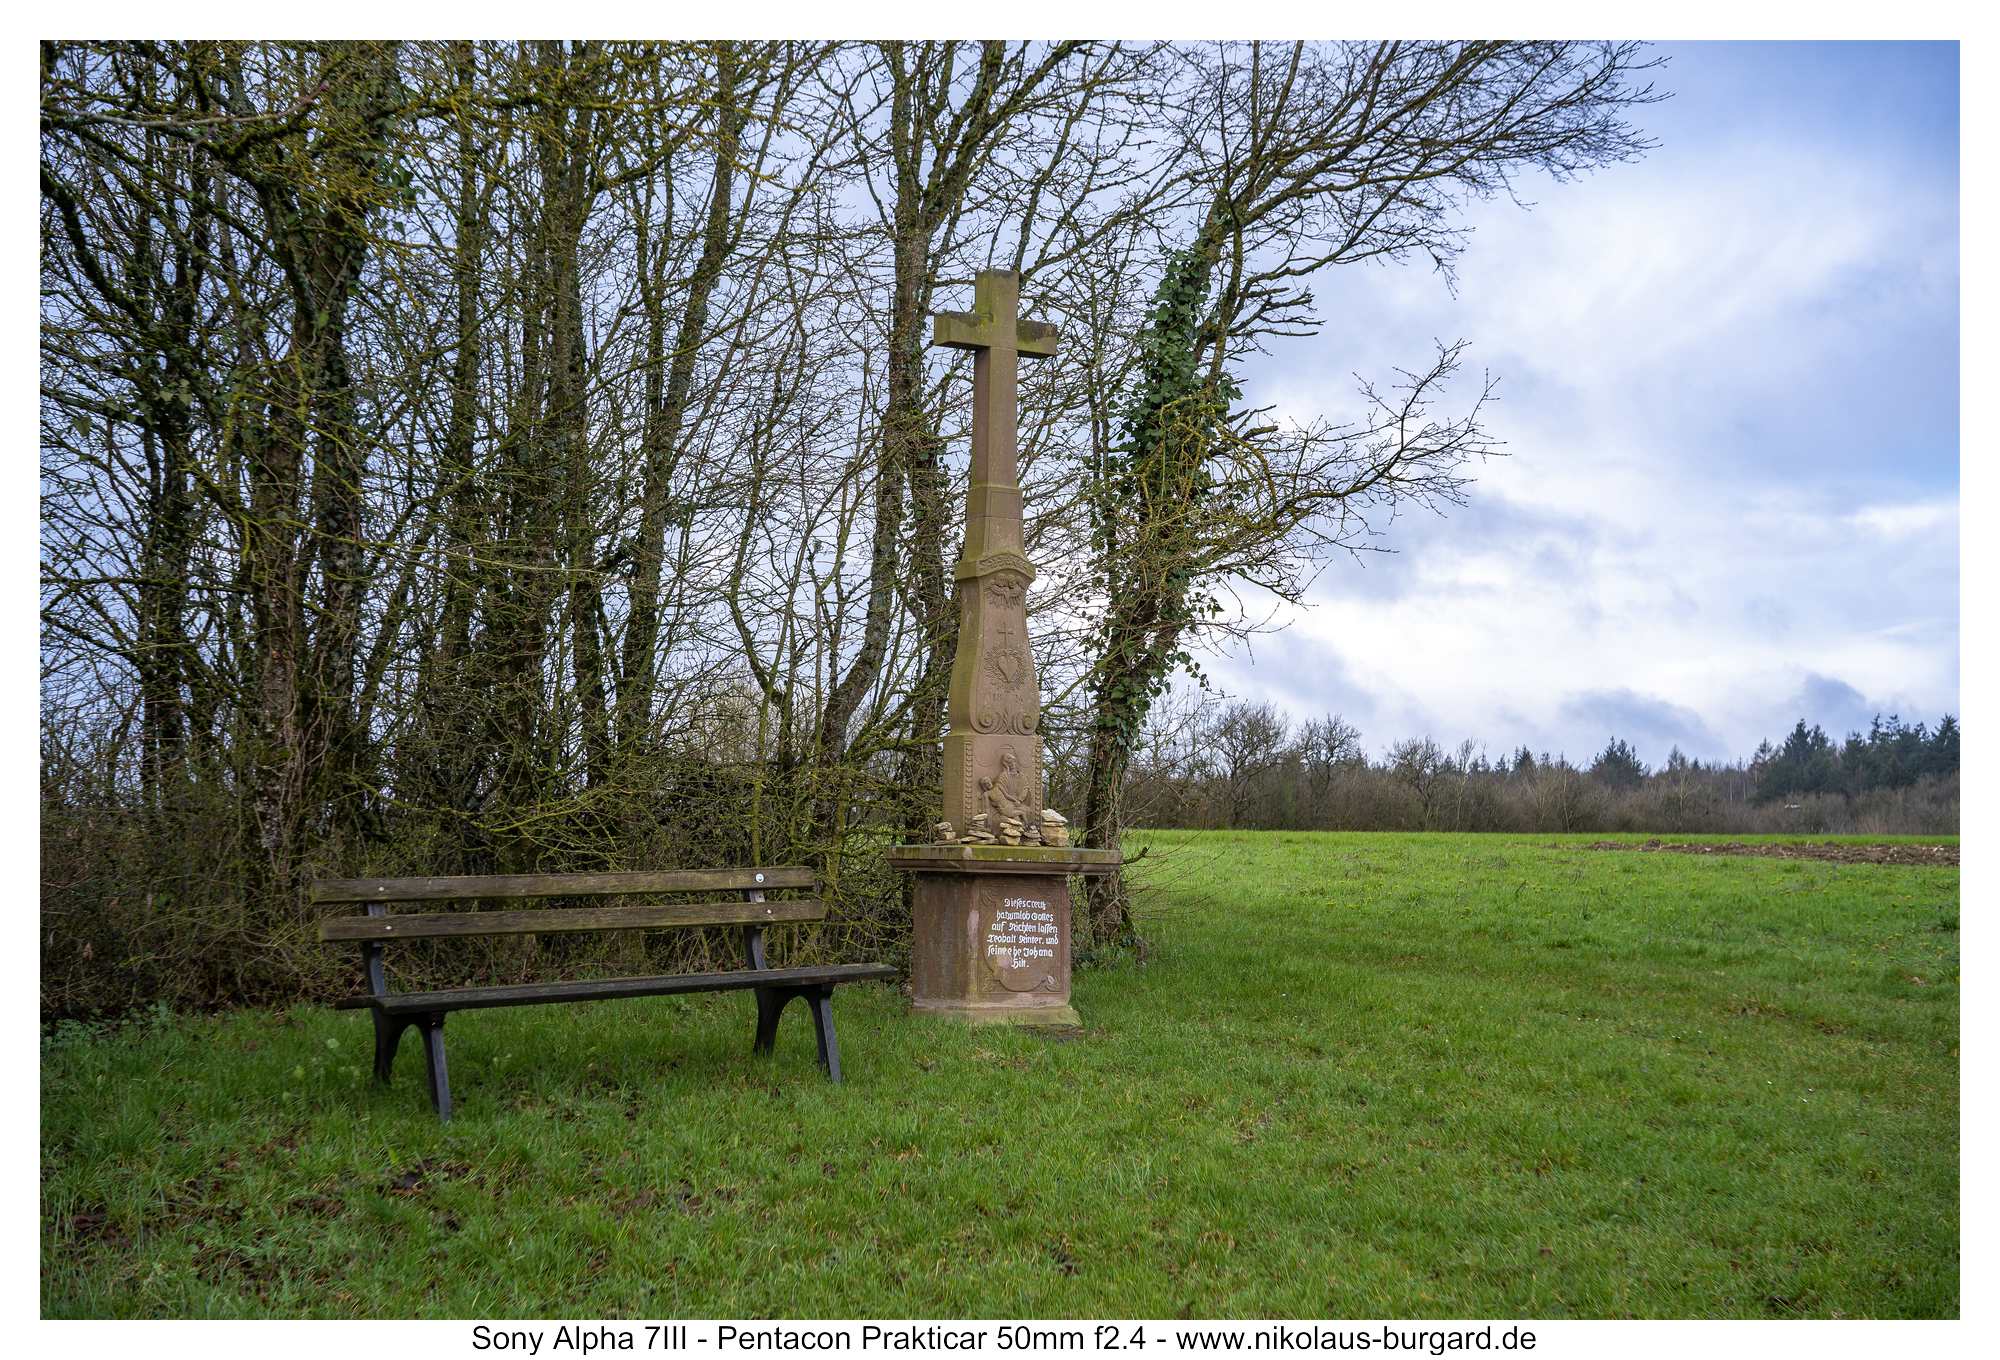
Bildserie: Ein Märzmorgen im Bliesgau - der Kreuzweg in Medelsheim
Photo series: A March morning in the Bliesgau - the Stations of the Cross in Medelsheim
Wie wirkt sich diese "Schärfeschwäche" nun in der Praxis aus?
Darüber soll nun eine Bildreihe aus der Praxis Aufschluss geben.
An einem Märzmorgen mit schönstem Bliesgauwetter (Sonne und Regen im Wechsel - oder gleichzeitig!) bin ich den Wanderweg "Medelsheimer Kreuzweg" gelaufen.
Die Detailaufnahmen sind bei Offenblende, die weiteren Landschaftsbilder bei f8 und f11 entstanden:
How does this "weakness in sharpness" work in practice?
A series of pictures from practice should now provide information about this.
On a March morning with the most beautiful Bliesgau weather (sun and rain alternating - or at the same time!) I walked the "Medelsheimer Kreuzweg" hiking trail.
The detail shots were taken with an open aperture, the other landscape shots at f8 and f11:
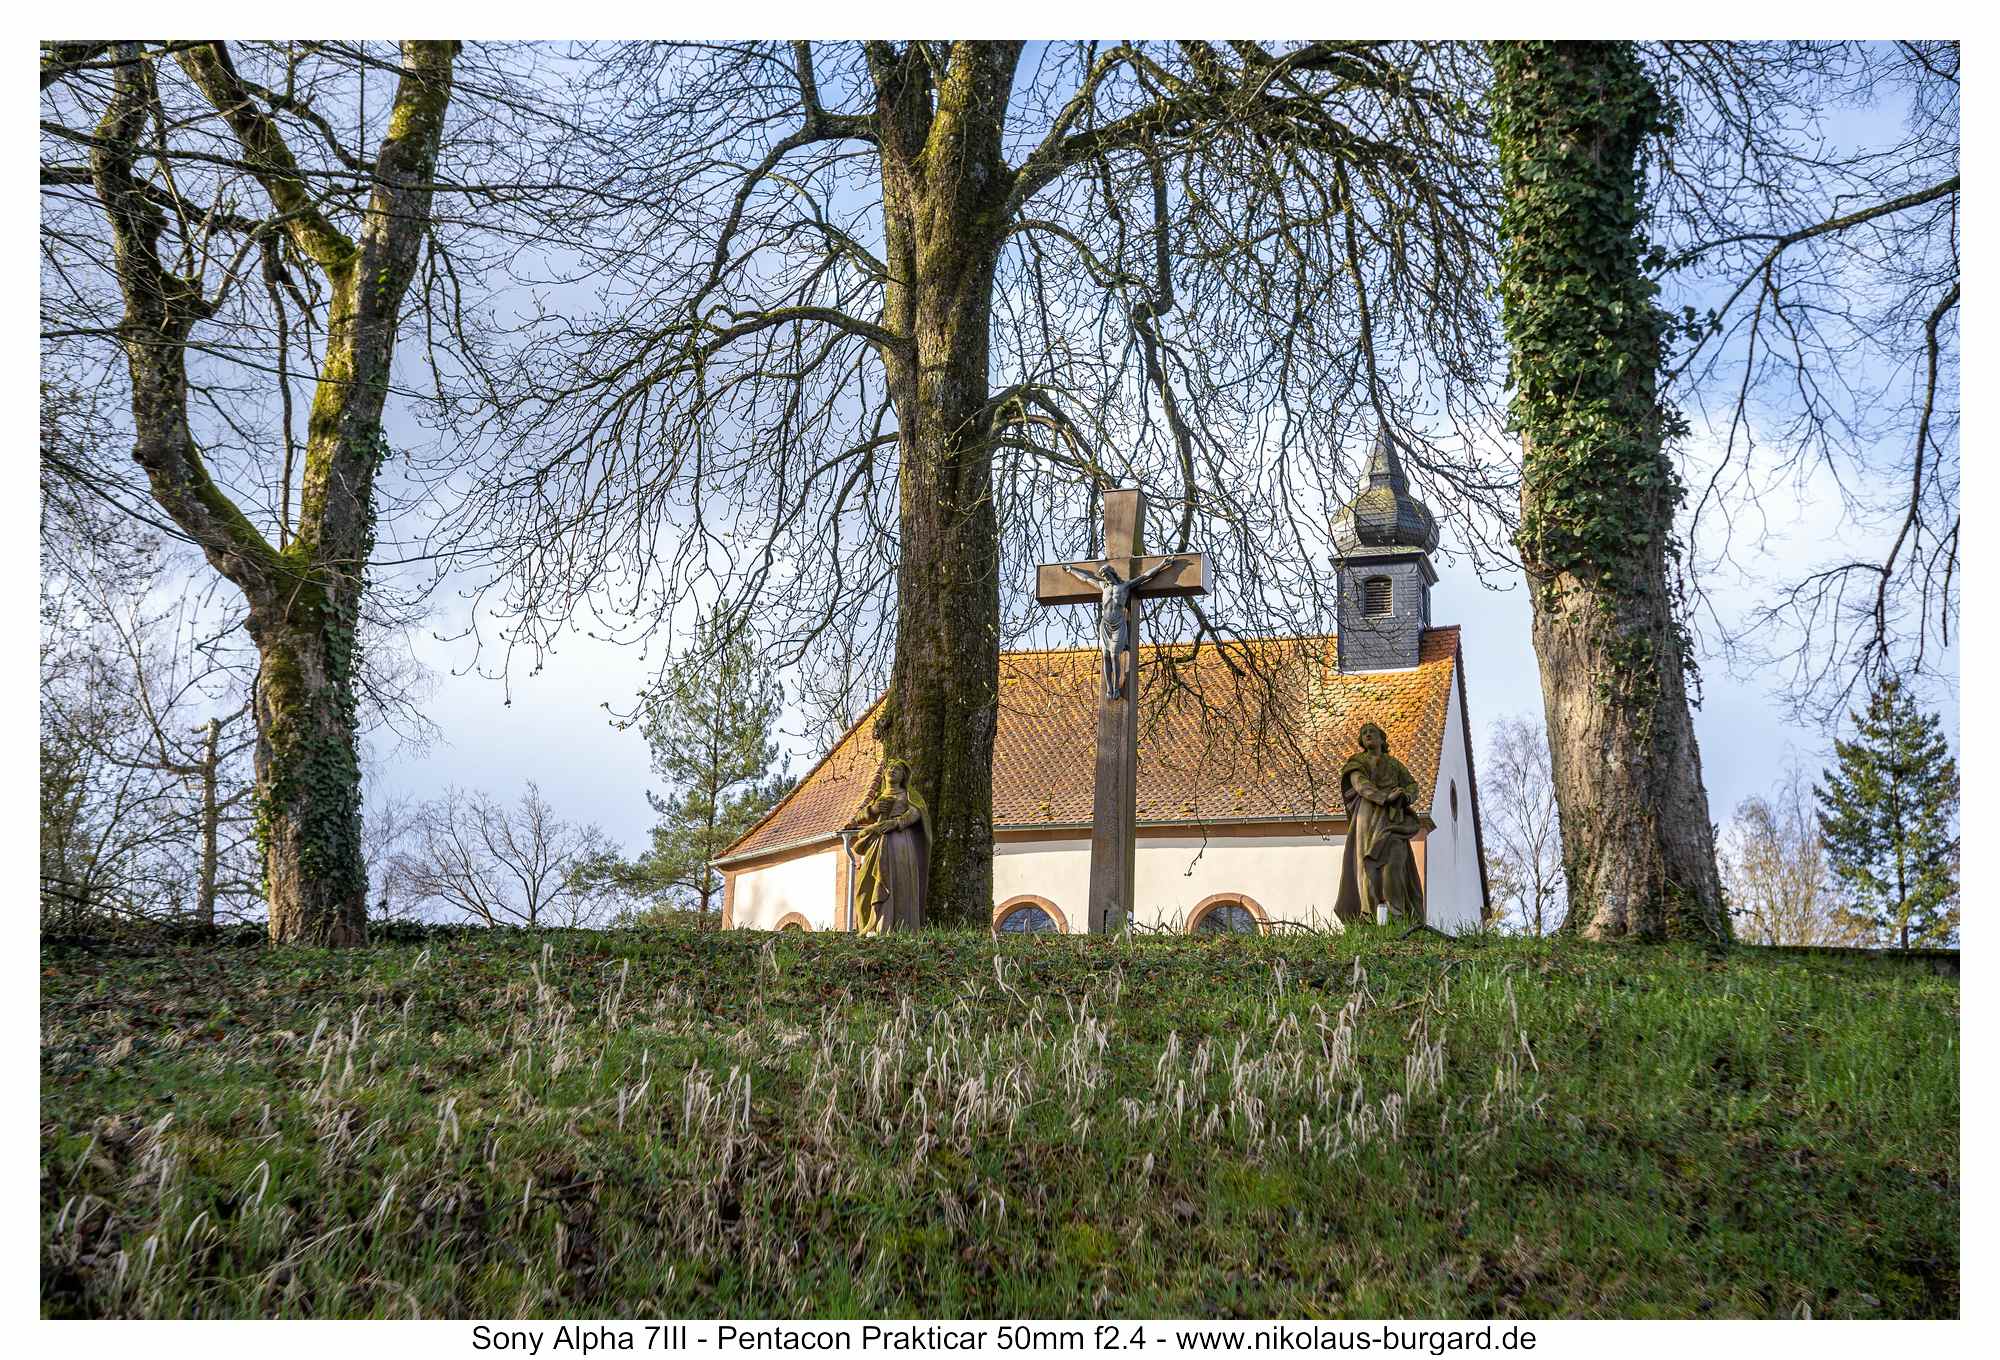
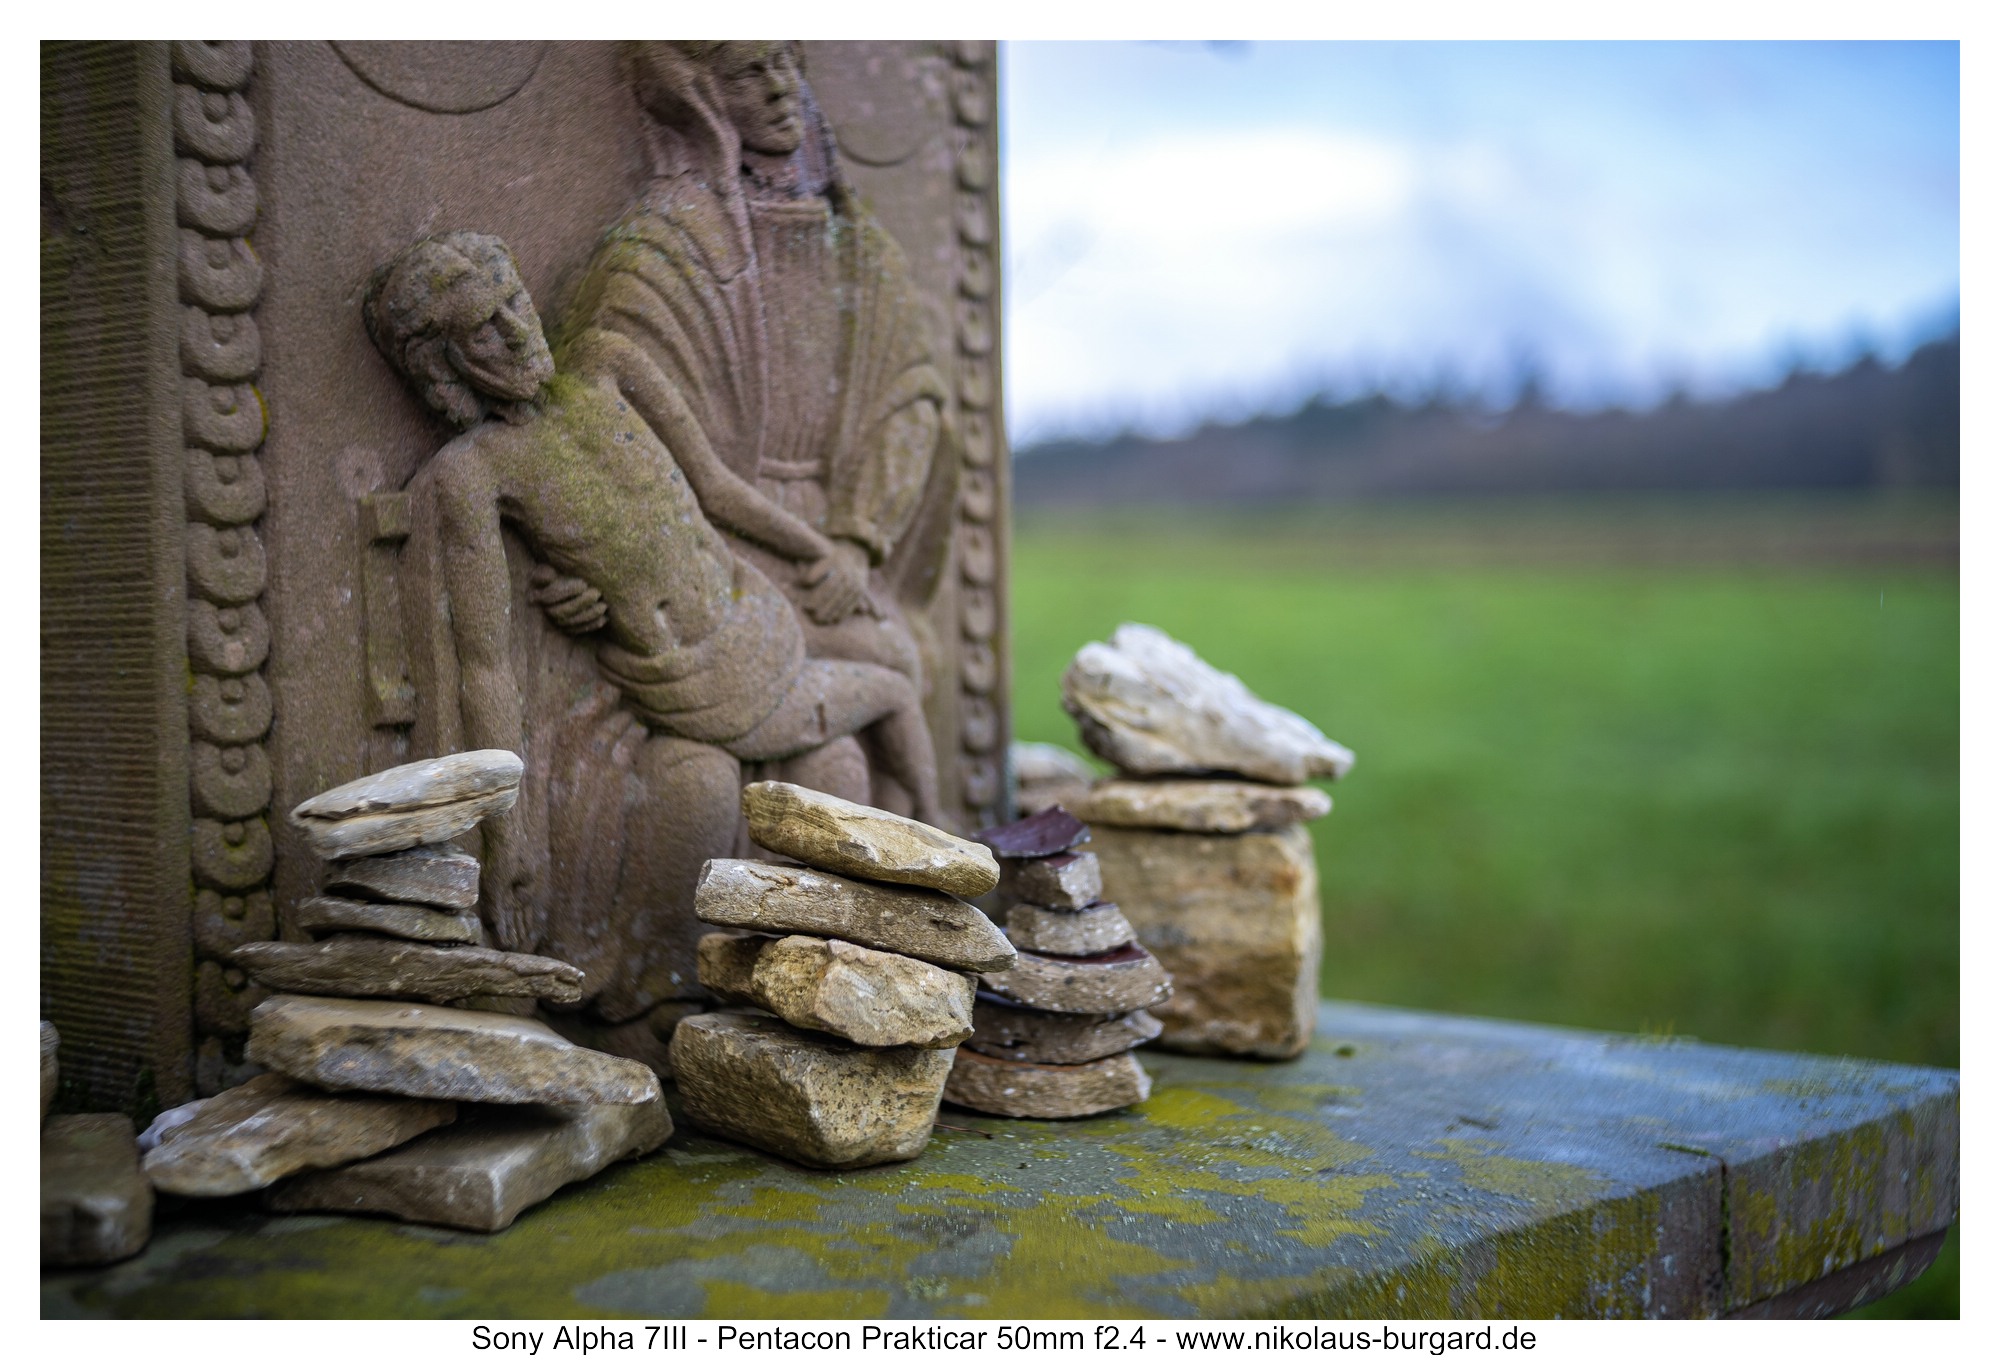


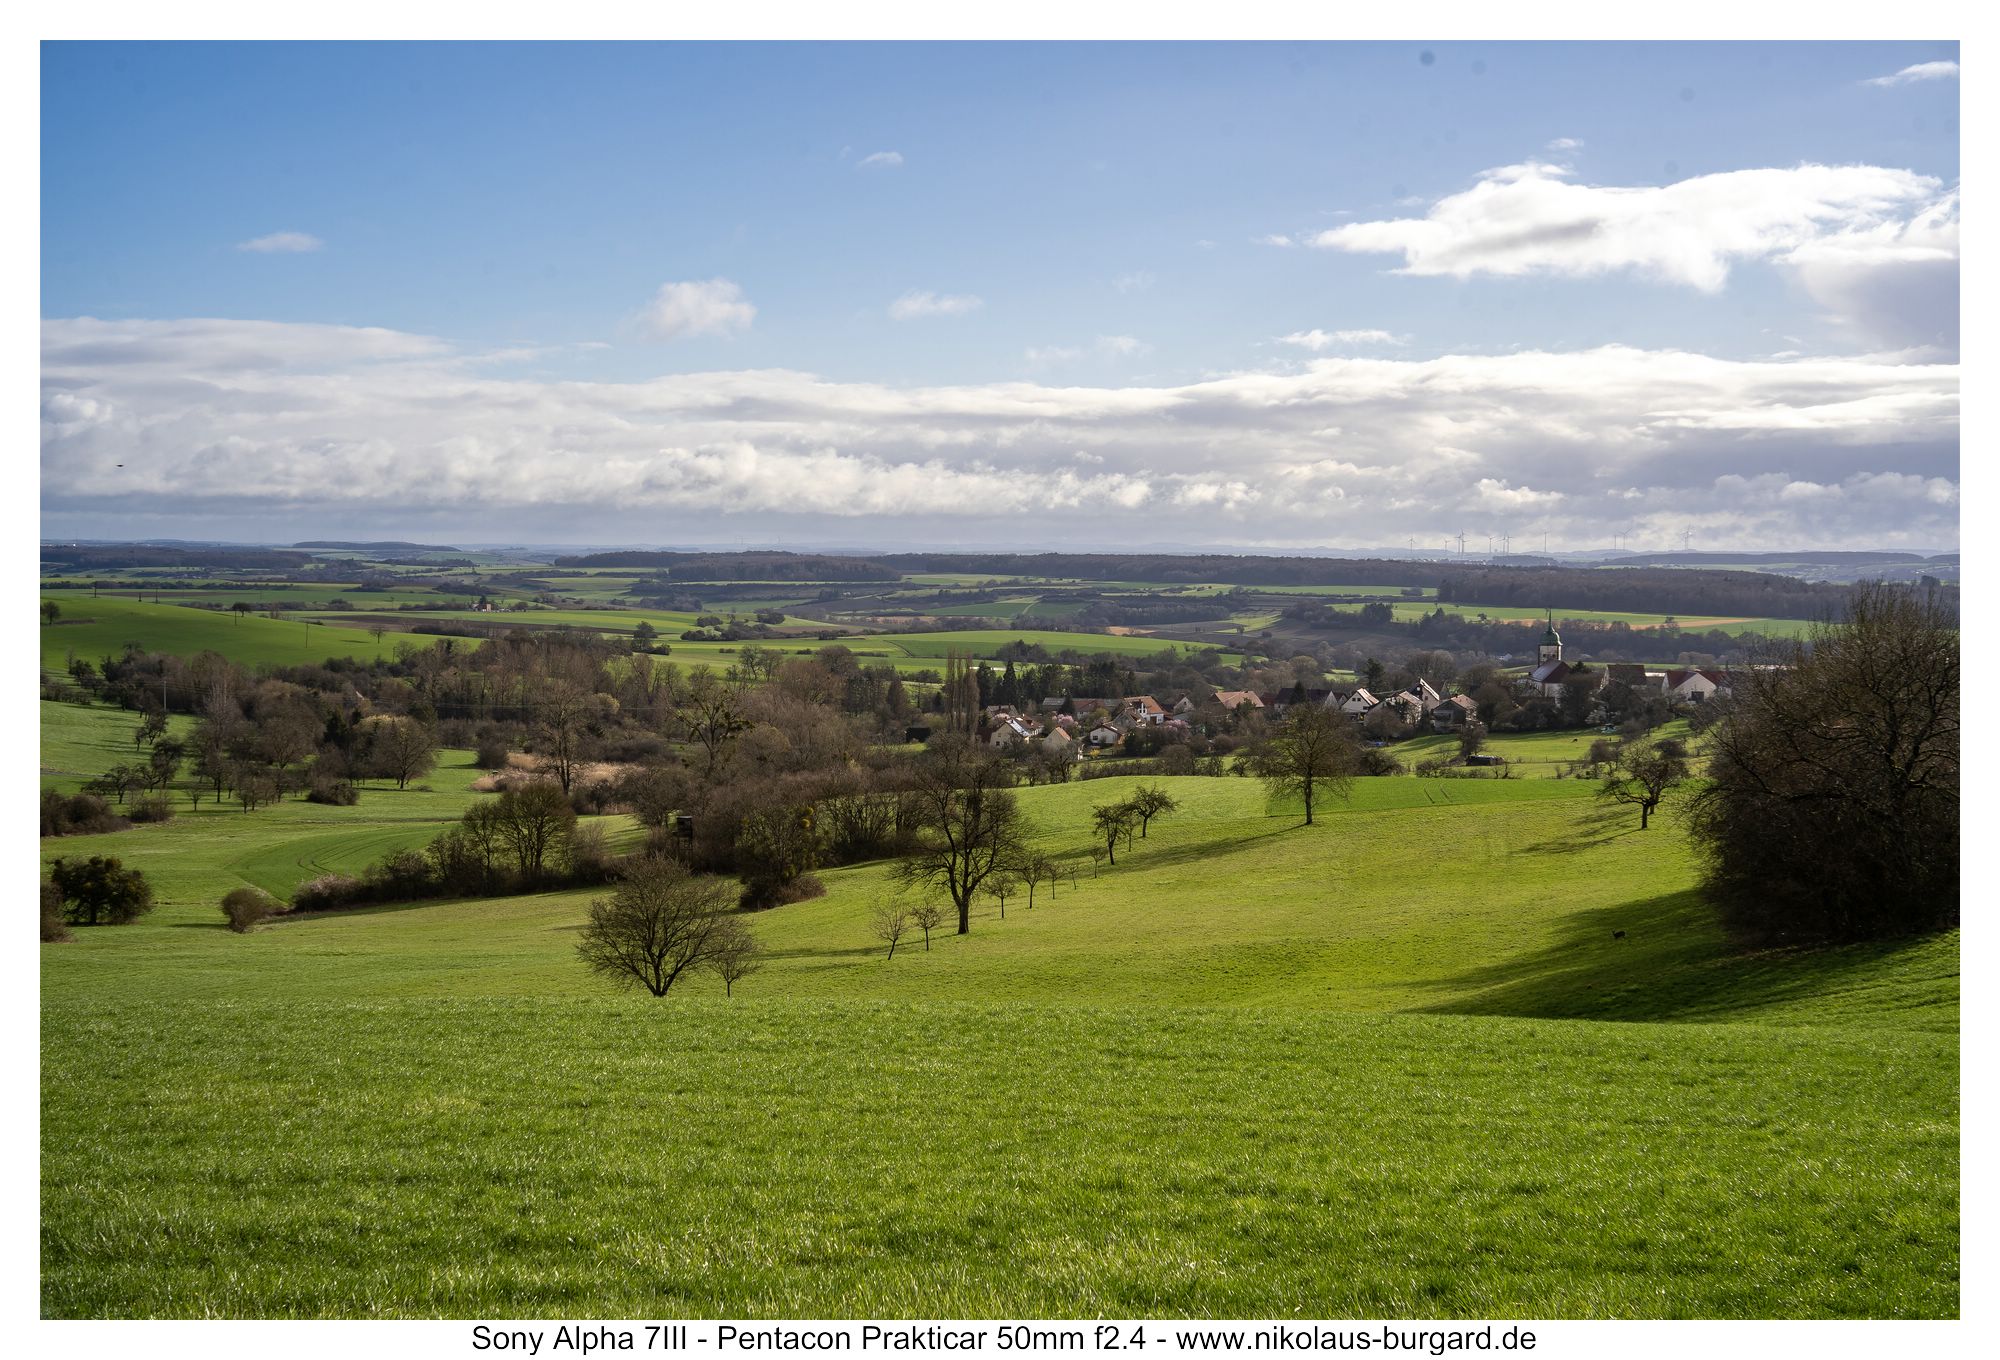

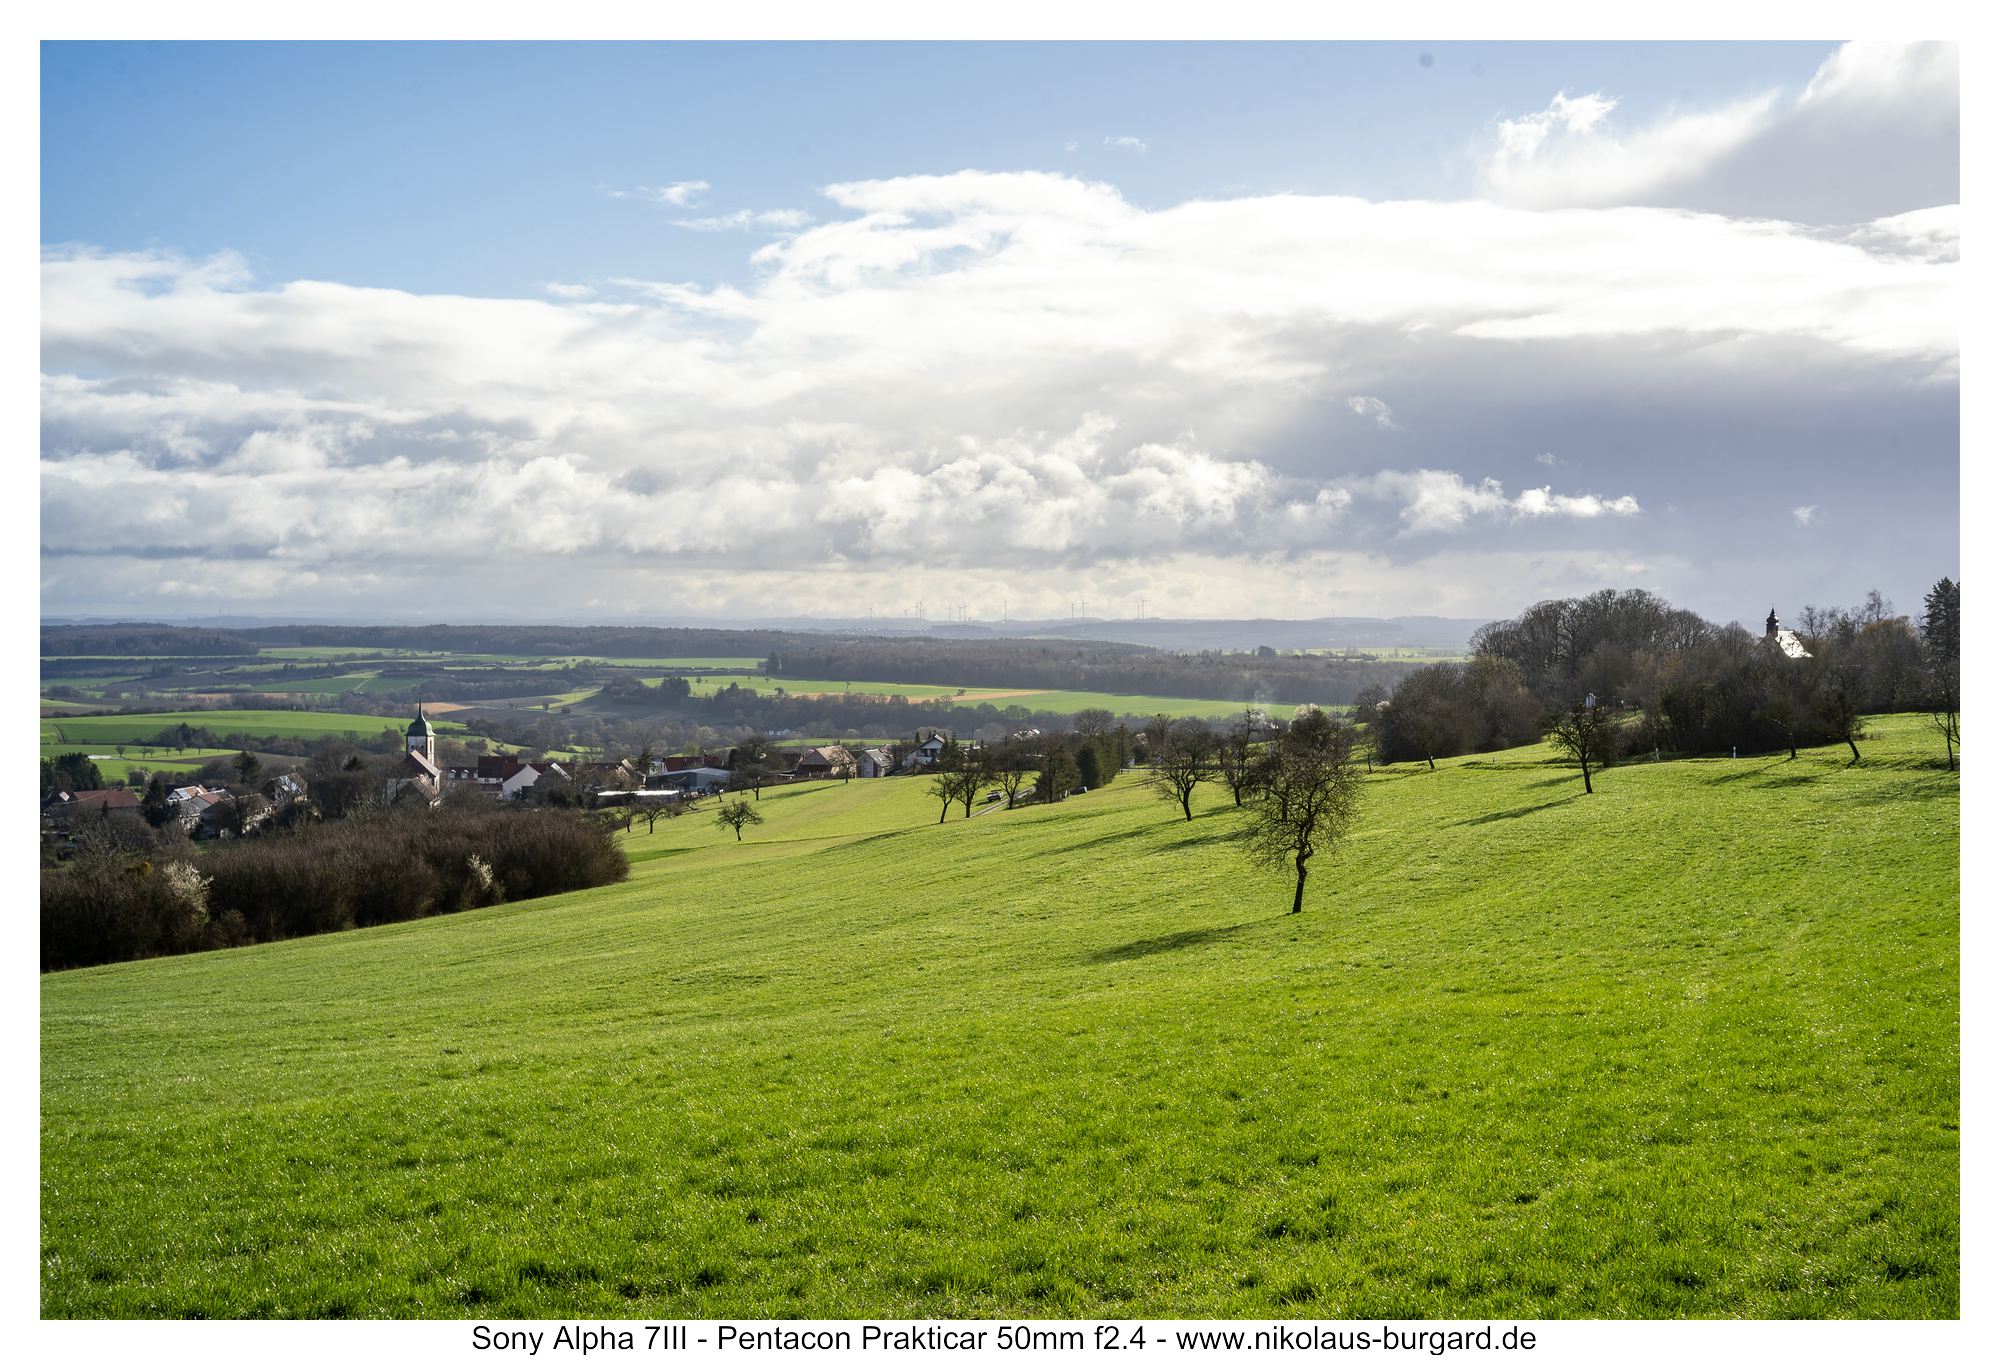
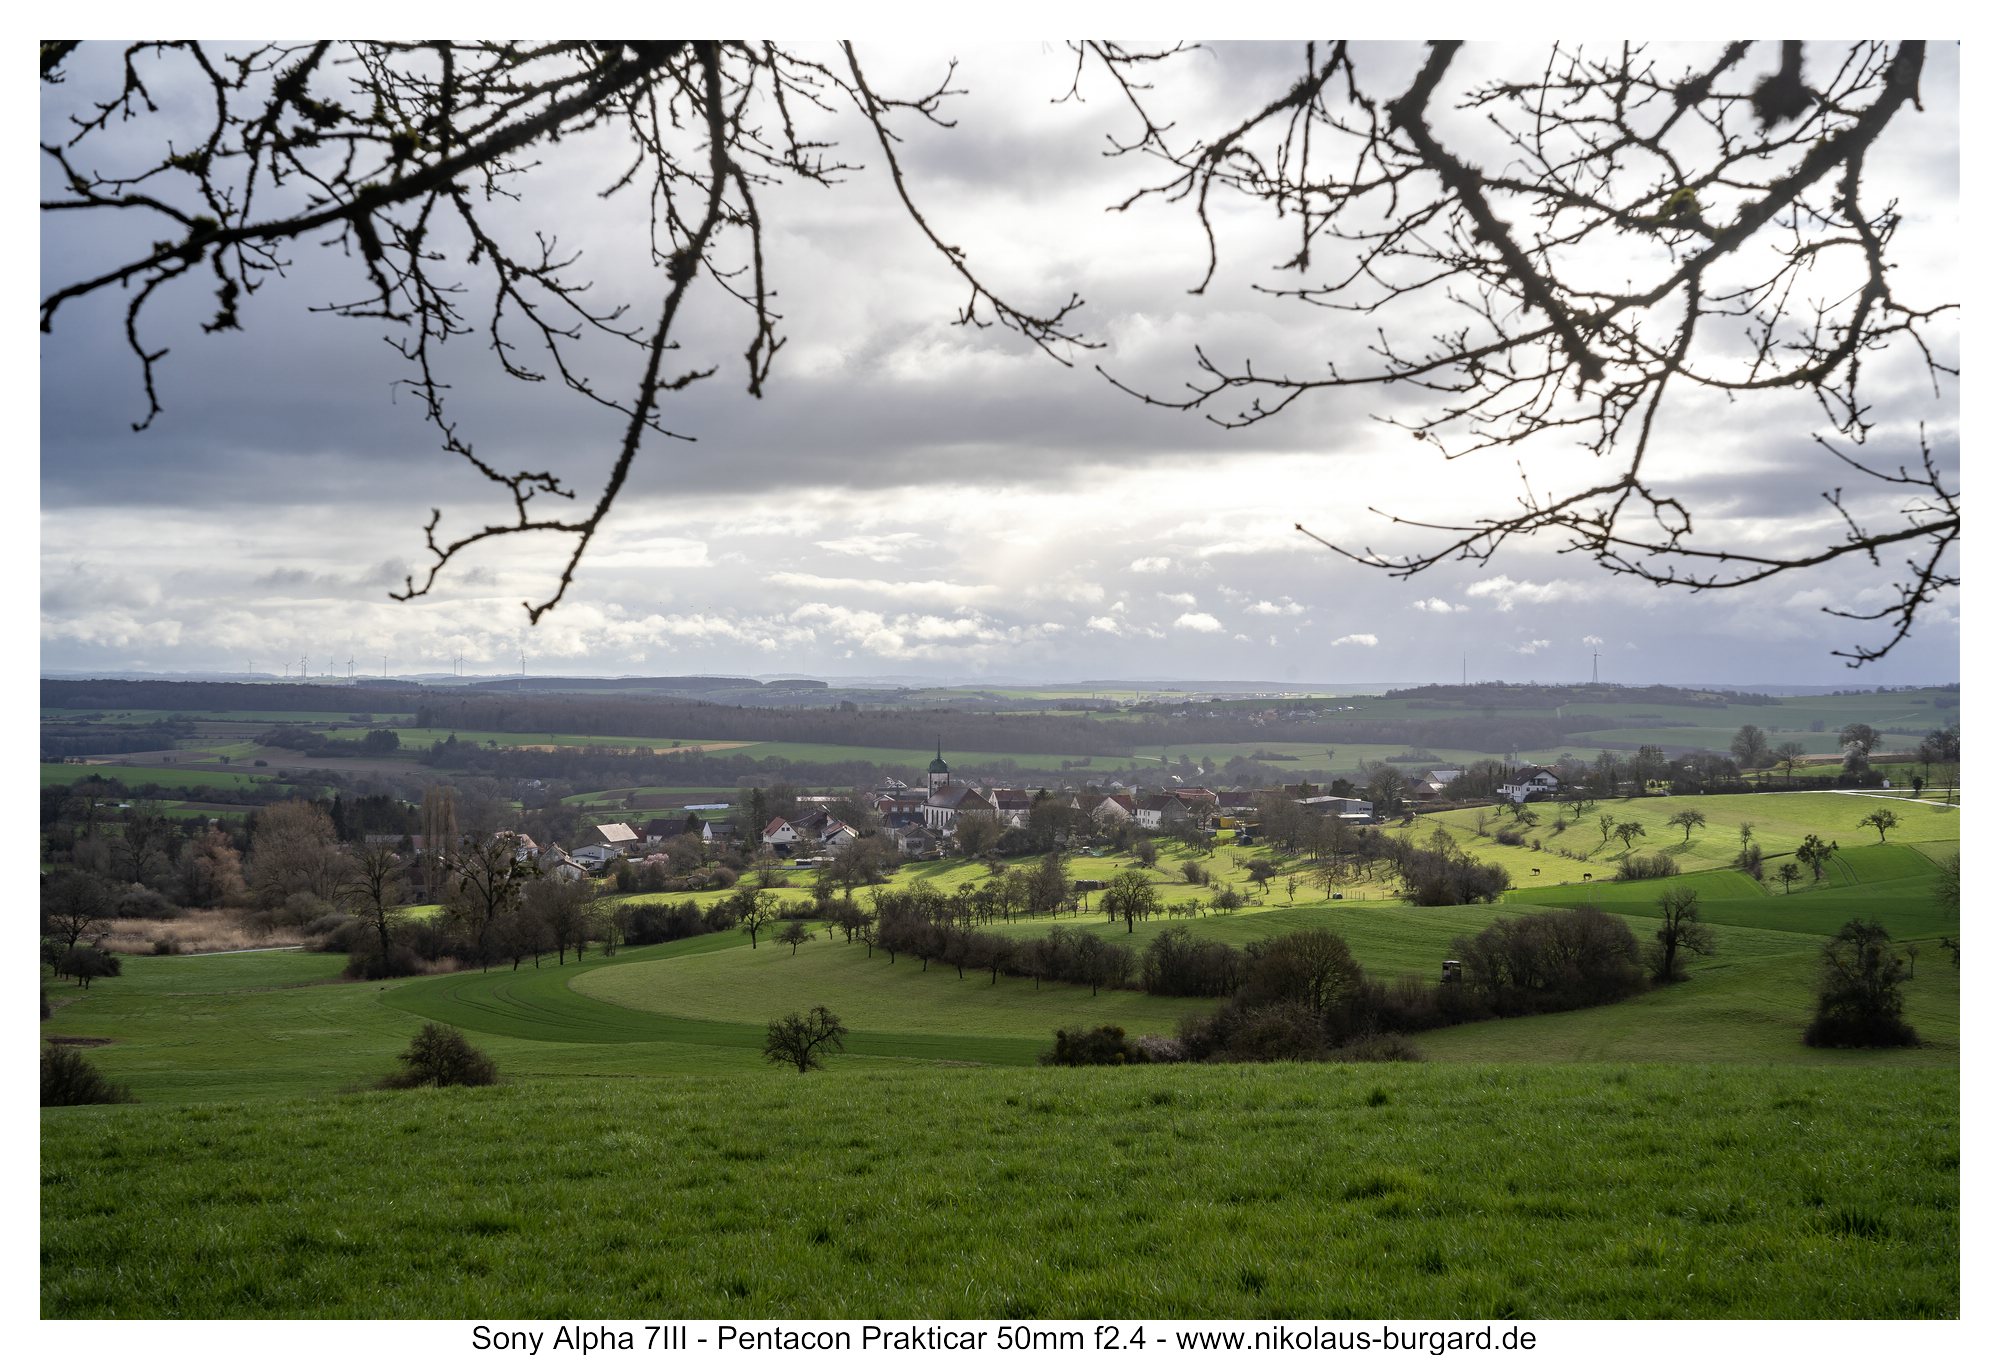
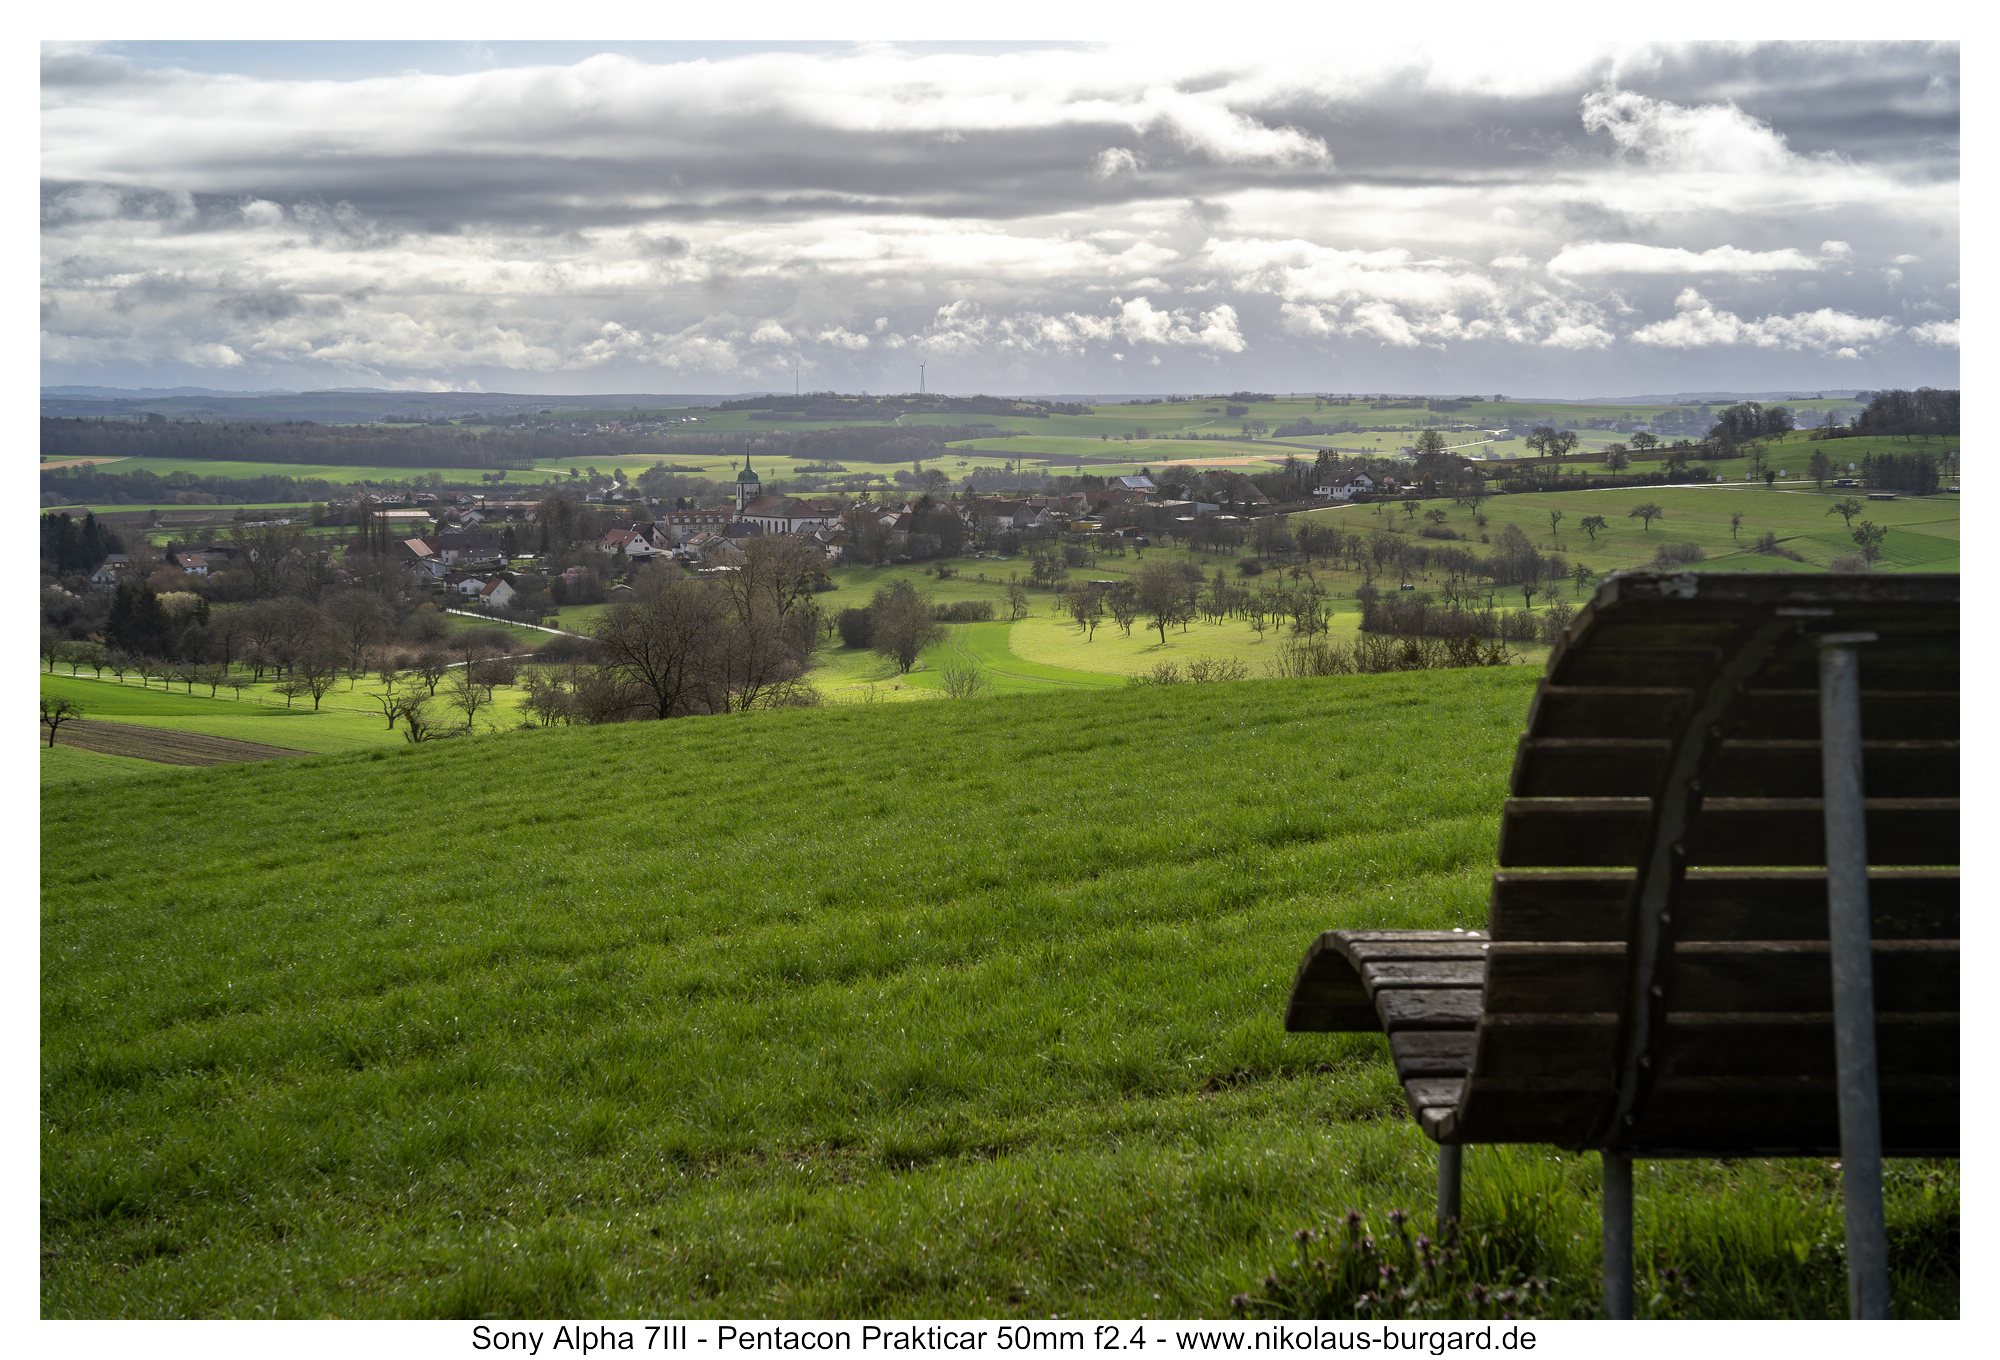
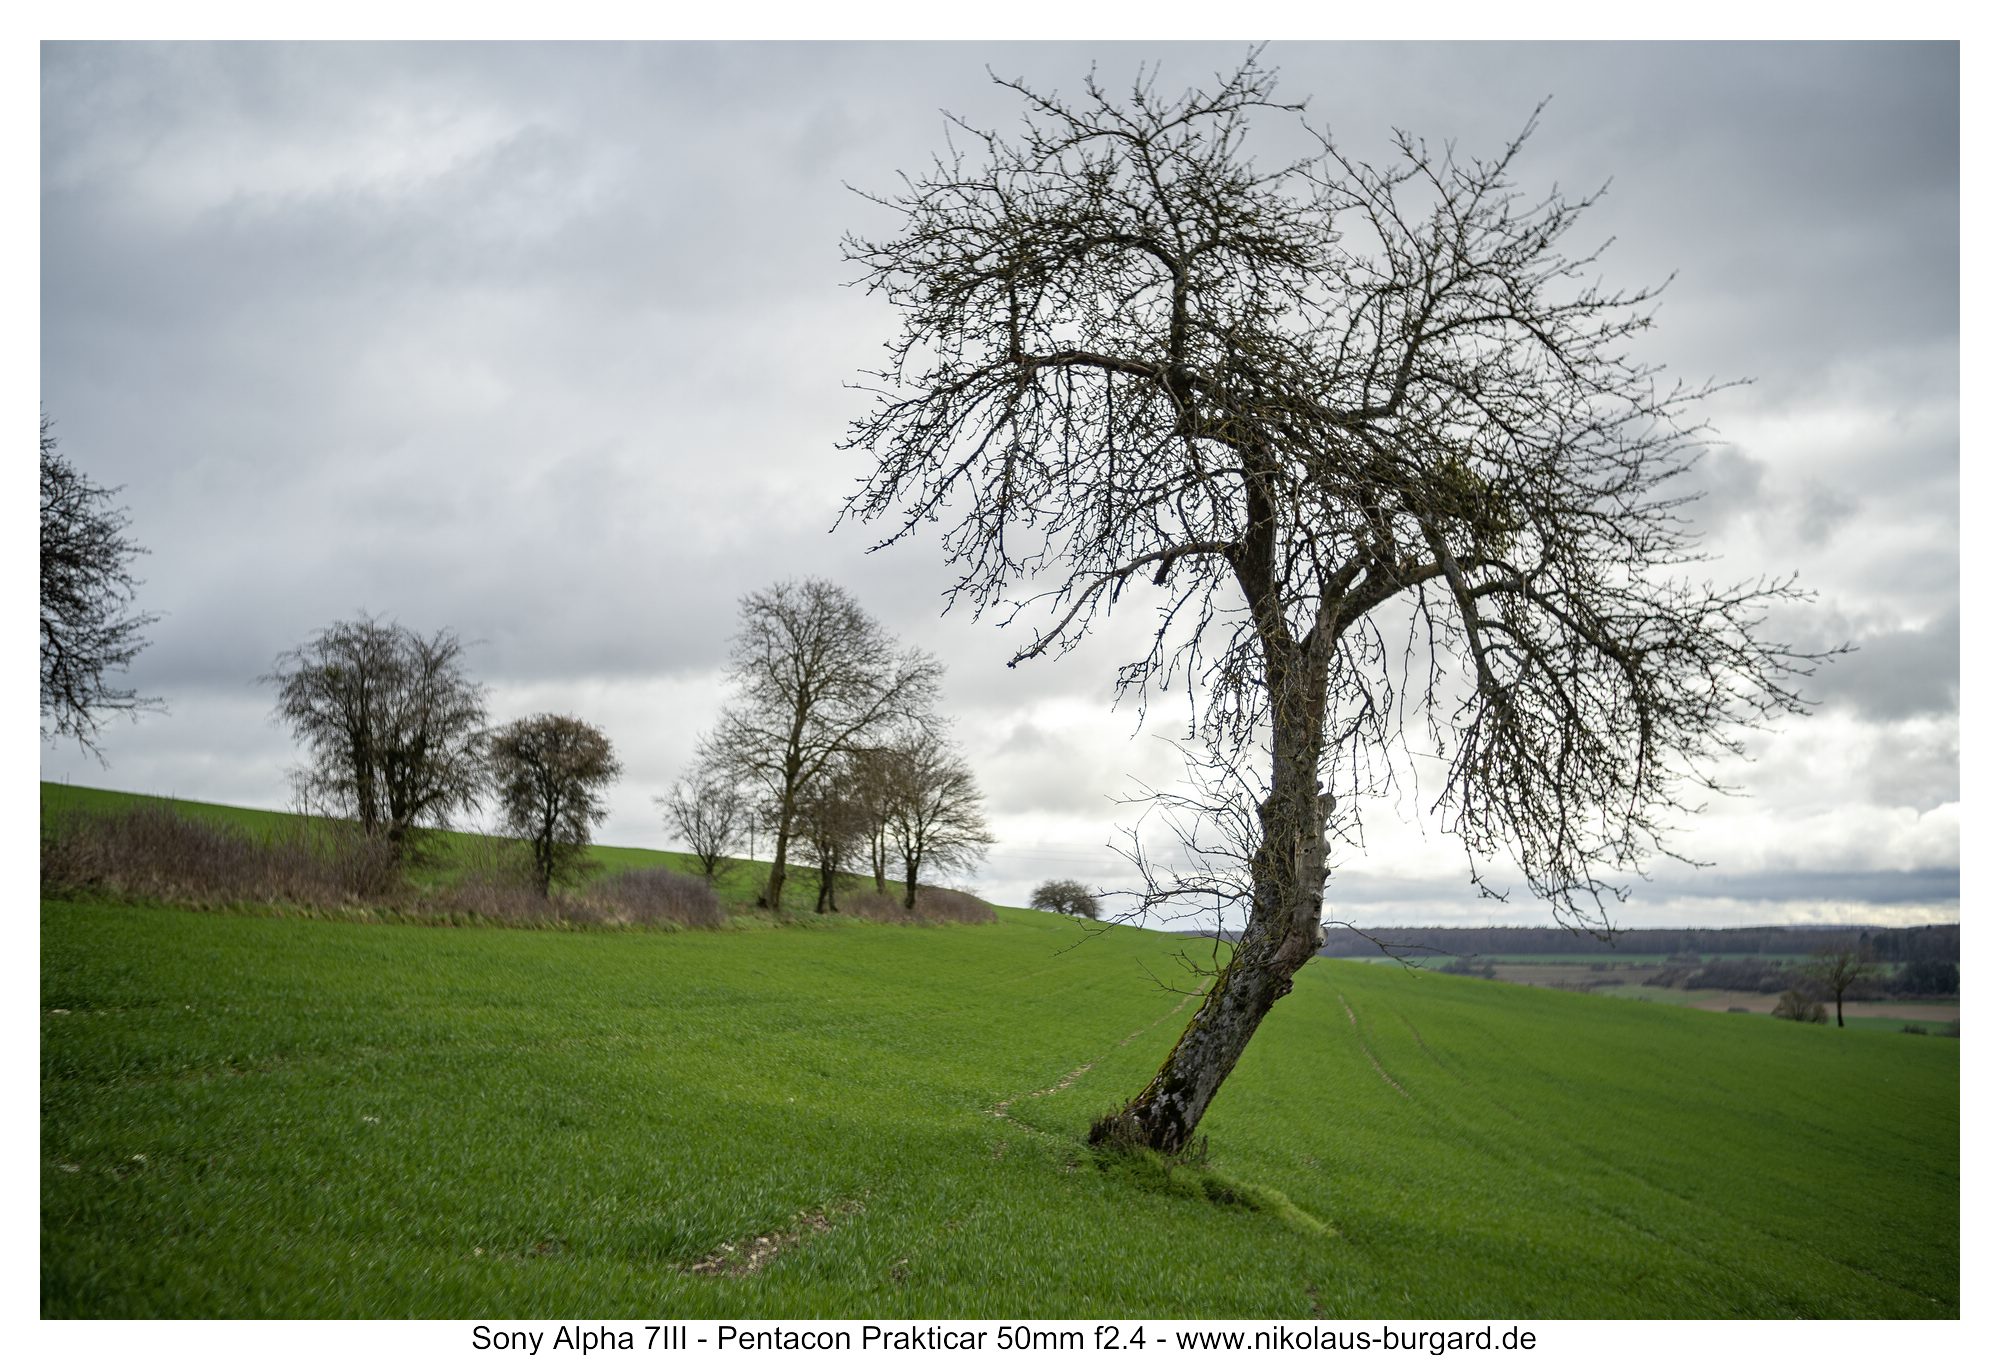
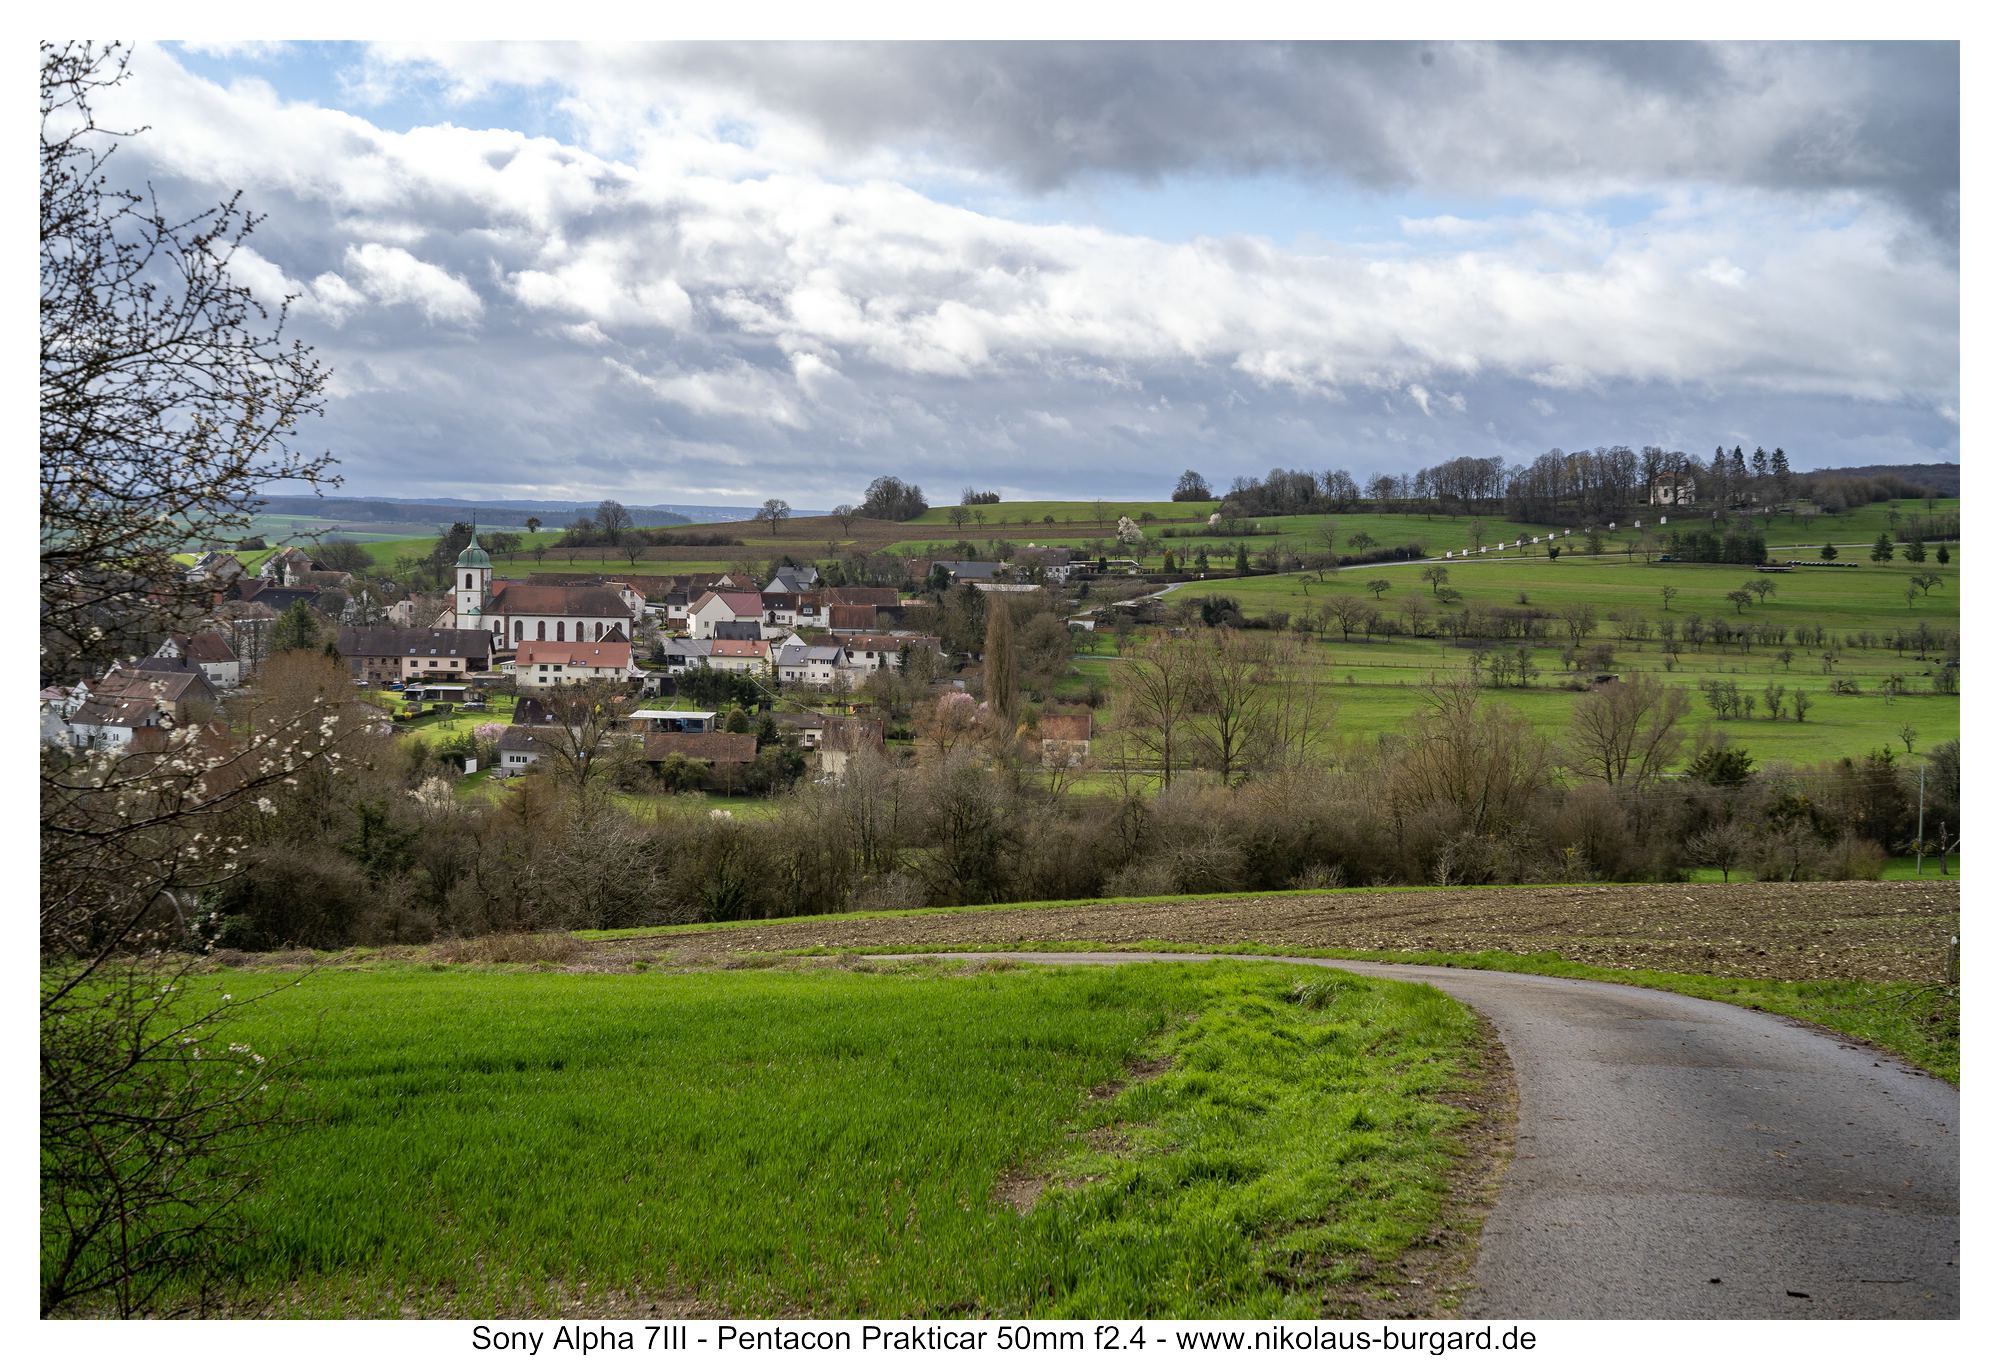
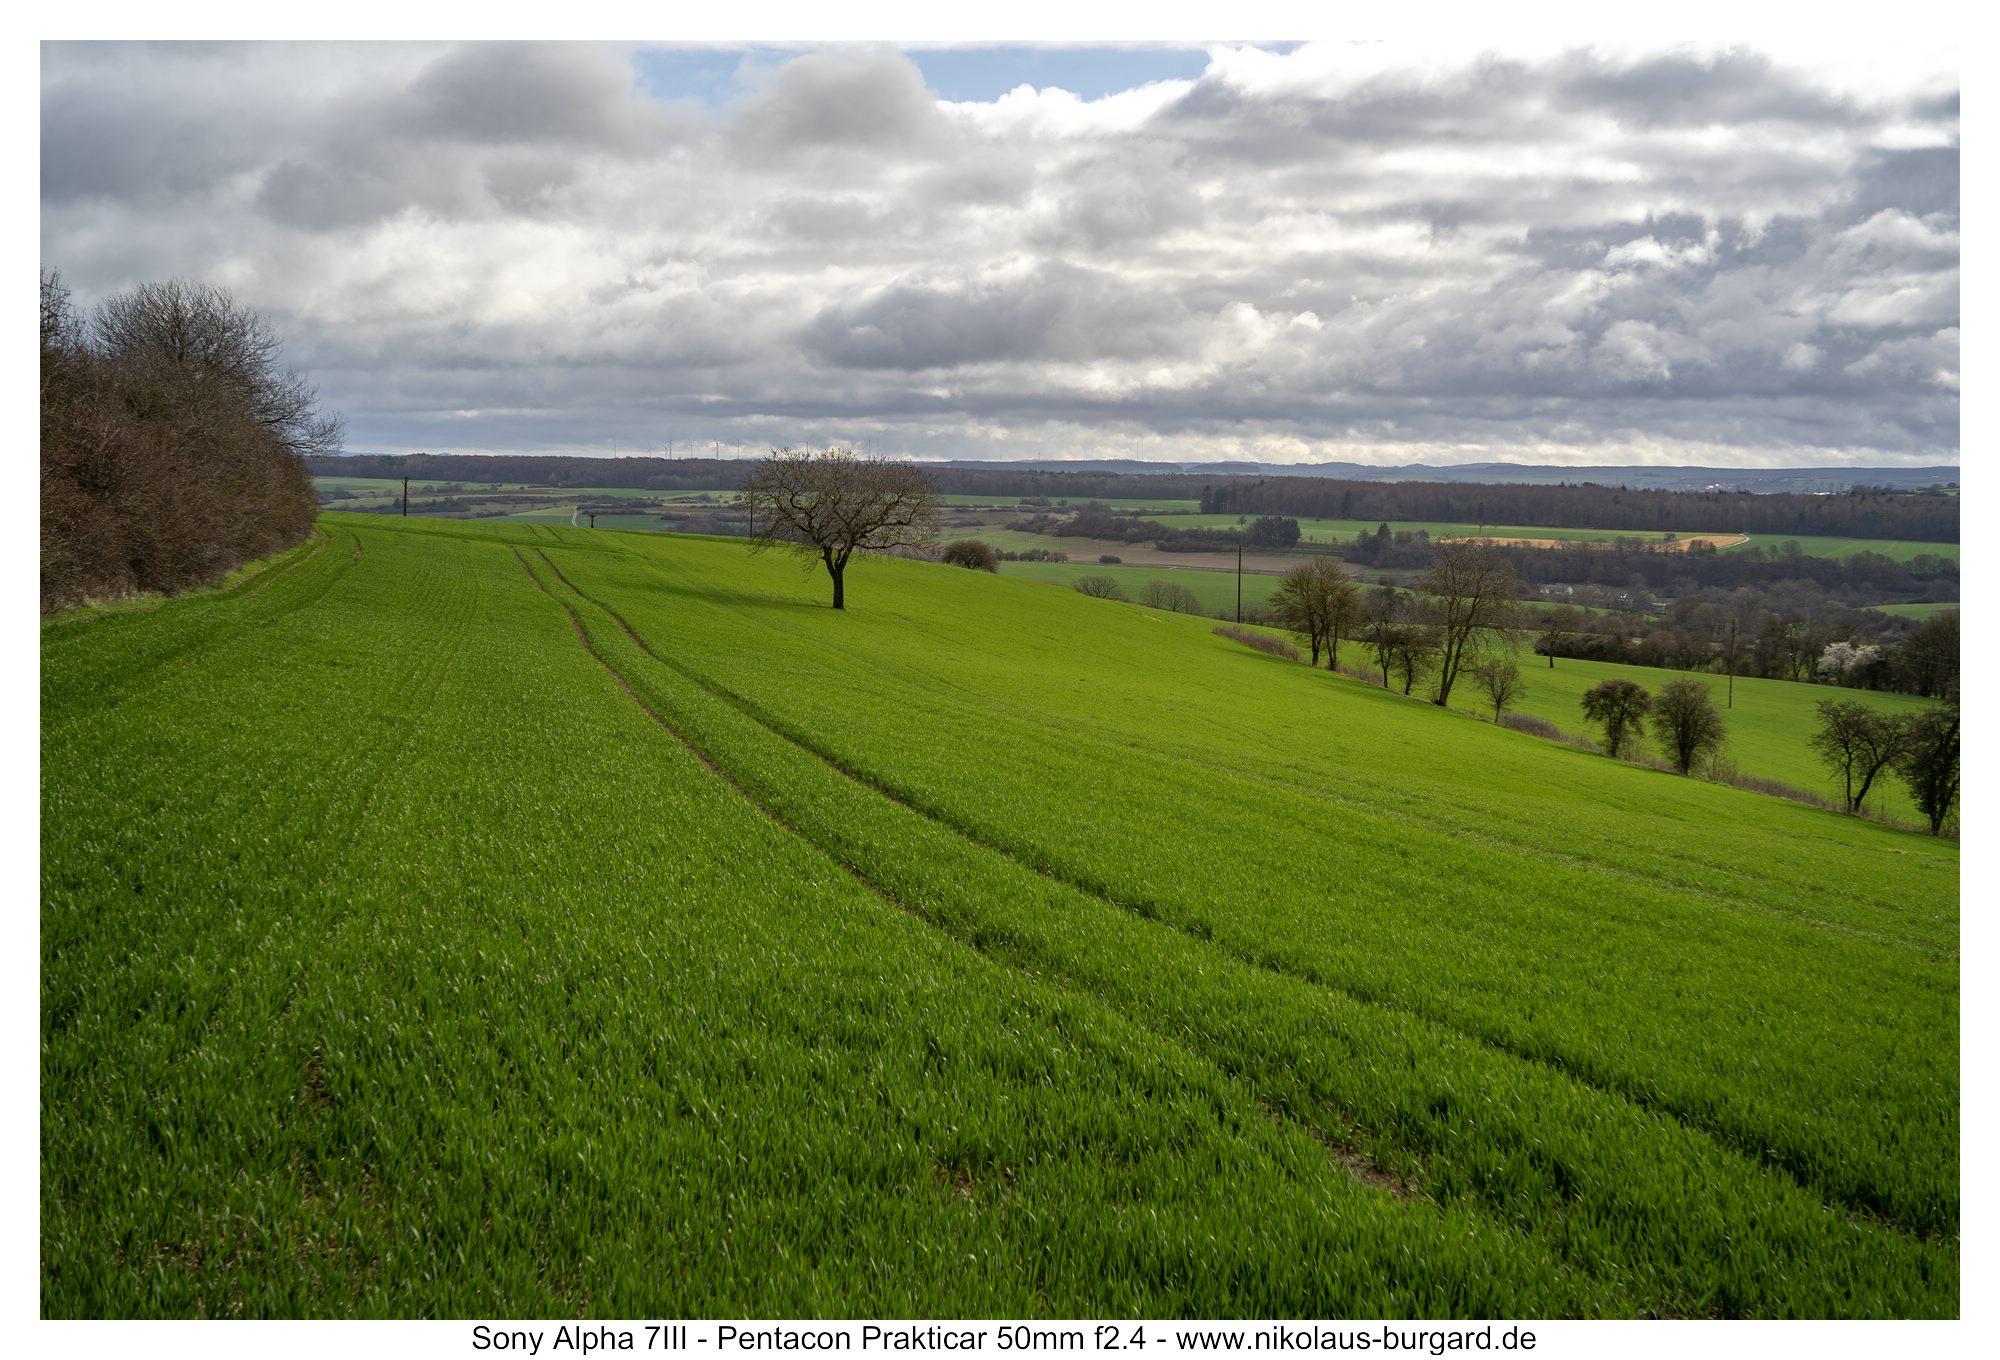
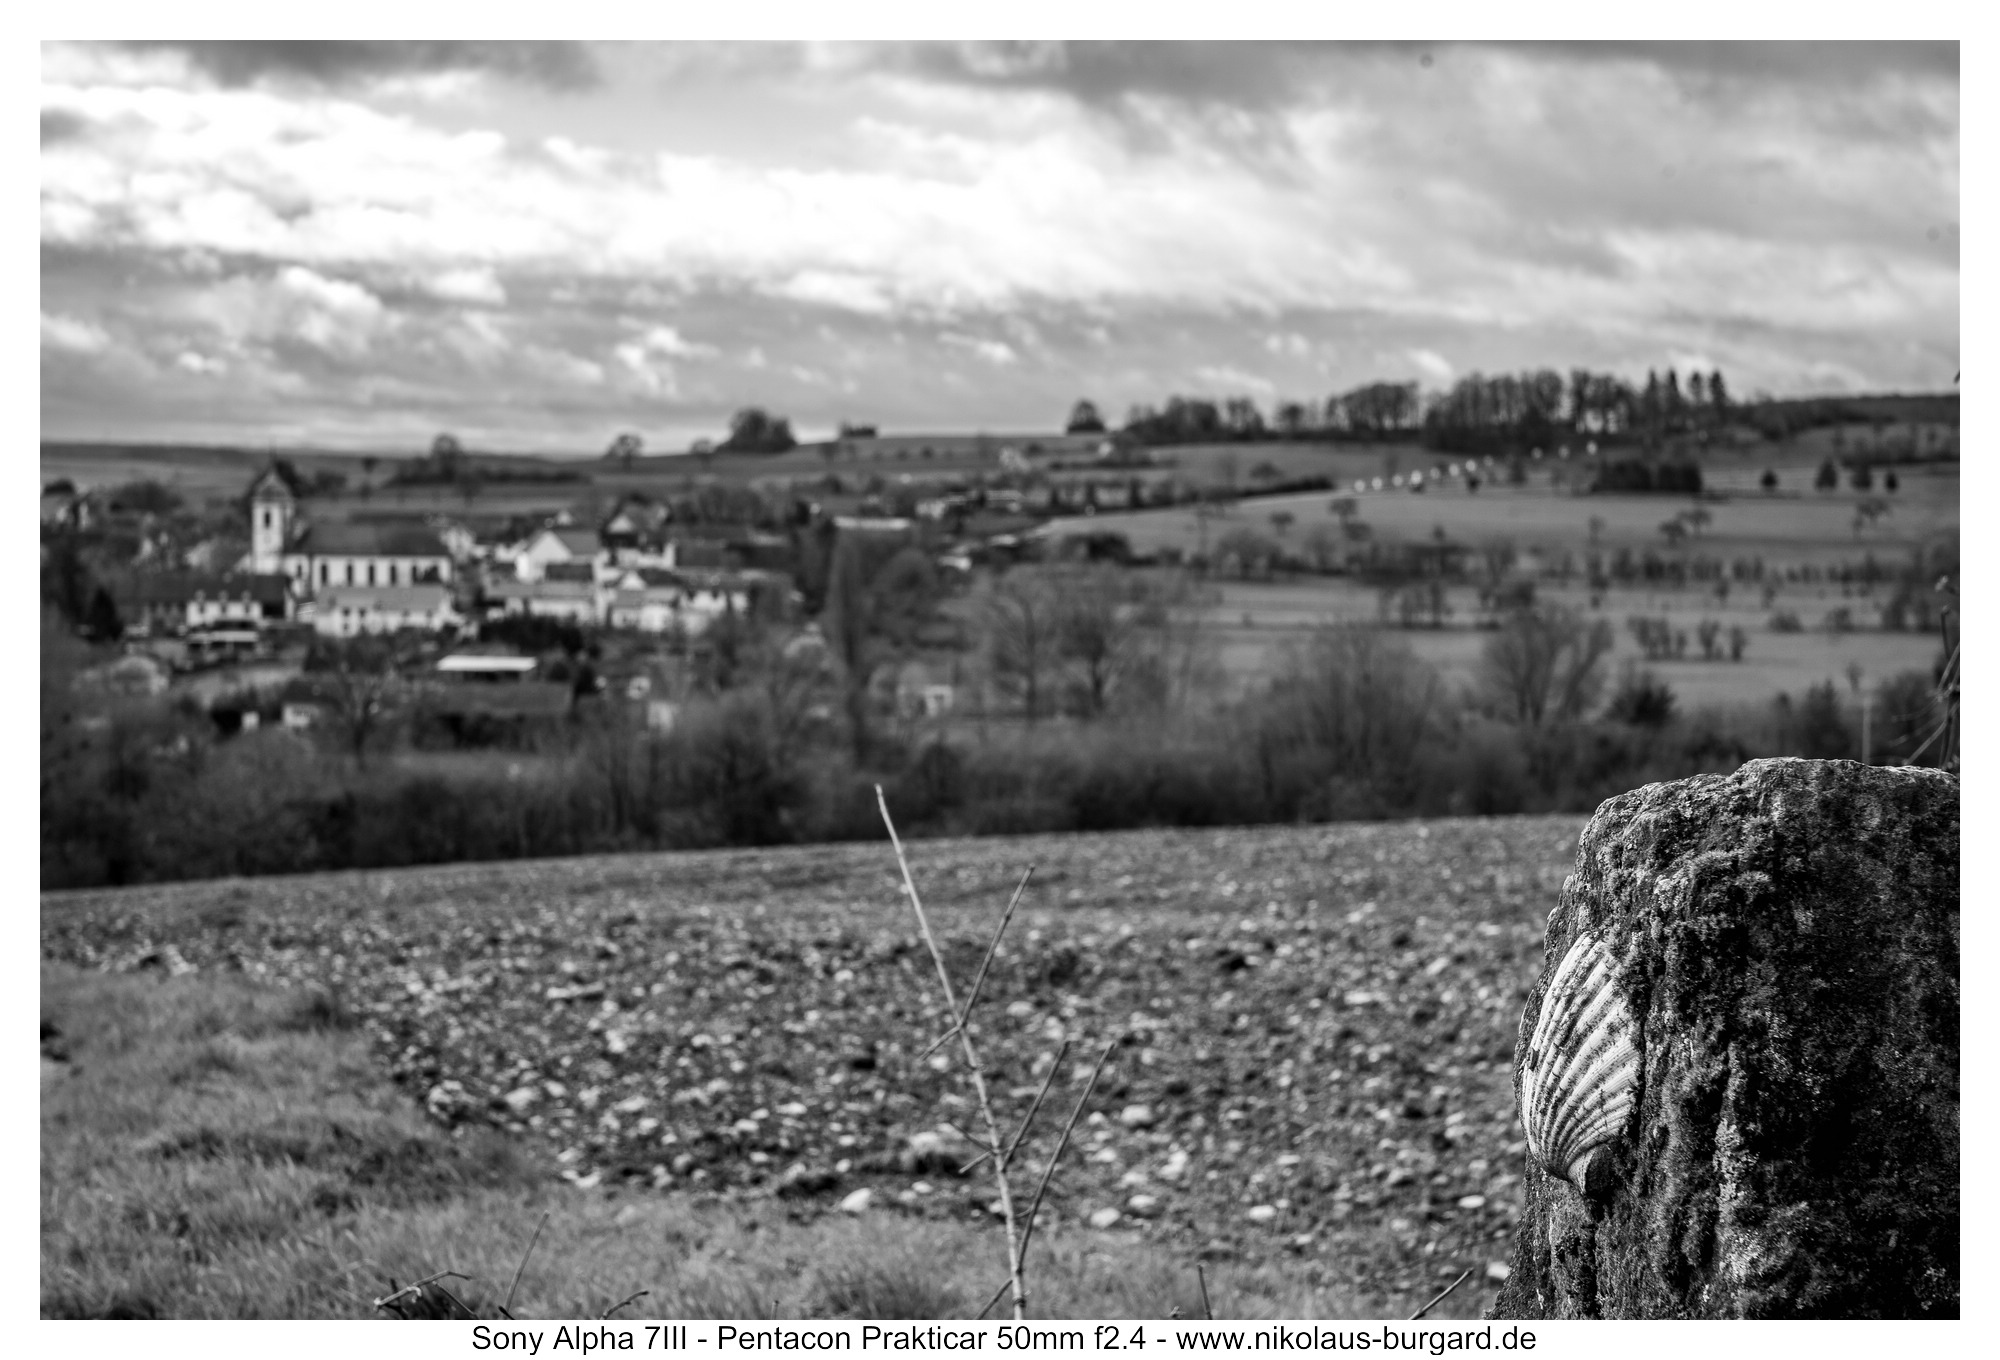
Ich finde, da gibt es schärfetechnisch nichts zu bemängeln. Die Randschärfe ist da, und in den Bildecken liegen bei mir eigentlich nie wichtige Details.
Auffälliger sind in meinen Augen die Offenblende-Aufnahmen.
Hier ist der Randabfall sehr deutlich und die Ecken sehr unruhig-unscharf, und hinzu kommt noch die Vignette.
Hier aus dieser Reihe 2 Beispielpaare, das gleiche Motiv jeweils bei f2.4 und f8:
I think there is nothing to complain about in terms of sharpness. The edge sharpness is there, and there are never really important details in the corners of the picture.
In my opinion, the open aperture shots are more striking.
Here the edge drop is very clear and the corners very restless and blurred, and then there is the strong vignette.
Here are 2 example pairs from this series, the same motif at f2.4 and f8:


Verzeichnung / Distortion
Ungewöhnlich für ein Normalobjektiv ist die sichtbar kissenförmige Verzeichnung des Prakticars.
Diese ist relativ stark ausgeprägt, aber zum Glück uniform und im Bedarfsfall in der Bildbearbeitung gut entfernbar.
Unusual for a normal lens is the visible pincushion distortion of the Prakticar.
This is relatively pronounced, but fortunately uniform and, if necessary, easily removable in image processing.

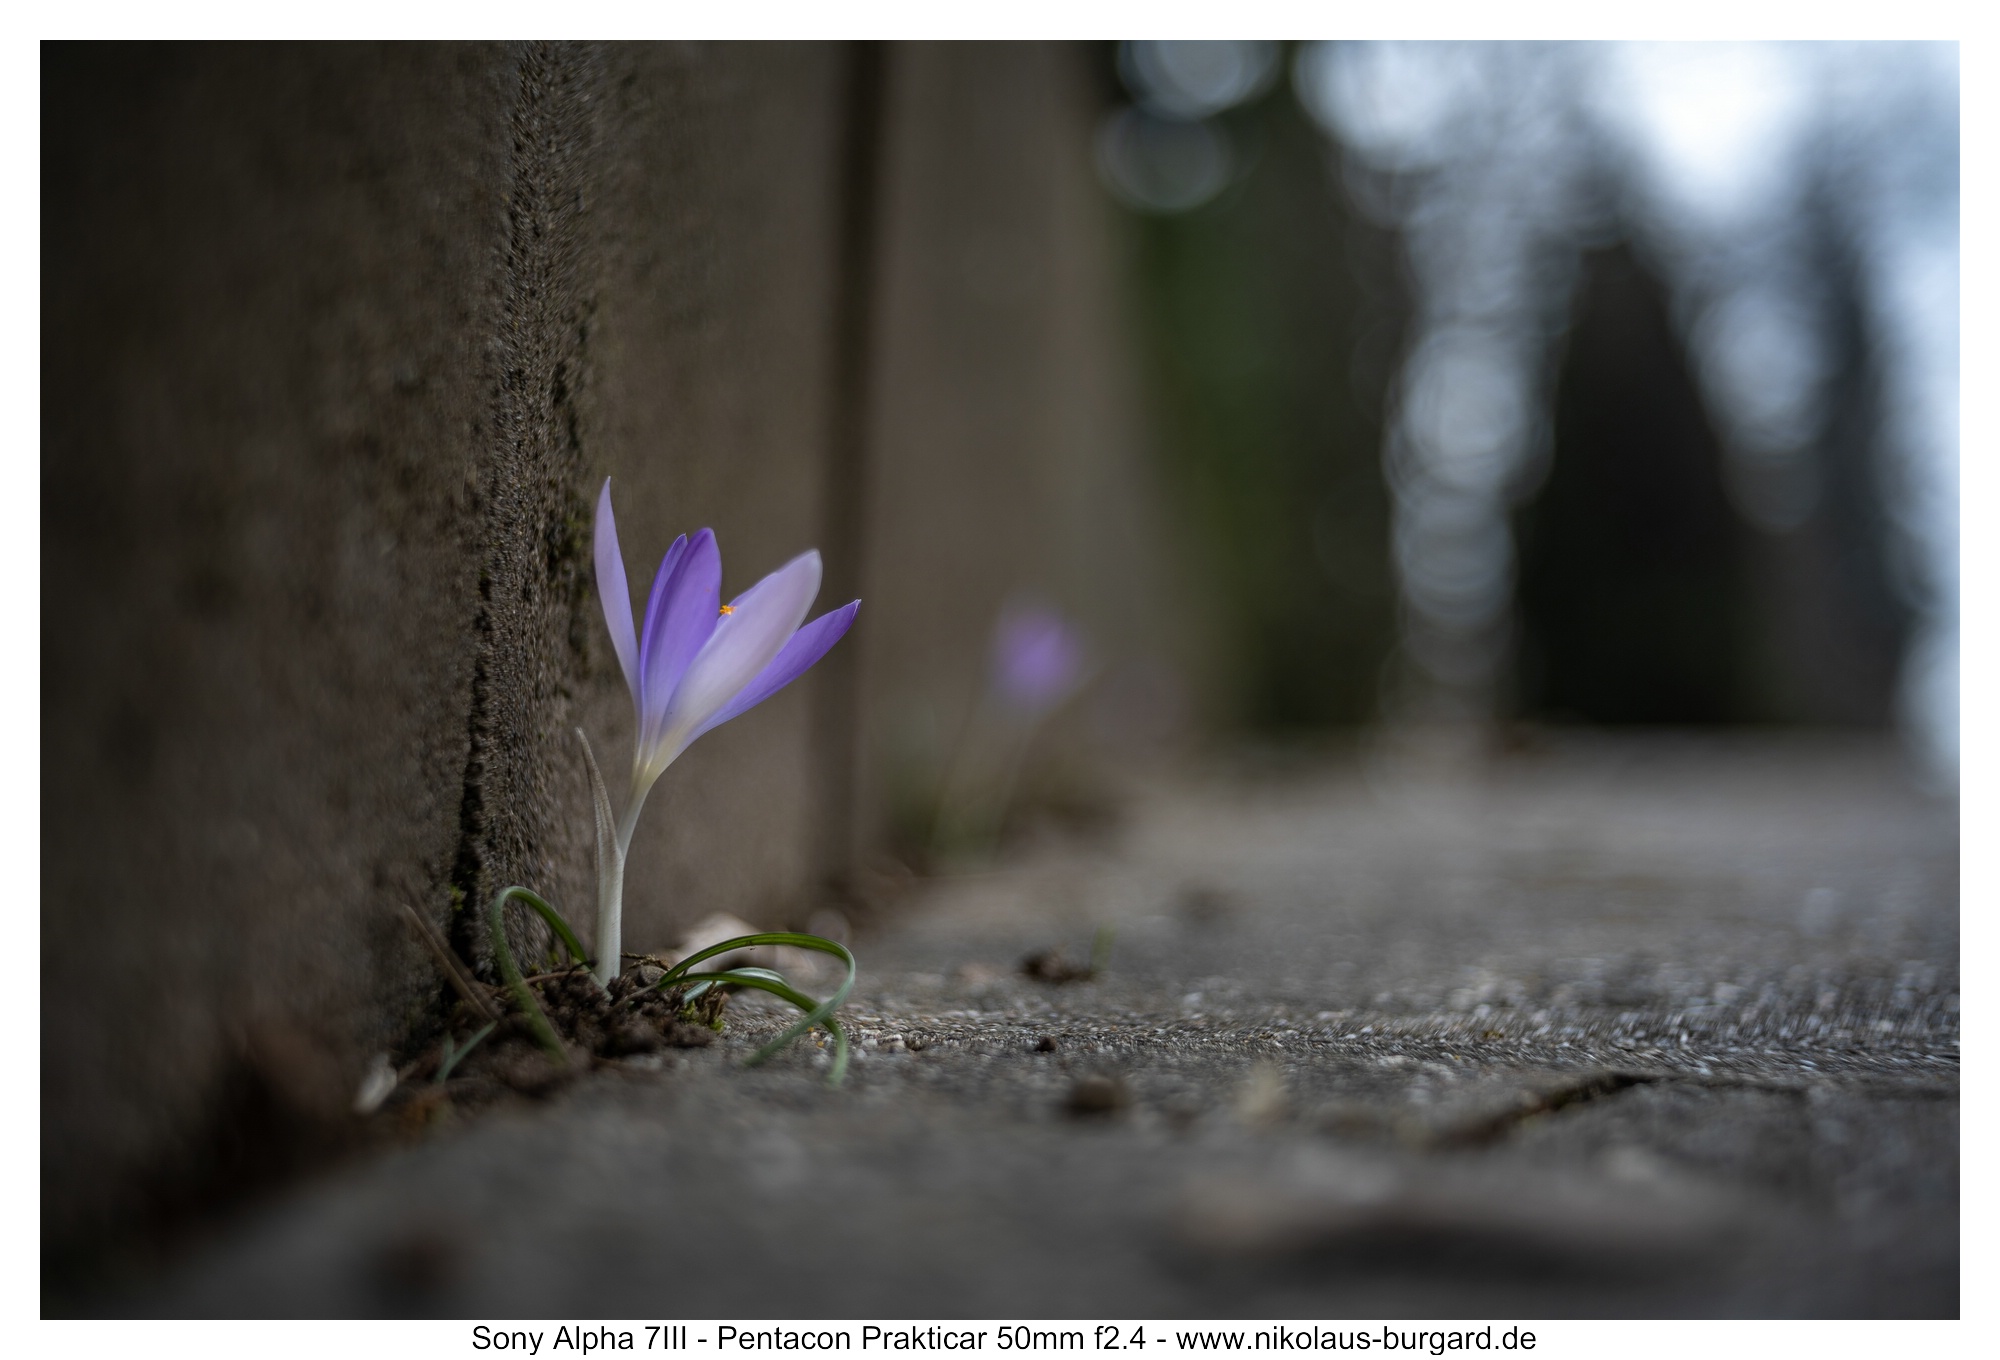
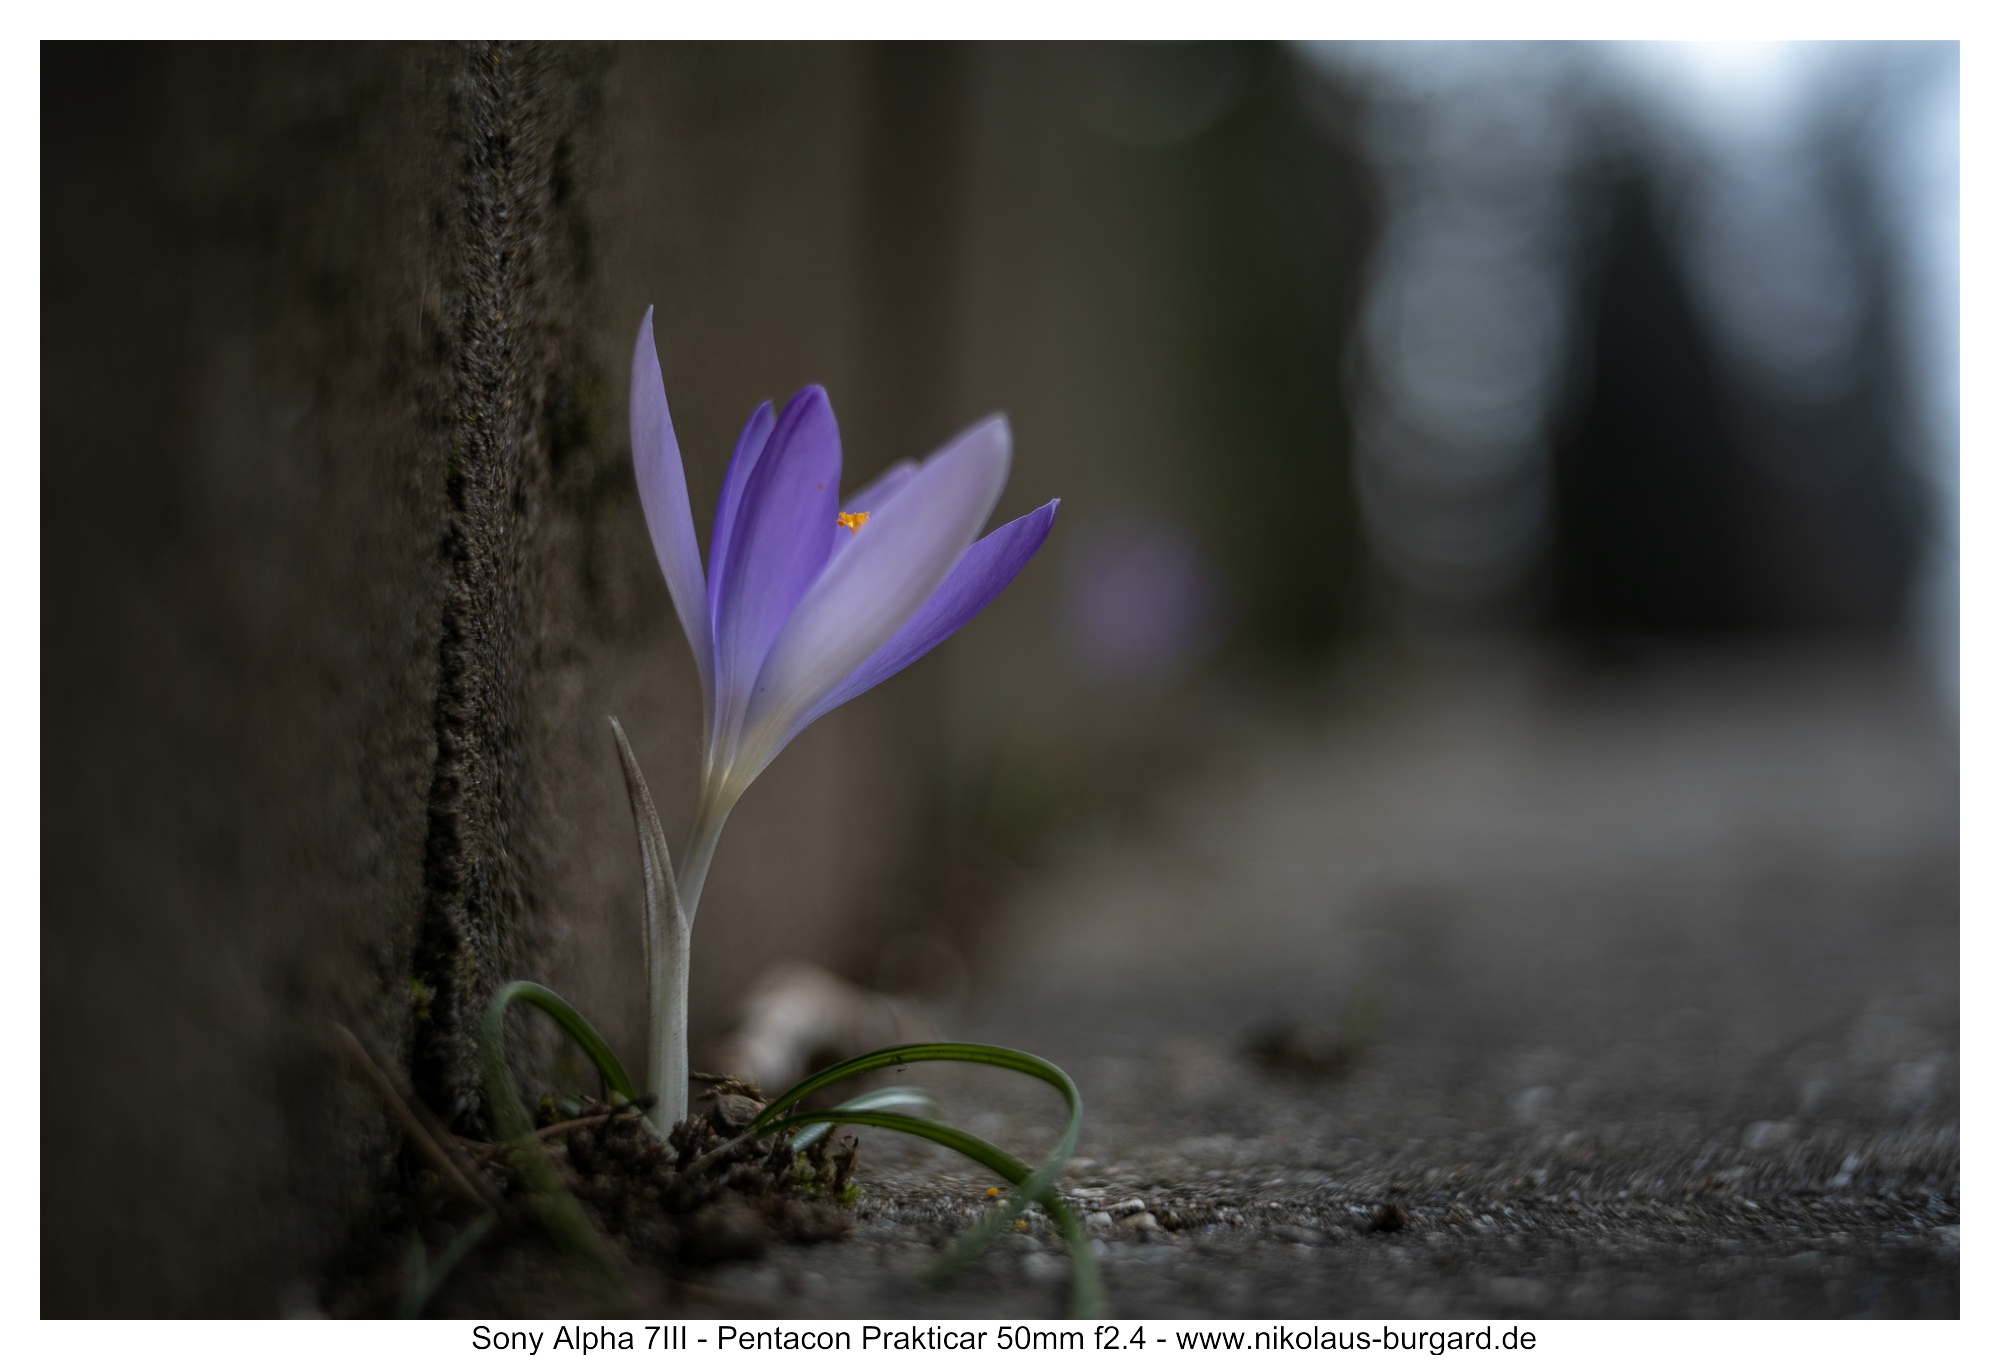
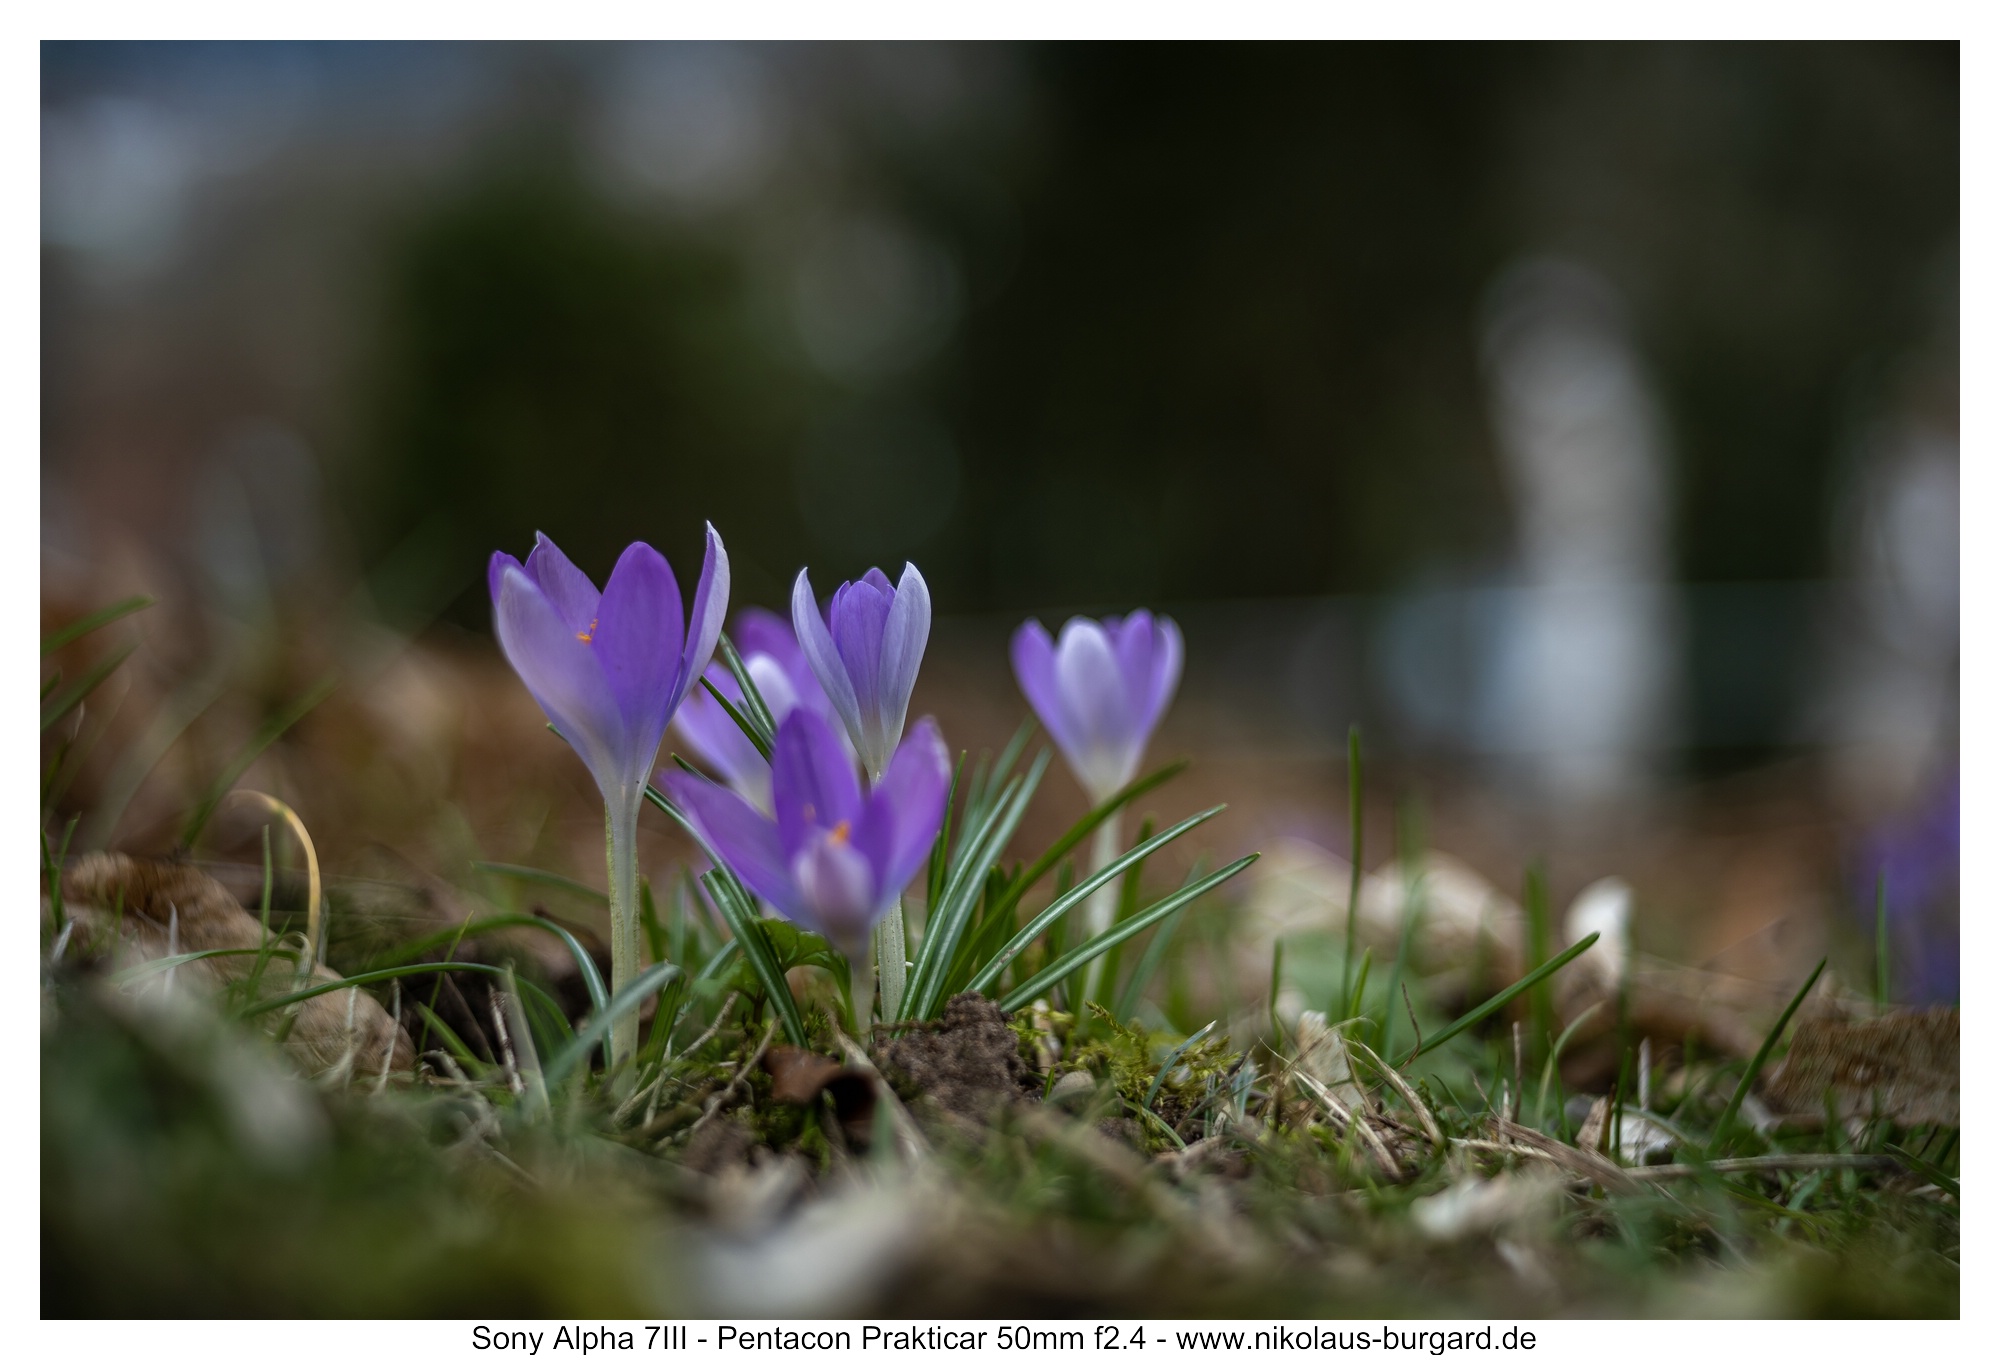
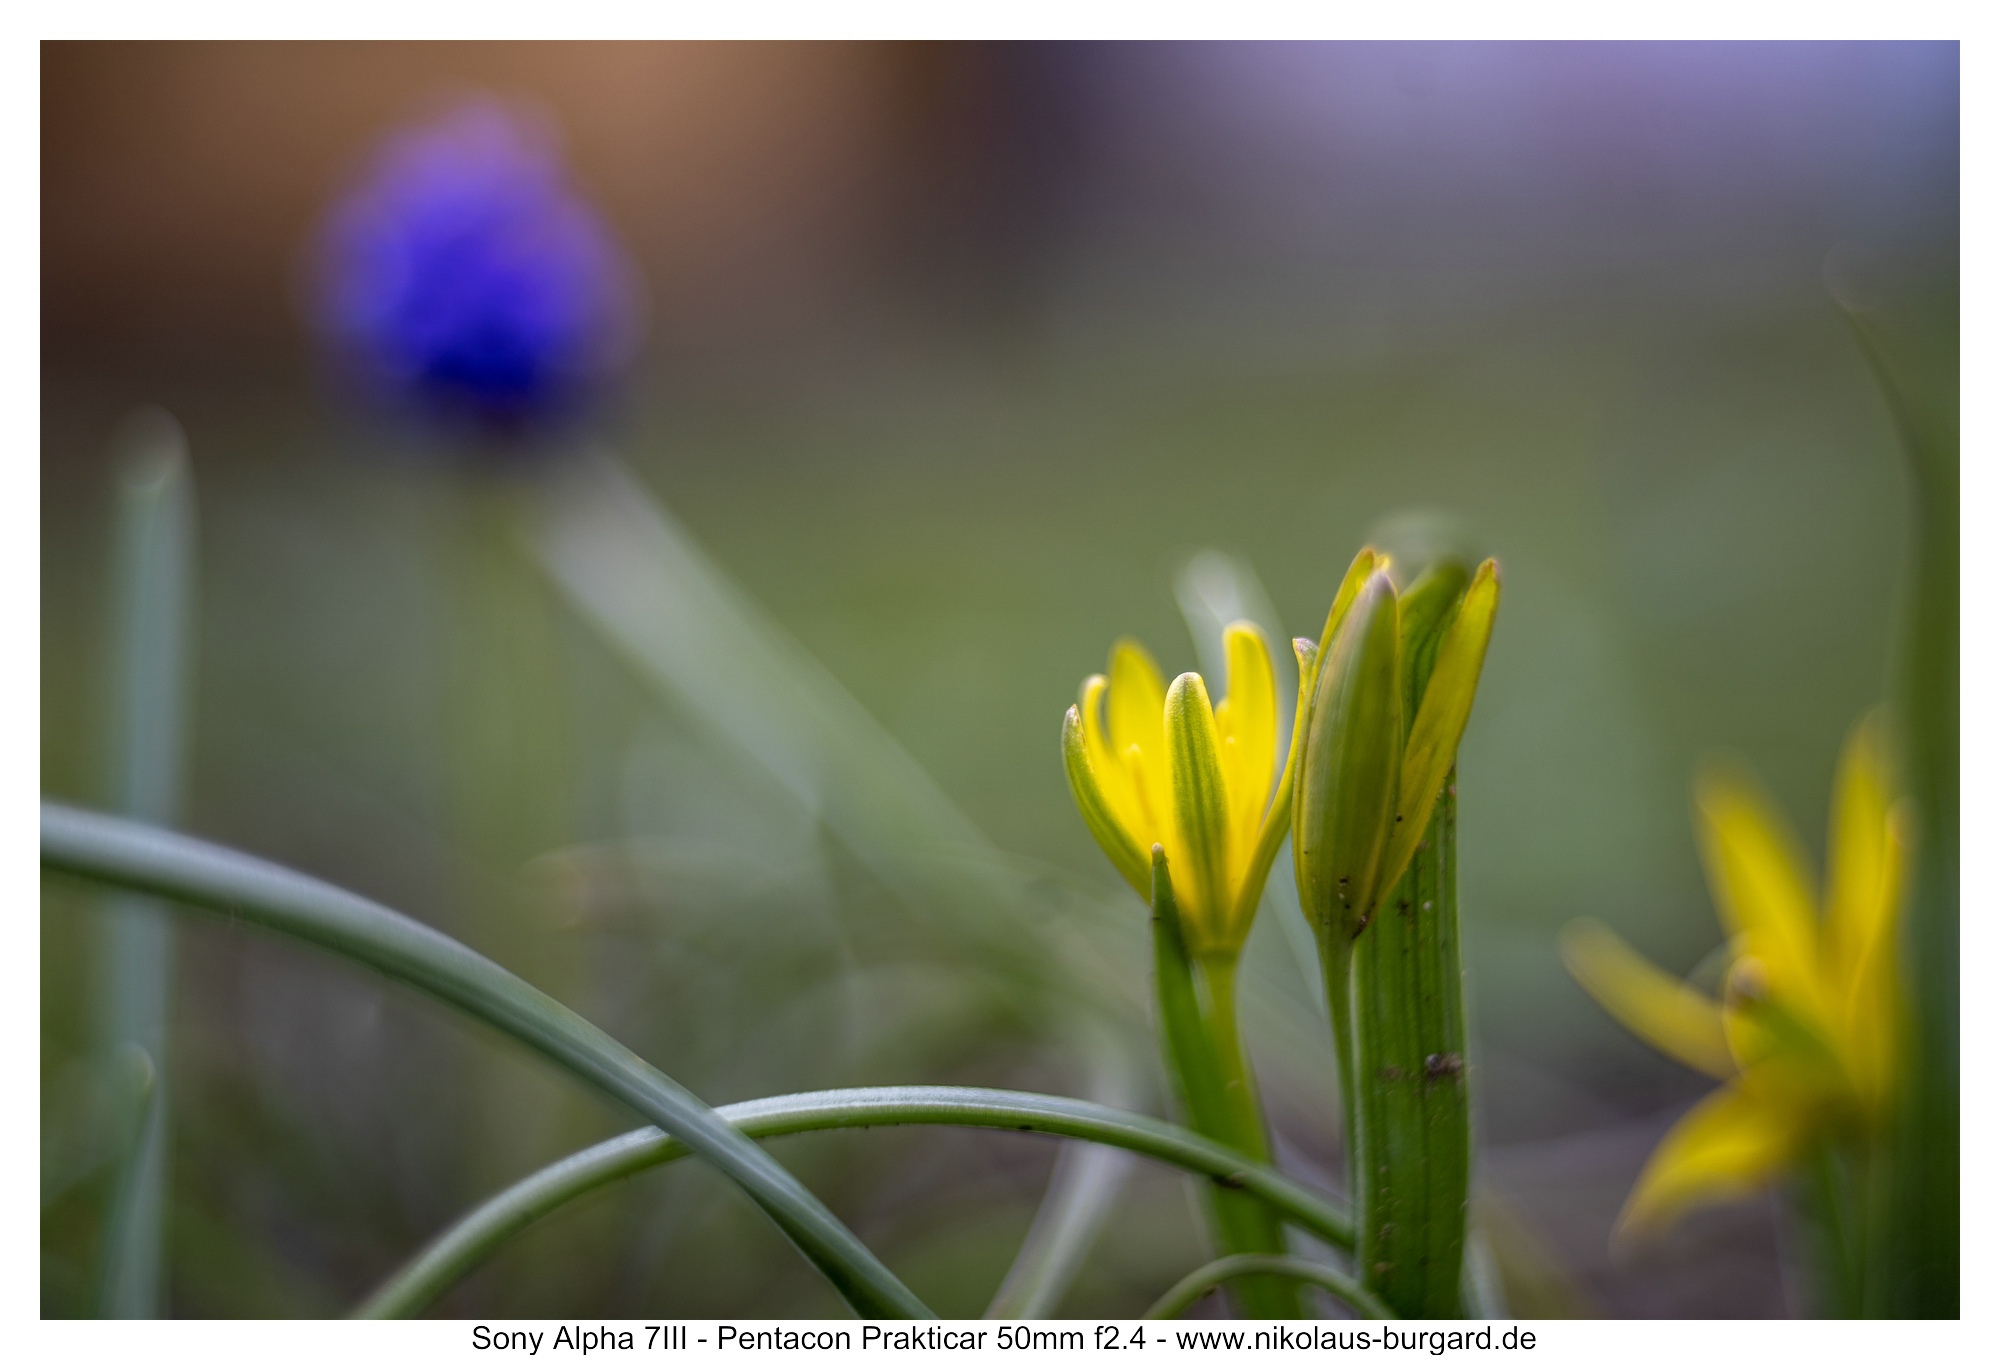
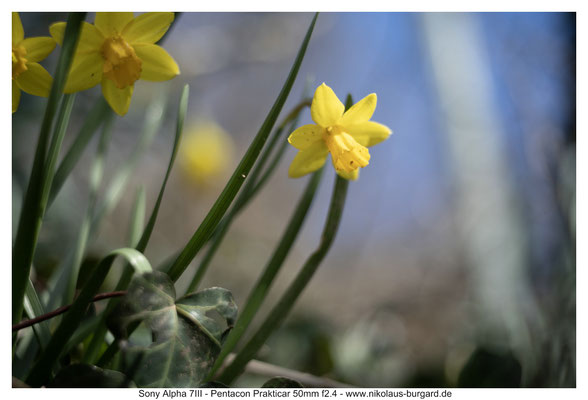
Bildserie: Die ersten Krokusse des Jahres
Photo Series: The first crocuses of the year
Im Februar (in diesem Jahr kurz vor Fasching) freue ich mich immer über die ersten Krokusse des Jahres, denn für mich heißt das immer, dass der Winter so langsam zu Ende geht und die Welt wieder "bunter wird".
Bei den folgenden Bildern kann das Prakticar seine Stärken voll ausspielen. Im Nahbereich ist es am Fokuspunkt sehr scharf und das Bokeh ist wirklich charakterstark:
In February (shortly before Carnival this year) I'm always happy about the first crocuses of the year, because for me that always means that winter is slowly coming to an end and the world is "more colorful" again.
In the following pictures, the Prakticar can fully demonstrate its strengths. At close range it is very sharp at the point of focus and the bokeh is really characterful:


Hintergrundrendering und Bokeh
Background rendering and bokeh
Nach der "Einstimmung" in das Bokehkapitel durch die Krokusbilder will ich das Ganze etwas systematischer betrachten.
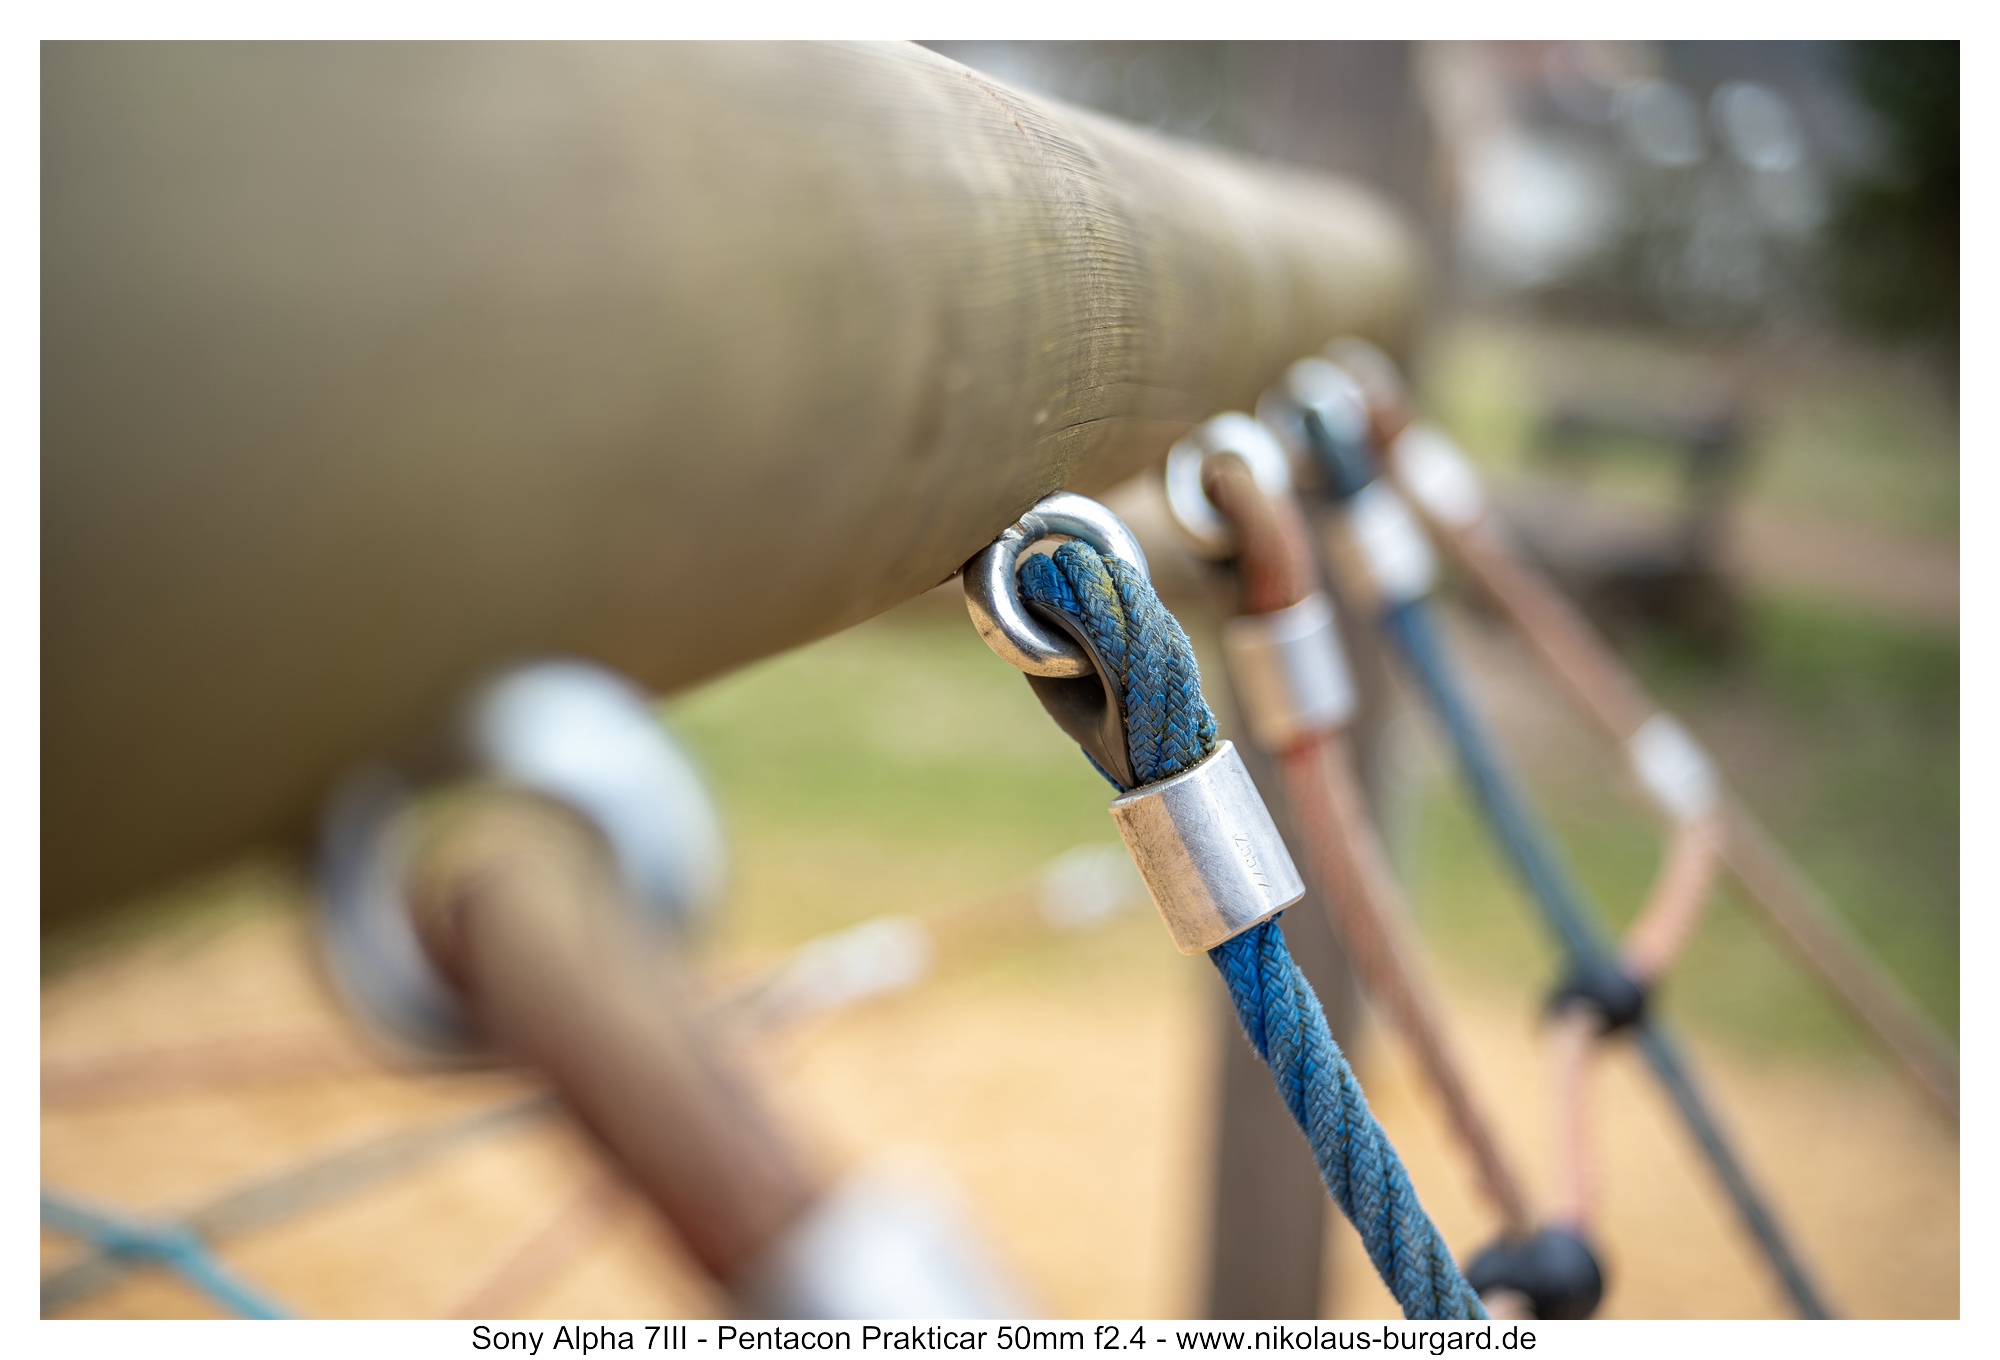
Zuerst möchte ich euch zeigen, wie sich das Hintergrundverhalten beim Abblenden verändert.
Dazu habe ich eine Blendenreihe am bereits bekannten Durchgang erstellt:
After the "teaser" to the bokeh chapter through the crocus pictures, I want to look at the whole thing a little more systematically.
First I want to show you how the background behavior changes when you stop down.
To do this, I created a row of apertures on the already known passage:

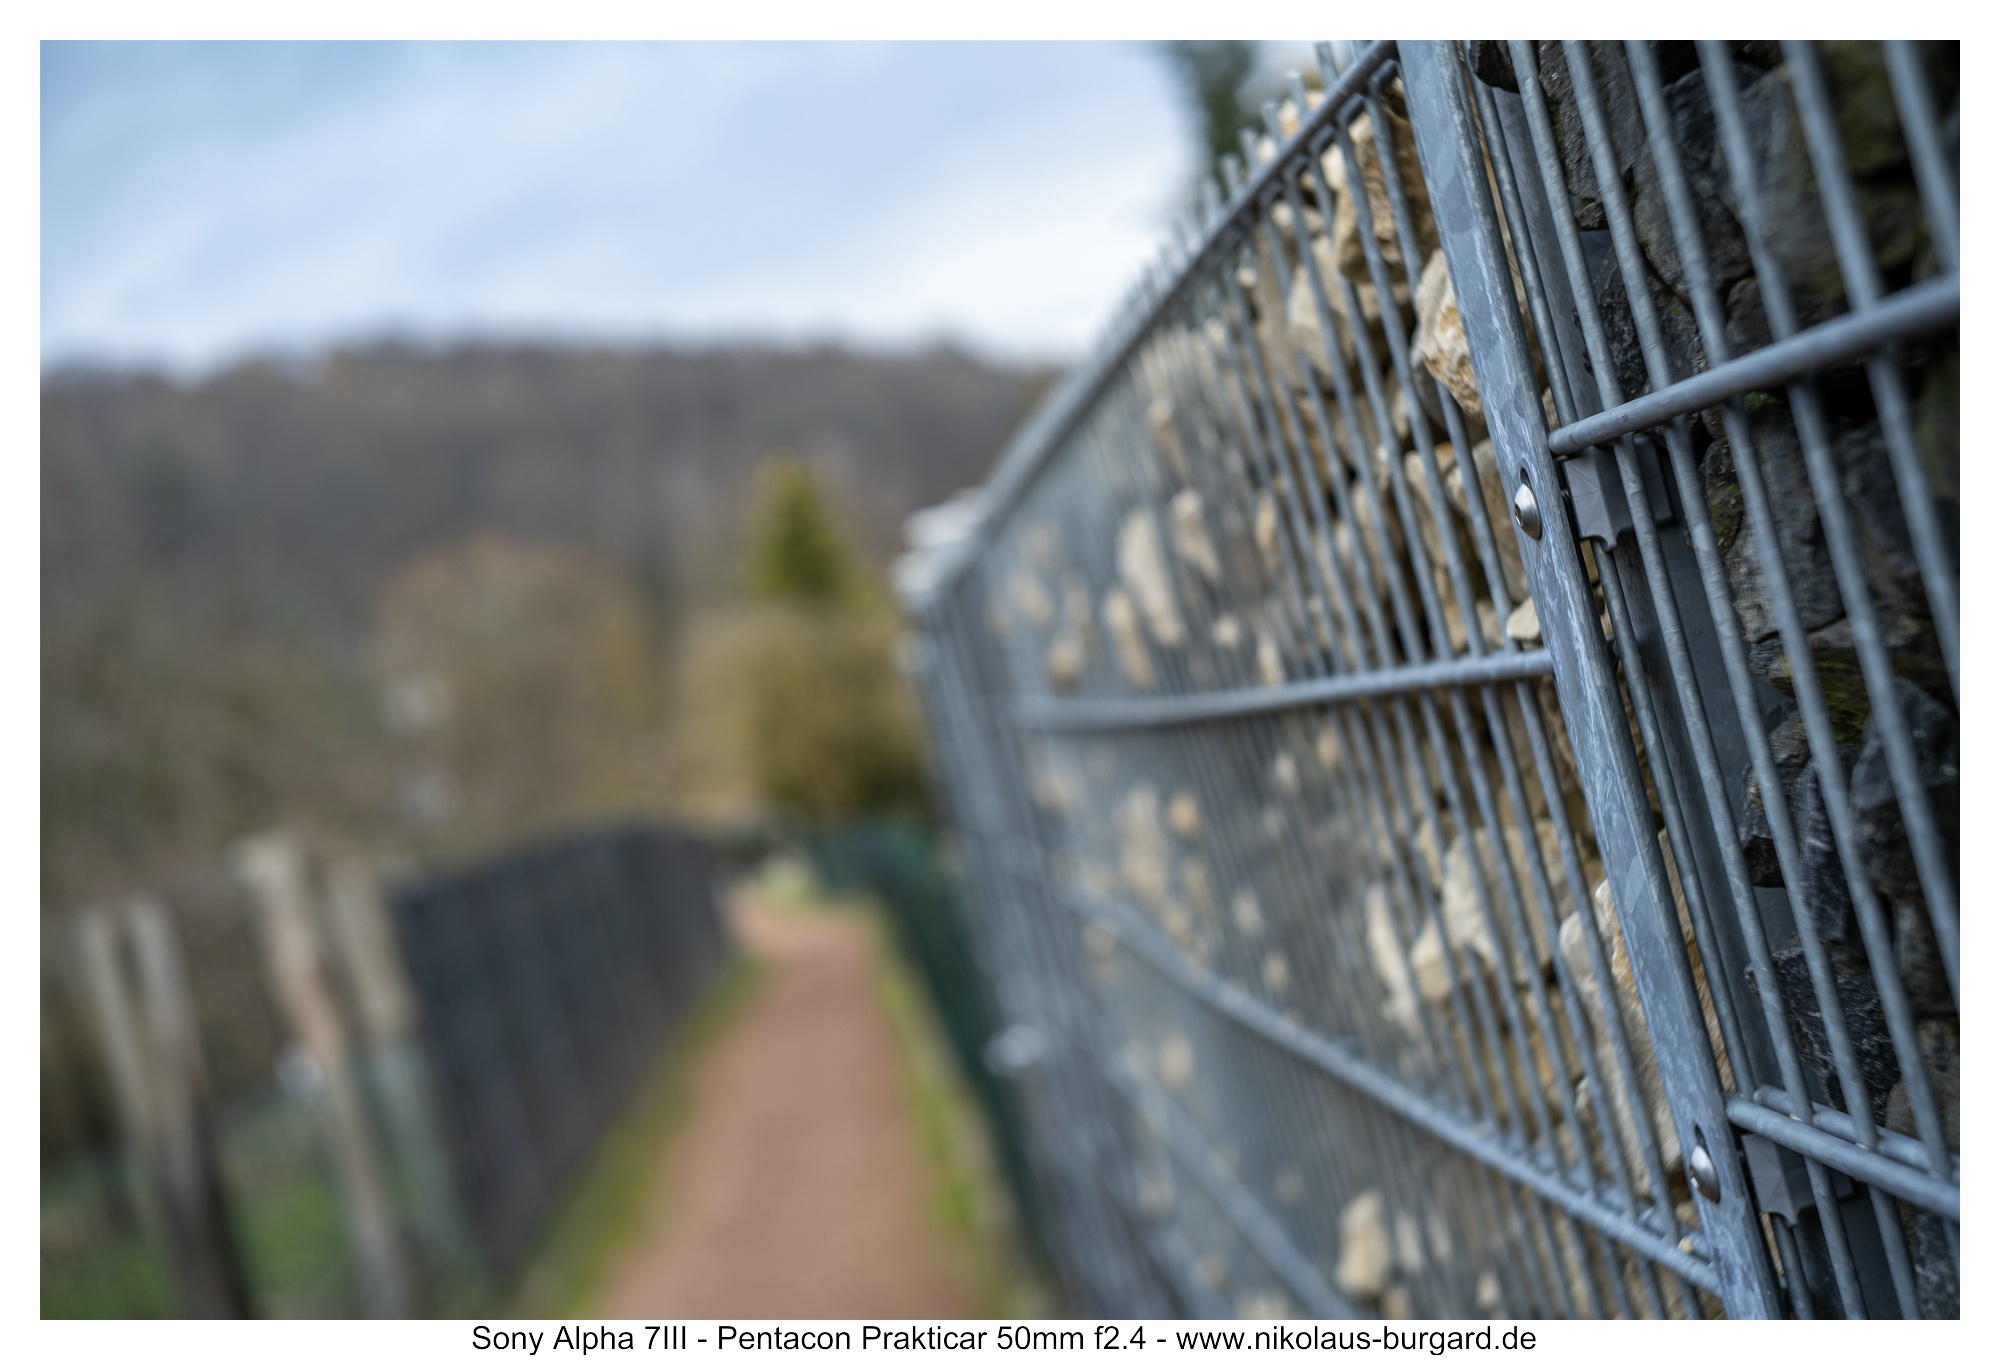

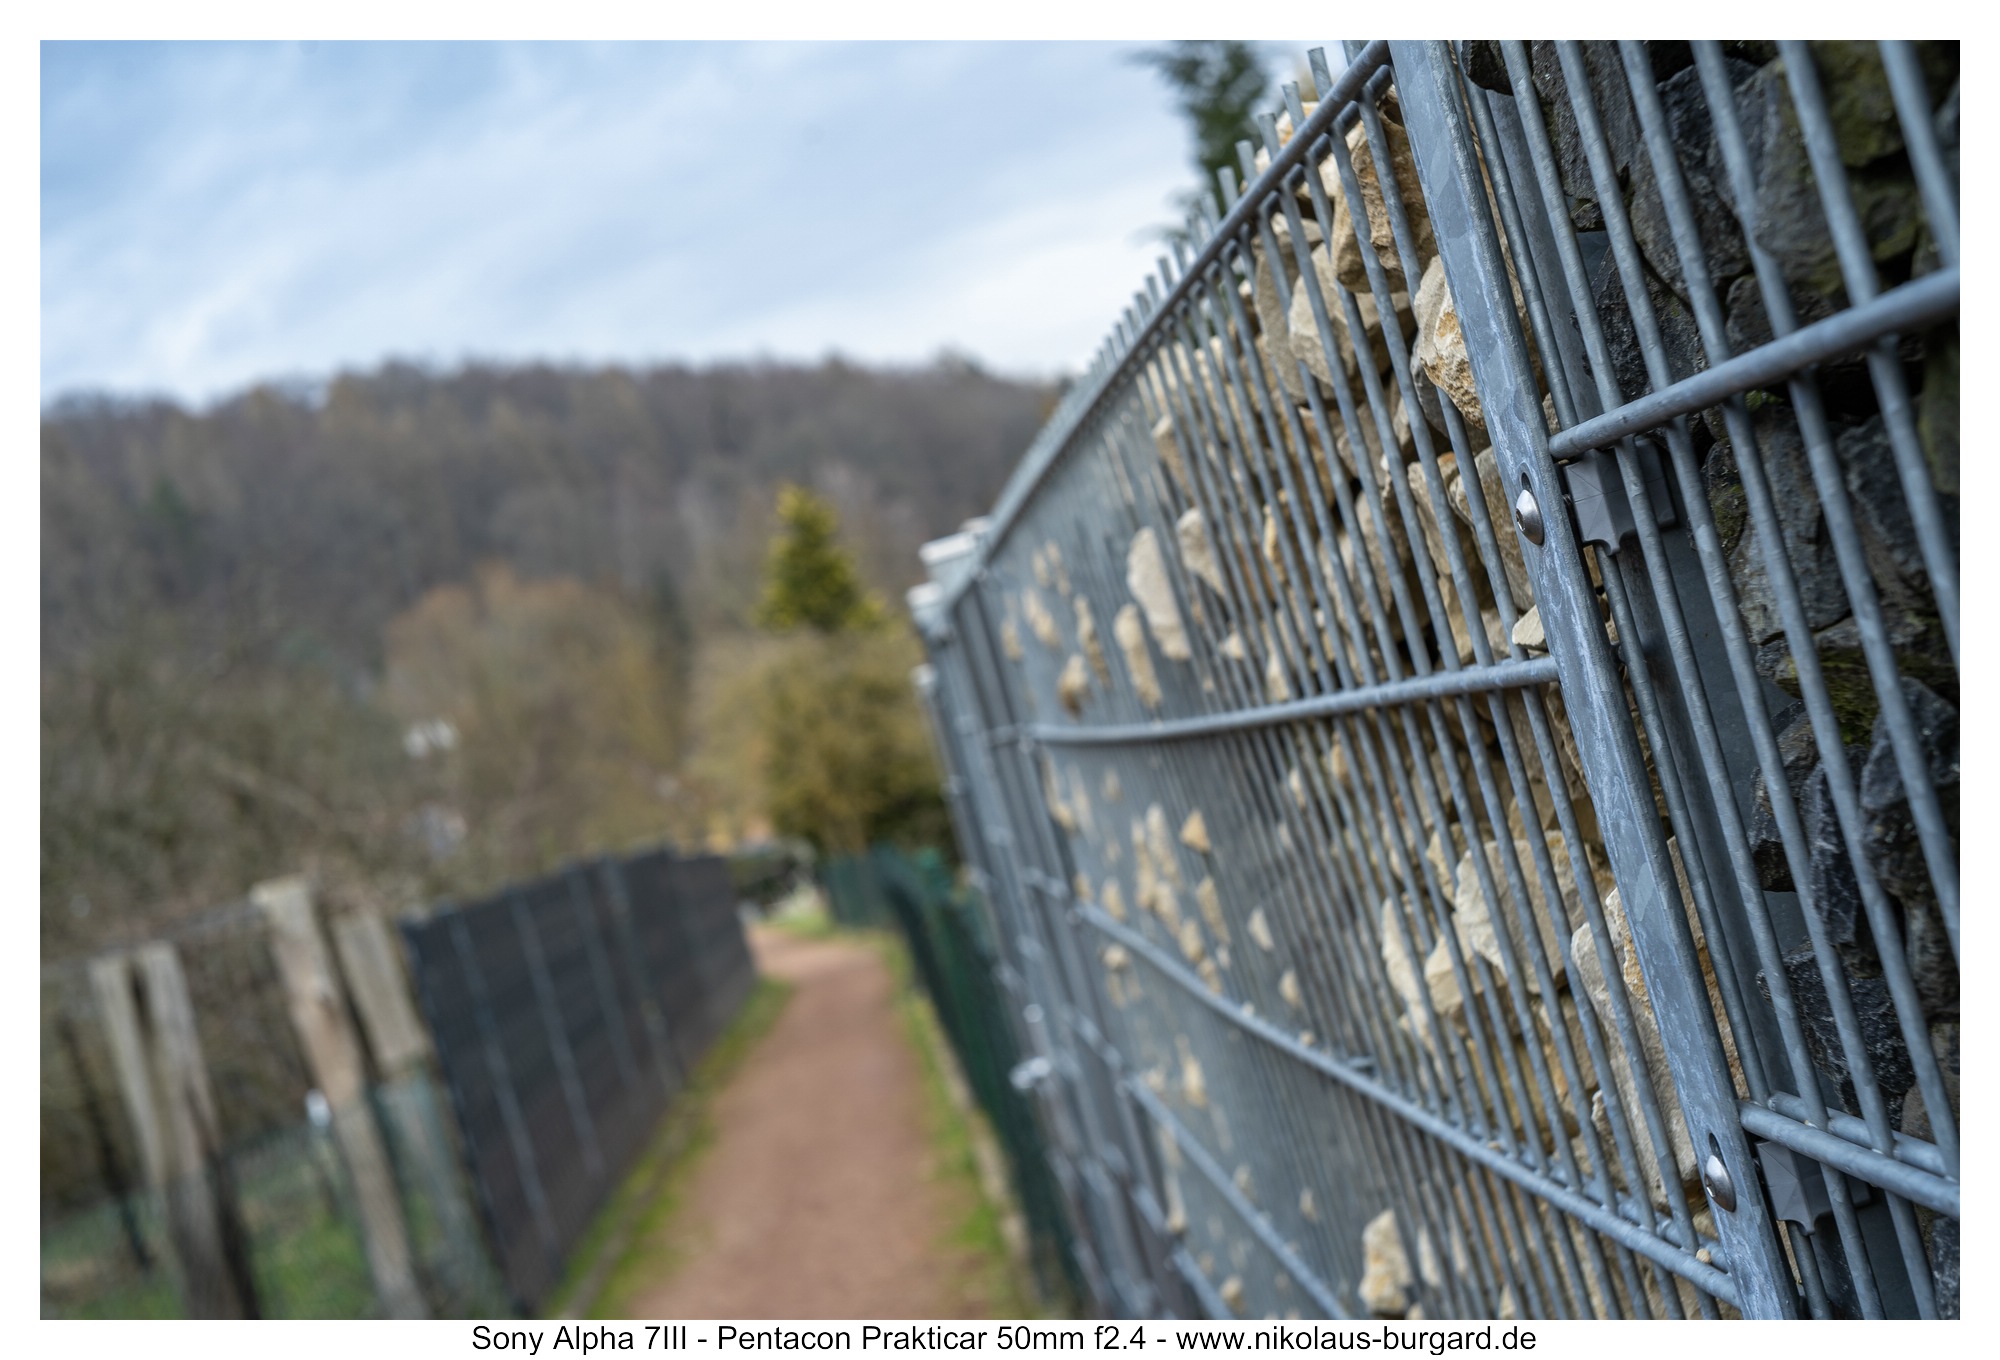


Auf diese Fokusdistanz (+/- 1m) ist das Bokeh selbst bei Offenblende nicht weich und unstrukturiert.
Es gibt deutliches Outlining am Metallzaun.
Trotz Schärfezunahme wird das Bokeh beim Abblenden eher ruhiger und unaufgeregter.
Auch mein zweites bekanntes Testmotiv zeigt die oben genannten Eigenschaften bei Offenblende deutlich: Der Hintergrund ist kleinteilig-nervös (siehe z.B. die Äste der Bäume), und dies zu den Ecken hin stärker werdend. Das Rendering auf diese mittlere Distanzen ist nicht gerade die Paradedisziplin des Objektives.
At this focus distance (+/- 1m), the bokeh is not soft and unstructured, even with an open aperture.
There is clear outlining on the metal fence.
Despite the increase in sharpness, the bokeh becomes calmer and less agitated when stopping down.
My second well-known test motif also clearly shows the above-mentioned properties with an open aperture: The background is "smallish" and nervous (see, for example, the branches of the trees), and this becomes stronger towards the corners. Rendering at these medium distances is not exactly the strength of the lens.

Hintergrundrendering auf kurze Distanz
Close-up background rendering
Auf kurze Fokusdistanzen sieht das allerdings anders aus, hier kann das Prakticar deutlich besser punkten.
However, things look different at short focus distances, where the Prakticar scores much better.
Vergleich ohne und mit Helicoid-(Macro-focusing-) Adapter
Comparison without and with helicoid (macro-focusing) adapter
Zuerst habe ich vergleichend ein paar Bilder an der "nativen" Naheinstellgrenze von 60cm und der per Helicoid-Adapter verkürzten Nahgrenze für euch gemacht, damit ihr abschätzen könnt, wie sich das auswirkt:
First, I took a few comparative pictures at the "native" close-up limit of 60cm and the close-up limit shortened by the helicoid adapter so that you can estimate how this affects you:


Die Verwendung des Helicoids ist schon ein großer Zugewinn an Gestaltungsmöglichkeiten.
Oft wird zu mir gesagt "Ein Zwischenring tut es doch auch!". Grundsätzlich ist das ja richtig.
Aber a) legt mich dieser auf eine bestimmte Aufnahmedistanz fest und b) muss ich jedes Mal das Objektiv abnehmen um den Zwischenring zu montieren oder abzunehmen.
Der Helicoid-Adapter bleibt montiert und ermöglicht mir jegliche Feinabstufung bei der Aufnahmedistanz.
Alle folgenden Bilder sind bei Offenblende auf kurze Aufnahmedistanzen entstanden.
Hier gefällt mir das Rendering des Objektives wirklich gut.
Es gibt sichtbare Reststrukturen und Swirl sowie bei passenden Hintergründen etwas Bubblebokeh der harmlosen (unbegrenzten) Sorte, und dies alles bei sehr guter Punktschärfe:
The use of the helicoid is already a great gain in creative possibilities.
People often say to me "An extension ring will do the trick!". Basically that is correct.
But a) this limits me to a certain shooting distance and b) I have to take off the lens every time to mount or remove the extension ring.
The helicoid adapter remains attached and allows me to fine-tune the shooting distance.
All of the following images were taken with the aperture wide open and at short shooting distances.
I really like the rendering of the lens here.
There are visible residual structures and swirl as well as some bubble bokeh of the harmless (unlimited) variety with suitable backgrounds, and all this with very good point sharpness:


Gemeinsam mit meiner Tochter habe ich ein kurzes Stop-Motion-Video mit dem Prakticar und der Sony A7III erstellt, hier könnt ihr es euch ansehen:
Together with my daughter I created a short stop-motion video with the Praktikar and the Sony A7III, you can watch it here:
(Hintergrund-) Rendering auf mittlere und große Distanz
(Background) rendering at medium and long distances
Auf mittlere und weite Distanz ist das Rendering (wie weiter oben ja schon beschrieben) ziemlich unruhig, und nicht gerade nach meinem Geschmack. Vor allem unscharfe Bereiche VOR der Schärfeebene sind sehr unruhig.
Hier ein Beispielpaar vom gleichen Standort mit unterschiedlicher Fokussetzung:
At medium and long distances, the rendering (as already described above) is quite unsteady, and not exactly to my liking. In particular, blurred areas BEFORE the focus level are very restless.
Here is an example pair from the same location with a different focus:


Aber Bilder sagen ja mehr als tausend Worte, deshalb hier einige Beispiele auf unterschiedlich weite Motivdistanzen, die diese Unruhe gut zeigen:
But pictures say more than a thousand words, so here are a few examples at different subject distances that show this restlessness well:


Auch abgeblendet auf f5.6 (die ersten 3 Beispielbilder) oder f11 ergibt sich kein anderes Bild,
die Hintergründe bleiben nervös und überstrukturiert. Es kommt irgendwie keine Harmonie beim Betrachten auf.
Even stopped down to f5.6 (the first 3 sample images) or f11, there is no different image,
the backgrounds remain edgy and over-structured. There is somehow no harmony when looking at it.


Portraits
Bei Portraits hat mich das kleine Pancake durchaus in der ein oder anderen Situation überrascht.
Wenn das Motiv im erweiterten Bildzentrum liegt, hat man gute Bildschärfe und schönes Rendering -
auch die Hautabstufungen wissen zu gefallen:
In portraits, the little pancake surprised me in one situation or another.
If the subject is in the extended image center, you have good sharpness and beautiful rendering -
the skin gradations also know how to please:


Sobald man jedoch auf oder außerhalb der Drittellinien komponieren möchte,
erlebt man sein "blaues" Wunder -
hier wird es einfach nicht mehr punktscharf, der Astigmatismus schlägt zusammen mit der sphärischen Aberration dann voll zu.
Ergebnis: scharfe Augenpartien kann man leider vergessen -
stimmungsvoll sind die Bilder meist trotzdem:
However, as soon as one wants to compose on or outside the lines of thirds,
you experience your "blue" miracle -
there is simply no sharpness, the astigmatism then hits fully together with the spherical aberration.
Result: you can unfortunately forget sharp eyes -
the pictures are mostly atmospheric anyway:


Auf Ganzkörperdistanz hat man dann wieder das generelle "Renderingproblem" des Objektives.
Der Swirl und der Eckabfall sind einfach zu stark, als das ein harmonisches Portrait vertragen kann:
At full body distances you have the general "rendering problem" of the lens again.
The swirl and corner drop are just too strong for a harmonic portrait:

Farbfehler / Chromatische Aberrationen
Chromatic aberrations
Beim Thema Farbfehler schlägt sich das Prakticar überraschend wacker.
Wie im Schärfekapitel angesprochen, gibt es in den Bildecken deutliche laterale chromatische Aberrationen, diese können jedoch in der Bildbearbeitung per 1-Click-Lösung beseitigt werden.
Wie es mit den longitudinalen chromatischen Aberrationen aussieht, zeigen euch die nächsten Beispiele.
Hier wie immer das Chromösenbild mit Vergrößerungen von vor und hinter der Schärfeebene:
When it comes to color errors, the Prakticar does a surprisingly good job.
As mentioned in the chapter on sharpness, there are clear lateral chromatic aberrations in the image corners, but these can be eliminated in image processing with a 1-click solution.
The following examples show you what the longitudinal chromatic aberrations look like.
As always, here is the chromoose image with enlargements from in front of and behind the focal plane:


Vor der Schärfeebene ist kaum etwas wahrnehmbar, und hinter der Schärfeebene findet sich ein leichter grüner Rand an den Kontrastkanten.
In "Real-World-Worst-Case"- Situationen sieht das dann folgendermaßen aus:
Hardly anything is perceptible in front of the focal plane, and behind the focal plane there is a slight green border at the contrasting edges.
In "real-world worst-case" situations, it looks like this:


Ein Hauch von grünem Bokeh Fringing und an den Kontrastkanten leichtes Purple Fringing.
Insgesamt kaum der Rede wert und in all meinem Bildern nie wirklich störend.
A hint of green bokeh fringing and light purple fringing on the contrasting edges.
Overall, hardly worth mentioning and never really disturbing in all my pictures.
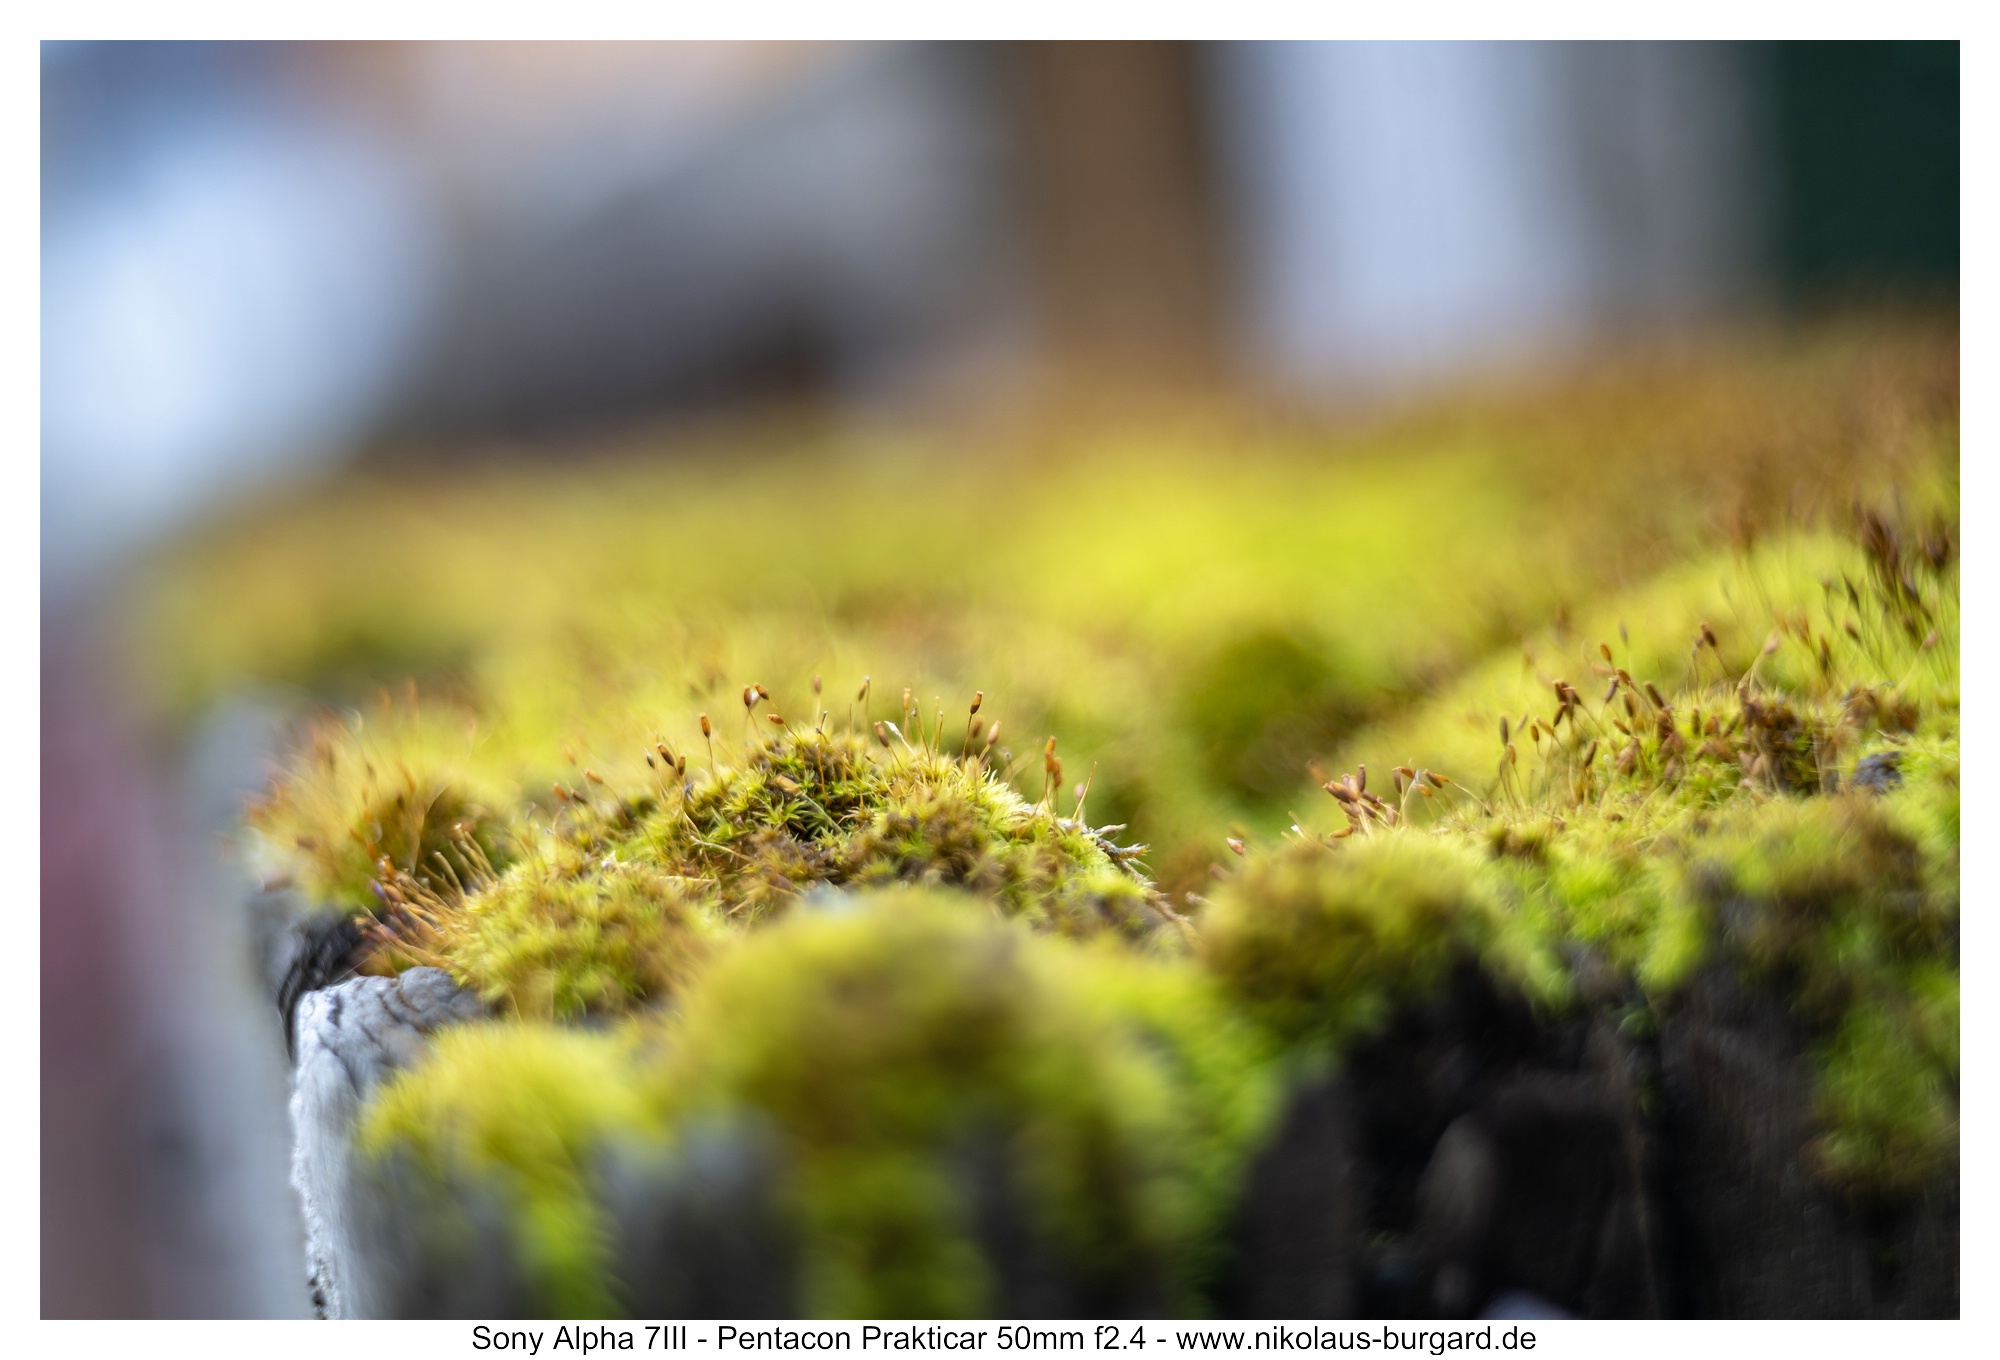
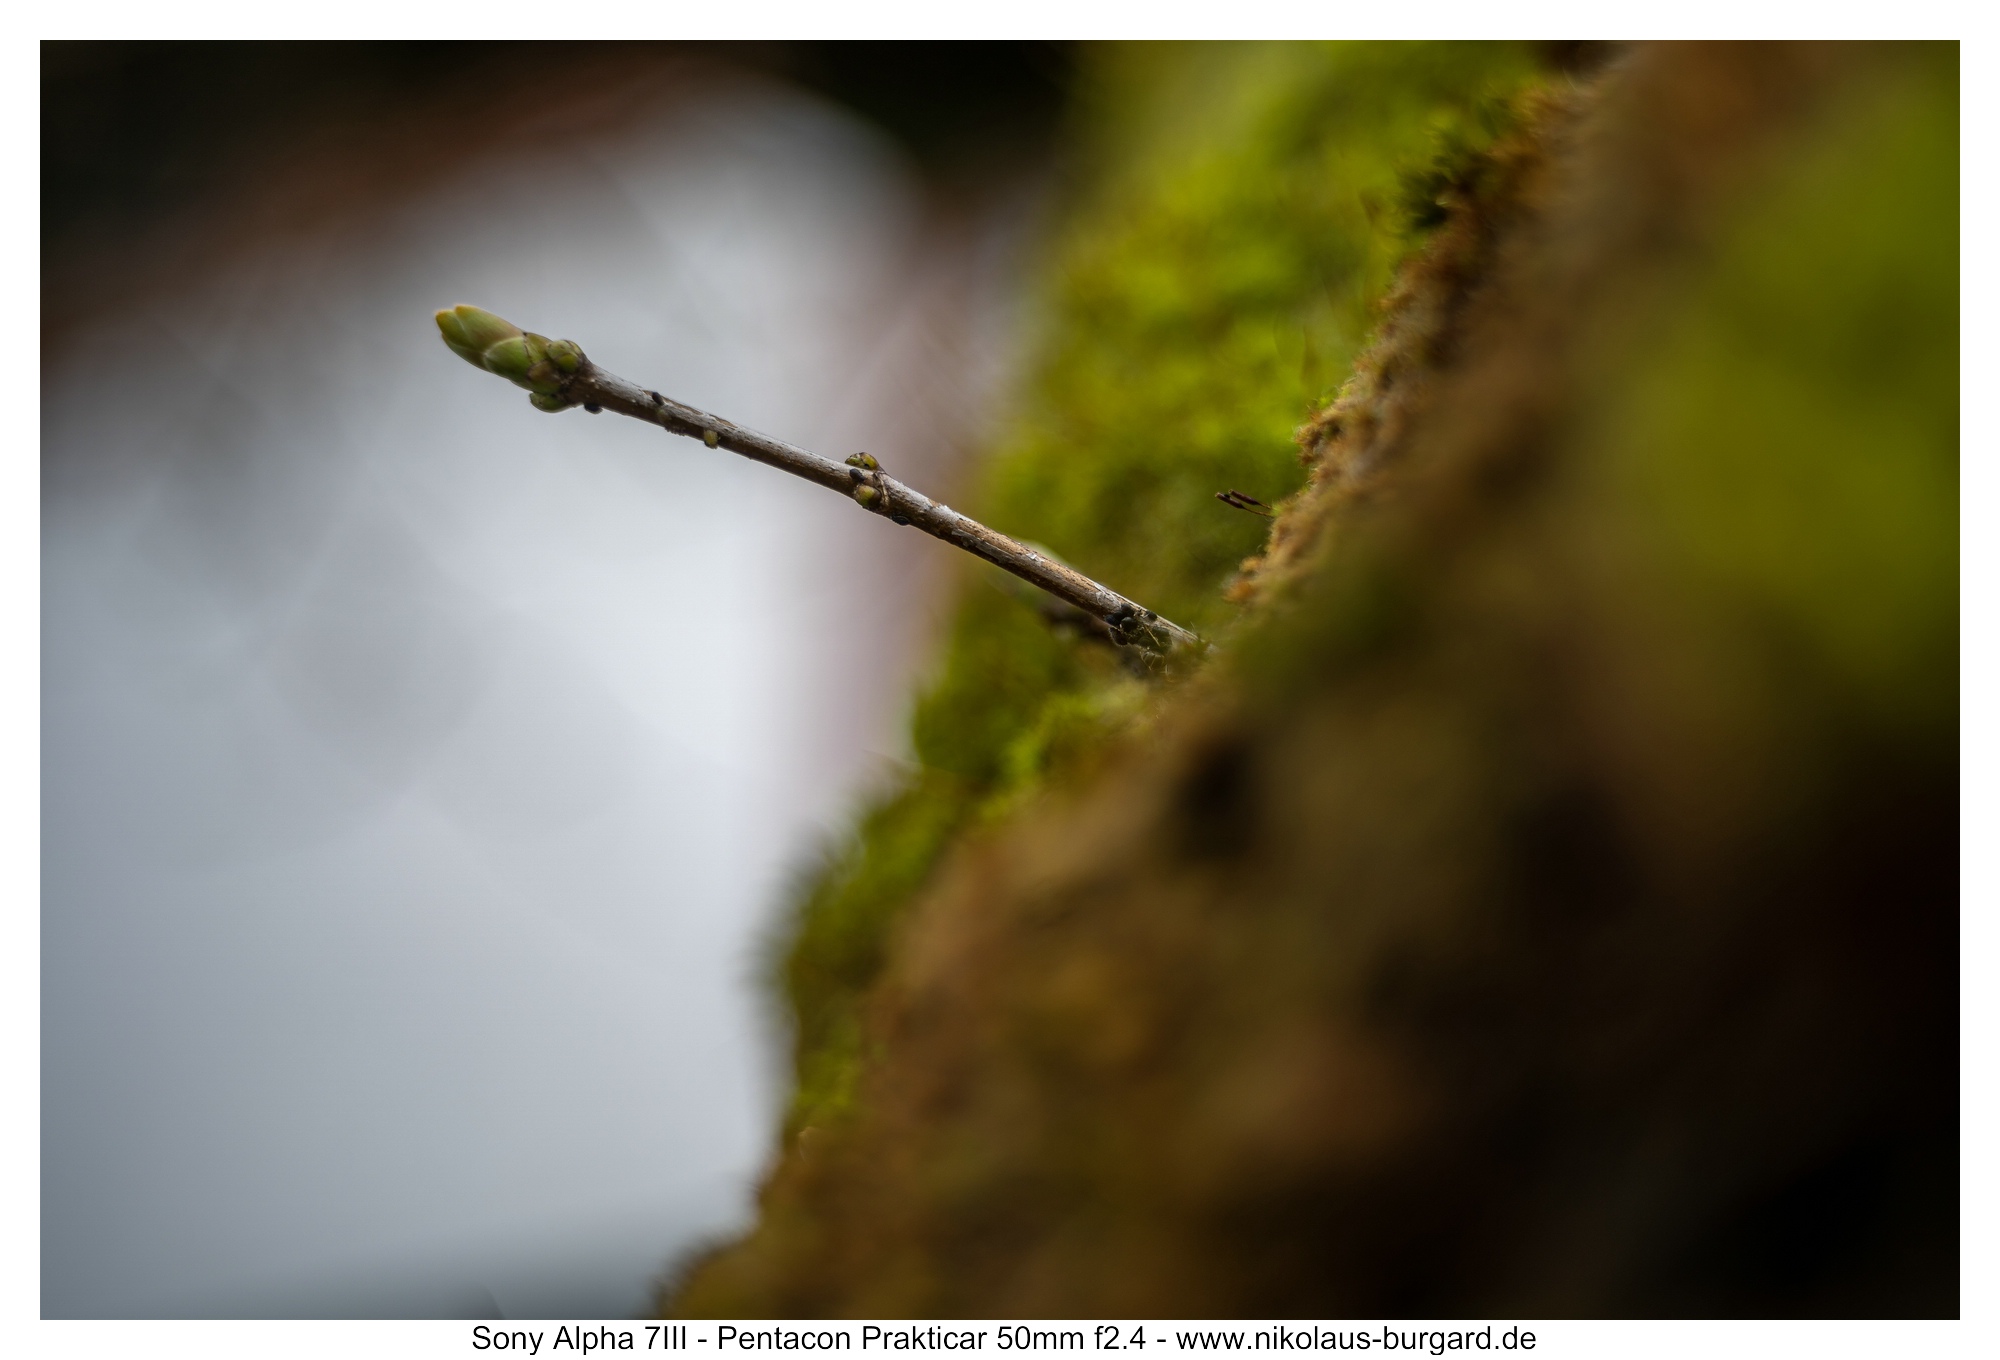
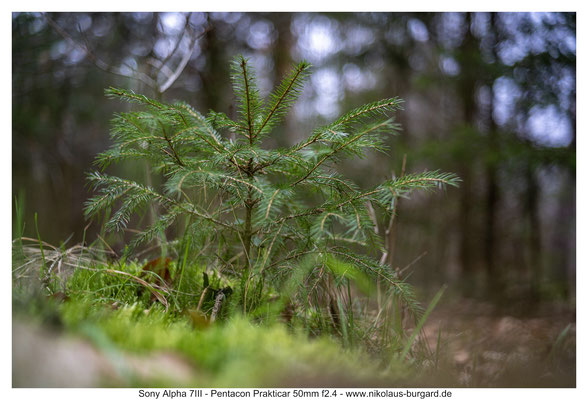
Bildserie: Details eines typischen, verregneten Frühlingstages
Photo series: Details of a typical, rainy spring day
Ja, im Frühling ist es meist grau und regnerisch bei uns.
Da muss man dann fotografisch "das Beste" draus machen.
Ich gehe dann immer auf die Suche nach Details - und da ist das Prakticar mit seinem im Nahbereich interessanten Rendering ein sehr guter Begleiter:
Yes, spring is mostly gray and rainy here.
Then you have to make the best out of it photographically.
I'm on the search for details - and the Praktikar is a very good companion with its interesting rendering at close range:


Verhalten im Gegenlicht / Flares
Behavior against the light / Flares
Im Gegenlicht ist das Prakticar eigentlich meist gutmütig.
Bei Offenblende direkt gegen die Sonne gibt es einen kontrastvermindernden Schleier,
und die Flares/Ghosts kann man durch leichtes Umkomponieren beeinflussen:
In backlight, the Prakticar is actually mostly good-natured.
With an open aperture directly against the sun, there is a contrast-reducing veil,
and the flares/ghosts can be influenced by slightly recomposing:


Etwas tückischer sind rote Blobs bei diffusem Licht gegenüber der Sonne/Lichtquelle.
Dann meist nimmt man sie im Sucher gar nicht wahr und bemerkt sie erst bei der Bildkontrolle am großen Bildschirm, wie bei den folgenden beiden Beispielen (beim ersten Bild links unten und beim zweiten Bild rechts unterhalb der Bildmitte):
Red blobs are somewhat more insidious in diffuse light compared to the sun/light source.
Then you usually do not notice them in the viewfinder and only notice them when checking the picture on the large screen, as in the following two examples (in the first picture the blob is on the bottom left and the second picture it is on the right below the middle of the picture):


Insgesamt eine zeitgemäß ordentliche Leistung, mit unseren heutigen Objektiven jedoch nicht vergleichbar.
All in all, a decent performance that was up to date at production time, but not comparable with our current lenses.
Mein Fazit
My conclusion
Das Pentacon Prakticar 50mm f2.4 MC ist leistungsmäßig ein "Mixed Bag".
Mein Interesse an dem Objektiv entsprang der interessanten Konstruktion (nur 4 Linsen, trotzdem relativ lichtstark) und wie die Korrektur wirklich gelungen ist.
Und genau da liegt "das Problem".
Es kann vieles ziemlich gut - aber ist nirgends so richtig stark - dafür hat es eine Menge kleine Schwächen.
Die Bildschärfe auf weite Distanz ist in der Mitte ab Offenblende sehr gut, ab f4 ausgezeichnet. Aber die Bildecken werden bei f8 und f11 gerade so noch gut. Randscharf ist es bei f11.
Im Nahbereich für Details ist die Schärfe immer sehr gut, da gibt es nichts zu meckern.
Das Rendering ist auf nahe Distanzen recht schön und interessant, charakterstark im positiven Sinn.
Auf mittlere und weite Distanzen jedoch ist es einfach unruhig und unharmonisch.
Die Verzeichnung ist stark für ein Normalobjektiv und deutlich kissenförmig.
Gut korrigiert ist es auf Farbfehler, die sonst oft problematischen longitudinalen chromatischen Aberrationen sind nur scwach ausgeprägt.
Im Gegenlicht verhält es sich wie ein typischer Vertreter seiner Zeit.
Ich finde das Pancake-Prakticar für Detail- und "Makro"-Aufnahmen mit Kontext wirklich schön,
im generellen Einsatz hat es mir zu viele Schwächen - und trotzdem hat es mir viele schöne Bilder geliefert in den letzten Wochen. Es muss nicht immer ein Hochleistungsobjektiv sein, auch die Standard-Ware kann begeistern. Und das Preis-Leistungsverhältnis auf dem Gebrauchtmarkt stimmt bei diesem Objektiv absolut.
Unter der nun folgenden abschließenden Bildergalerie freue ich mich auf eure Meinungen zu Objektiv und Test im Kommentarbereich!
The Pentacon Prakticar 50mm f2.4 MC is a "mixed bag" in terms of performance.
My interest in the lens came from the interesting construction (only 4 lenses, but still relatively fast) and if the correction was really successful.
And that's where "the problem" lies.
It can do a lot of things pretty well - but isn't really strong anywhere - and it has a lot of small weaknesses.
The image sharpness at long distances is very good in the center from the open aperture, and excellent from f4. But the image corners are just about good at f8 and f11. It is edge sharp at f11.
In the close-up range for details, the sharpness is always very good, there is nothing to complain about.
The rendering is quite nice and interesting at close range, full of character in a positive sense.
At medium and long distances, however, it is simply restless and inharmonious.
The distortion is strong for a normal lens and clearly pincushion-shaped.
It is well corrected for color errors, the otherwise often problematic longitudinal chromatic aberrations are only weakly pronounced.
Against the light, it behaves like a typical representative of its time.
I really like the pancake Prakticar for detail and "macro" shots with context,
in general use it has too many weaknesses for me - and yet it has provided me with many beautiful pictures in the last few weeks. It does not always have to be a high-performance lens, even the standard product can inspire. And the price-performance ratio on the used market is absolutely right with this lens.
I look forward to your opinions on the lens and test in the comments section after the final picture gallery that follows!
Tests anderer Objektive aus dem Praktica-PB-System:
Reviews of other lenses of the Praktica-PB-System:
- Carl Zeiss Jena Vario-Prakticar 35-70mm f2.7-3.5
- Carl Zeiss Jena Prakticar 50mm f1.4 (Version 1)
- Carl Zeiss Jena Prakticar 80mm f1.8


Kommentar schreiben
CanRoda (Freitag, 31 März 2023 19:59)
Dieses Triplet mit vorgesetzter 4. Linse ist schon ein sehr interessanter Entwurf und deine wieder sehr informellen Bilder sind spannend anzusehen.
Ich frage mich, welche Leistung das Objktiv bei Begrenzung auf f 2,8 gebracht hätte.
Es könnte gut sein, dass allein das Marketing die Entwicklung dominiert hat.
Ich würde einen etwas lichtschwächerern Tessar mit 50 mm klar bevorzugen.
Beste Grüße Ulrich
Wilfried (Dienstag, 07 November 2023 20:01)
Vielen Dank für den umfangreichen Test mit den wirklich aussagekräftigen Fotos.
Ich habe das Prakticar auch immer mal wieder an meiner Fuji X-T3 und komme zu ähnlichen Ergebnissen: nicht schlecht, aber auch nicht wahnsinnig toll.
Eine Alternative ist sicher das Prakticar 1,8/ 50. Das ist in vielen Disziplinen etwas besser.
Mehr „Vintage“ mit einem dezenten Bubble-Bokeh bei ähnlicher Schärfe liefern mein 1955er 2,8/ 50 Tessar und top Schärfe mit Charakter mein Zeiss Biotar und das Pancolar.
Nikolaus Burgard (Autor) (Mittwoch, 08 November 2023 09:08)
Hallo Wilfried,
beide Prakticare 50mm f1.8 (Zeiss und Pentacon) sind selbstverständlich die deutlich besser korrigierten Objektive.
Der Vergleich mit dem Tessar ist passender (es ist ja der direkte "Vorgänger" und auch eine 4-linsige Konstruktion). Ich denke wir haben hier einen vergleichbaren Schärfe-Level mit deutlich unterschiedlichem (Bokeh-) Rendering.
Jan Nuijten (Dienstag, 03 Dezember 2024 15:10)
I have the prakticar 50 mm F2.4 and tried to use it on my Canon 6D with an adaptor PB-EOS.
Unfortunately the mirror hits the back of the lens. I'm glad it did not damage anything.
So use it only on a mirrorless camera!
Best regard and thanks for the review.